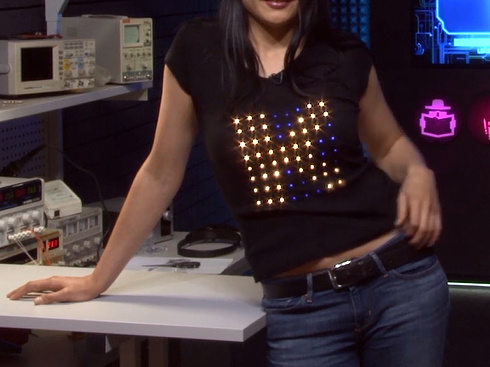
Good evening! Want to impress friends? Or just to shock passersby on a warm summer evening? Make a LED t-shirt! I present the Arduino project of the day - an exclusive LED t-shirt. How it will look, see in the video. For now a photo.

I spent on making this t-shirt for two evenings, and then another week was played, inventing various shapes to revive it. What it is made of:
1. Arduino Nano - it is small and it is very convenient to sew in similar designs. Only feet solder!
2. 64 LEDs SK6812. For an 8 x 8 matrix. These are RGBW LEDs with pixel addressing. RGBW - this means that they contain three RGB crystals and one scrambled egg of white glow. Very bright!
3. Button to change effects.
4. 1800 mAh battery.
5. Wire MGTF.
6. Solder, flux, and 8 hours of free time.
What should happen:
We carry the 8 x 8 matrix by doing so - we take a 20-by-20-cm tissue flap and glue all 64 LEDs to it at a distance of 2.5 cm. Pay attention - the first line of eight LEDs is up, second down, then up, down, etc. If you are confused, you are tortured to join ... They can only be held tightly with a cloth. Then we connect them according to the scheme:

Here, too, strictly. The sketch describes a matrix of LED signal lines, which are connected as in the diagram. From top to bottom and alternately from left to right, then from right to left.
Power LEDs in any direction. Meals I did, too, "snake". The input of the first LED is connected to the 12th input of the arduin. Arduin itself is sewn on the same flap. Little Nano, without its legs under the shirt is almost invisible.
Between the first and last columns, a velcro tape for clothing is sewn, the counterpart of which is sewn to the T-shirt from the inside. Well, now the flap matrix is glued to the T-shirt from the inside.
The design still has a button for changing effects and a battery. They are still in the back pocket.
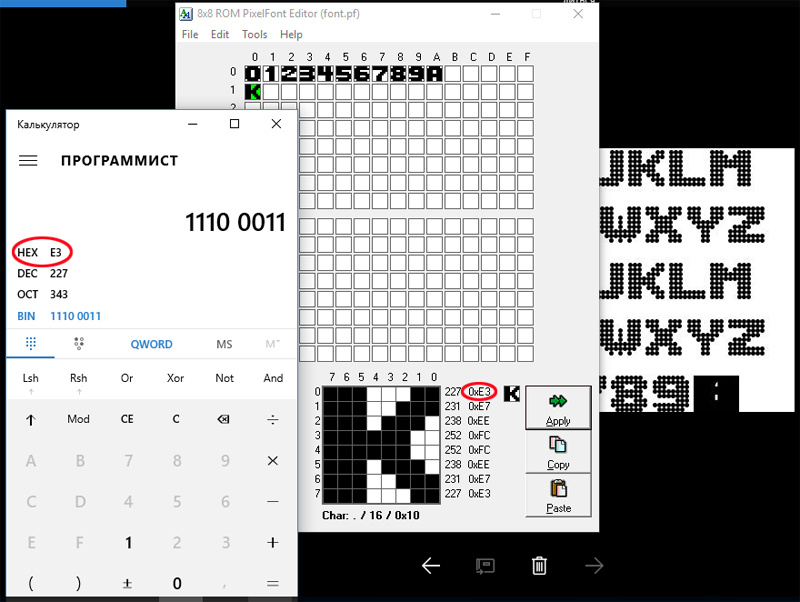
Now about the sketch. Writing, drawing is very simple. In the video on a T-shirt, my assistant Catherine first alternately lights the letters - KATRINDETKA. Below is illustrated how to write the letter K. The first line of the letter is 11100011. 1 - the LEDs are lit, 0 is not.
In the programmer mode with the Windus calculator, we translate the binary code into HEX and we get 0xE3.
In the sketch (file LEDS_64_panel.h) we look at the line:
const uint8_t DIG_0[] PROGMEM = { 0xE3, 0xE7, 0xEE, 0xFC, 0xFC, 0xEE, 0xE7, 0xE3, };
This is the letter K, all eight lines. The first line is just 0xE3. I think everything is clear further.

This is the image display in bytes. But it is possible and binary code without translation in HEX. Look for the array below:
const uint8_t SQUARE_1[PIXEL_NUM] PROGMEM = { 1, 1, 1, 1, 1, 1, 1, 1, 1, 0, 0, 0, 0, 0, 0, 1, 1, 0, 0, 0, 0, 0, 0, 1, 1, 0, 0, 0, 0, 0, 0, 1, 1, 0, 0, 0, 0, 0, 0, 1, 1, 0, 0, 0, 0, 0, 0, 1, 1, 0, 0, 0, 0, 0, 0, 1, 1, 1, 1, 1, 1, 1, 1, 1, };
This is a square on a t-shirt. On the video after clicking a button. It is described simply in binary code. You can change the color and brightness of the background or pattern.
BACK_COLOUR
MAIN_COLOUR
You can change the frame rate
SHOW_DELAY
TETRIS_DELAY
The scheme is very simple, sketch too. The work is very hard! But the result is incredibly beautiful techno clothing. The video does not transmit a tenth of the wow effect.
How do the LEDs with pixel addressing, I will not tell. Just do a beautiful thing!
Have a nice weekend!
Sketch LEDS_64_panel.h #define LED_PIN 12 #define KEY_PIN 7 #define PIXEL_IN_STICK 8 #define STICK_NUM 8 #define PIXEL_NUM (PIXEL_IN_STICK * STICK_NUM) #define MAIN_COLOUR ((uint32_t) 0xff000000) #define BACK_COLOUR ((uint32_t) 0x00000010) #define SHOW_DELAY 600 #define TETRIS_DELAY 200 #define CharGroups 3 const uint8_t DIG_0[] PROGMEM = { 0xE3, 0xE7, 0xEE, 0xFC, 0xFC, 0xEE, 0xE7, 0xE3, };
ps It is very convenient for drawing to use the font editor, of which on the Internet Nemer. I liked
this one . He is in the last picture at the calculator. Generate lines in C.
And yet - libraries will be needed: Adafruit_NeoPixel and PinChangeInt. Find Ada okay?
Posted 06/09/2017Sketch for color matrix.
Download.and video demonstration