Sometimes projects that we do just for fun turn into something more. And sometimes not. I want to share the story of one such fan project, which went through several transformations, until something sensible came out. Part one, in which sensible nothing happened. But you can learn some interesting solutions.
A year ago, I flew into the reins and wanted a strange one. The rein looked like this:

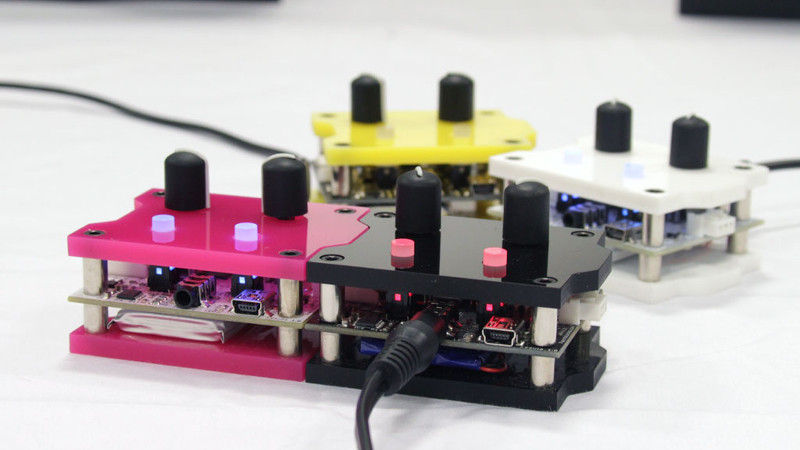
This is a patchblocks project from kickstarter. Several absolutely identical modules, connected in a modular synthesizer. Each module performs a different functionality due to the fact that it is stitched with its software from a simple editor ...
What to talk about it? Just watch the kickstart video, it's worth it. Everything is beautiful in this project. I especially liked the beauty and low financial threshold of entry when producing small batches. That is the lack of plastic molding. And at the same time, the thing looks beautiful: “self-sufficiency” gives it a special charm. It's just a handkerchief, a battery and two pieces of plexiglass! Wow
When I saw this, my pyramid of Maslow blunted on the page of the browser. I want to come up just as cool!
Wishlist
A detailed work plan has matured in my head:
- Come up with something cool
- ???
- PROFIT !!!
The plan is ready, it remains only to strictly observe it.
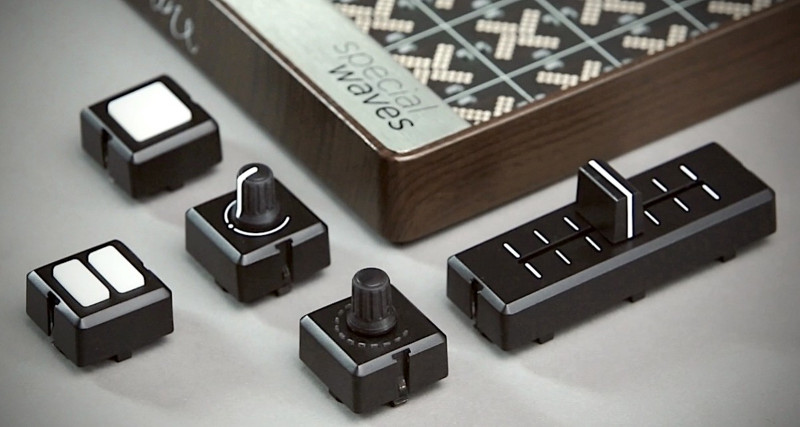
I am interested in music and synthesizers. Already came to the stage when more synthesizers than music. Over the prescription I do not remember how the thought was made out. But in the end I decided to make some kind of modular and customizable control panel with something. For example, digital synthesizers or video editor. That is, krutilki, buttons, sliders, indicators all sorts. Well, something like this, but without size limitations:

Hardwired Wishlist to this something:
- Modularity. Maximum similar modules that can be combined in a simple way. In short, lego.
- The user must be able to very easily make a unique, convenient for their task, the location of the modules. And it does not get tired.
- Simple logistics. Ideally, if the finished module can be taken on the production of printed circuit boards in one piece, put in a package and give to the user. And he will collect everything for himself. Yes, and get pleasure from the process. And do not get tired.
- Beautiful results. The custom hardware resulting from the user's assembly is bound to look good. No wires, jigurda, electrical tape and solder burns.
- The intelligence of the modules. It is necessary to make it so that you can connect them a lot at once to some arduino through a simple iron interface. Together, the modules must provide some kind of uniform software interface so that the code does not fool around.
First pancake
The easiest way to come up with an abstract something is to solve the problem more specifically. We also have a lot to come up with, it is desirable to concretize at least something.
To begin with, I decided to design a module of four potentiometers. It would be possible to take a bunch of such modules and assemble a matrix from a pile of potentiometers. Everyone loves matrices from a heap of potentiometers!
The idea is simple. There is a handkerchief with a microcontroller that polls potentiometers and sends this date somewhere.
The managing microcontroller was chosen on the basis of price and power. Although why am I lying? I stumbled upon an article
"NOT Arduino for 55 cents" and just fell in love with this kid! STM32F030F4P6 cool. He has not so many legs, but 9 of them with a 12-bit ADC and a bunch of 16-bit PWM ports.
It took a lot of time to choose how to connect modules. Revised a mountain of options for plugs and connectors. I wanted the connection to be simple. It should not be afraid of mechanical loads, be reliable and should not extend beyond the edge of the case. And he should absolutely not care how the user connects the modules. After a couple of weeks, the biceps of the index finger finally came to a tone from daily scrolling. It became clear that the desired connector is simply not in nature.
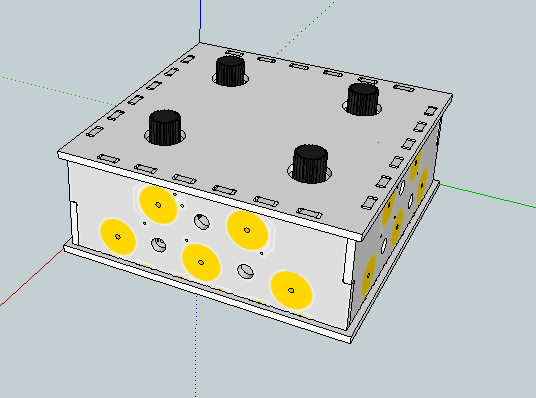
As a result, stopped at the sewing buttons. It turned out like this:

From the moment of the described events a year has passed. Unfortunately, the top plexiglass covers were lost and there were no photos left with them. A small idea of how it should look like can be obtained from the model:

From the advantages of such a decision:
- The entire piece of iron (except for the cover) is made of foil textolite. All parts of the case together with electronics can be located on one printed circuit board, and come in one big detail directly from the factory. The user will only have to break them off and assemble the case.
- The buttons are connected and disconnected quite easily and with such a wonderful “crunch” that for a long time it was my personal anti-stress gadget. Very pleasant feeling.
- The connection with the buttons is quite strong. Modules hold each other well: do not hang out, do not play.
Video of the connection:
There are also disadvantages:
- The side walls must conduct electricity and at the same time commute with the main board, on which all the electronics are located. I managed to achieve a reliable mechanical and electrical connection. On the vertical board there are edge connectors with teeth. In the photo you can see the top such connector. The bottom one is inserted into the galvanized rectangular holes in the main board. True, the side boards had to be hammered into the main board with a hammer and a soft lining. Not that it upset me greatly, but the UX is frankly not very.
- Modules have a direction. You cannot connect two modules by either side.
- Mounting the components into the holes spoils the bottom part of the board to the touch. Surface mount potentiometers are, of course. But not the fact that it turns out to find absolutely all the necessary parts with surface mounting. Who knows what might be needed in the future?
- It is very difficult to guess the height of the side walls. It’s not completely clear what specific components would you like to put inside? Came to some kind of average value. But with this average value, the same potentiometers, for example, barely look out over the top cover.
Interfaces
Of all the standard versions of the viewed iron interfaces, I liked the I2C the most. You can connect everyone with everyone and they will figure it out themselves. But there is an ambush with addresses. A bunch of identical potentiometers should somehow distinguish each other. And best of all, if a bunch will distinguish each other according to their own location relative to others.
In this version of the "beautiful piece of iron," he sacrificed four pins of the microcontroller for the benefit of addressing. We know where the module has inputs and where the outputs are. Let us assign the left upper module in the module array as the main one.
In words, explain it turns out badly. Let me try to illustrate addressing one line on the example of marching soldiers:
An array of lines and columns of modules is addressed in the same way. Just drawing a soldier with two input ports is somewhat more difficult.
Threw
It was a pity to throw in the development of a piece of iron, in which work I spent a lot of great time. But with prototypes it happens. Having played with such a form factor, he slowly abandoned it. It turned out that you can solve the problem of a beautiful piece of iron is much easier and more fun. I will tell about it in the following series. And this article wanted to pay tribute to the beautiful piece of iron, with which we did not work out. Sorry, Knob. It's not about you, I just loved another.
Upd.
To respond to the comment had to google. And that very beautiful piece of iron that I dreamed about went wild. She has already done. Here, of course, a completely different level. Change the buttons on the magnets and spring-loaded contacts. And plexiglass and textolite on the anodized aluminum. Yes, I could not do that. But it is still interesting to observe how others solved the same problems that they themselves solved.

This is called
the Palette . Well done boys.