Hello, Habr! Everyone likes responsive apps. Even better when they have relevant animations. In this article I will tell and show with all the "meat" how to properly show, hide, twist, twirl and do everything with pop-up screens.
Initially, I wanted to write an article stating that on iOS 10 a convenient UIViewPropertyAnimator appeared that solves the problem of interrupted animations. Now they can be stopped, inverted, continued or canceled. Apple calls this interface Fluid .
But then I realized: it's hard to talk about interrupting the animation of controllers without a description of how these transitions are correctly animated. Therefore, there will be two articles. In this, we will figure out how to correctly show and hide the screen, and about the interruption in the next (but the most impatient ones can already see an example ).
How do transits work
UIViewController has a transitioningDelegate property. This is a protocol with different functions, each returns an object:
animationController for animation,interactionController for interrupting animations,presentationController for display: hierarchy, frame, etc.
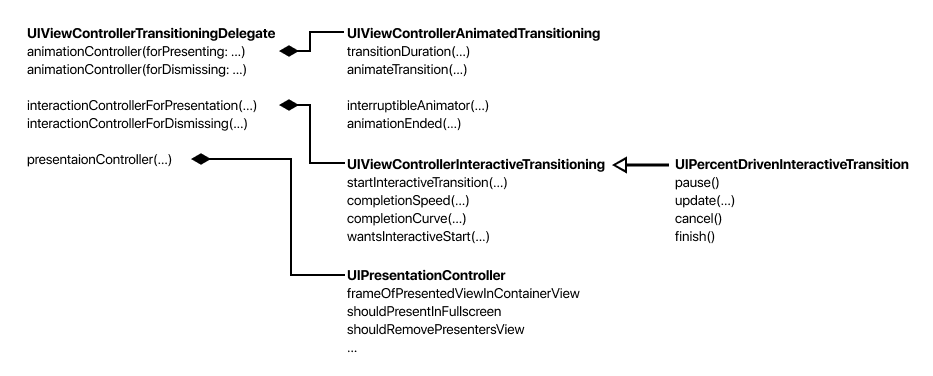
Based on all this, we’ll make a popup panel:

Cooking controllers
You can animate the transition for modal controllers and for UINavigationController (works through UINavigationControllerDelegate ).
We will consider modal transitions. We show the controller as usual:
class ParentViewController: UIViewController { @IBAction func openDidPress(_ sender: Any) { let child = ChildViewController() self.present(child, animated: true) } }
For simplicity, the display method will be set in the child controller:
class ChildViewController: UIViewController { private let transition = PanelTransition()
- Create an object that describes the transition.
transitioningDelegate marked as weak , so you have to store transition separately by strong link. - We set our transition to
transitioningDelegate . - In order to control the display method in
presentationController you need to specify .custom for modalPresentationStyle. .
Show in half screen
Let's start the code for PanelTransition with presentationController . You worked with it if you created pop-ups through the UIPopoverController . PresentationController controls the display of the controller: frame, hierarchy, etc. He decides how to show popovers on the iPad: with which frame, which side of the button to show, adds blur to the background of the window and darkens under it.

Our structure is similar: we will darken the background, put the frame not in full screen:

To begin with, in the presentationController(forPresented:, presenting:, source:) method, we return the PresentationController class:
class PanelTransition: NSObject, UIViewControllerTransitioningDelegate { func presentationController(forPresented presented: UIViewController, presenting: UIViewController?, source: UIViewController) -> UIPresentationController? { return presentationController = PresentationController(presentedViewController: presented, presenting: presenting ?? source) }
Why are 3 controllers transmitted and what is source?Source is the controller on which we called the animation of the show. But the controller that will participate in the tranche is the first of the hierarchy with definesPresentationContext = true . If the controller changes, then the real indicating controller will be in the presenting. parameter presenting.
Now you can implement the PresentationController class. To start, let's set the frame to the future controller. There is a frameOfPresentedViewInContainerView method for frameOfPresentedViewInContainerView . Let the controller occupy the lower half of the screen:
class PresentationController: UIPresentationController { override var frameOfPresentedViewInContainerView: CGRect { let bounds = containerView!.bounds let halfHeight = bounds.height / 2 return CGRect(x: 0, y: halfHeight, width: bounds.width, height: halfHeight) } }
You can start the project and try to show the screen, but nothing will happen. This is because we now manage the view hierarchy ourselves and we need to add the controller view manually:
Still need to put a frame for presentedView . containerViewDidLayoutSubviews is the best place, because this way we can respond to screen rotation:
Now you can run. Animation will be standard for UIModalTransitionStyle.coverVertical , but the frame will be half the size.
Darken the background
The next task is to darken the background controller to focus on what is shown.
We will inherit from PresentationController and replace with a new class in the PanelTransition file. In the new class there will be only code for dimming.
class DimmPresentationController: PresentationController
Create a view that we will overlay on top of:
private lazy var dimmView: UIView = { let view = UIView() view.backgroundColor = UIColor(white: 0, alpha: 0.3) view.alpha = 0 return view }()
We will change alpha views in accordance with the transition animation. There are 4 methods:
presentationTransitionWillBeginpresentationTransitionDidEnddismissalTransitionWillBegindismissalTransitionDidEnd
The first one is the most difficult. You need to add dimmView to the hierarchy, put down the frame and start the animation:
override func presentationTransitionWillBegin() { super.presentationTransitionWillBegin() containerView?.insertSubview(dimmView, at: 0) performAlongsideTransitionIfPossible { [unowned self] in self.dimmView.alpha = 1 } }
Animation is launched using an auxiliary function:
private func performAlongsideTransitionIfPossible(_ block: @escaping () -> Void) { guard let coordinator = self.presentedViewController.transitionCoordinator else { block() return } coordinator.animate(alongsideTransition: { (_) in block() }, completion: nil) }
We set the frame for dimmView in containerViewDidLayoutSubviews (as last time):
override func containerViewDidLayoutSubviews() { super.containerViewDidLayoutSubviews() dimmView.frame = containerView!.frame }
Animation can be interrupted and canceled, and if canceled, then dimmView must be removed from the hierarchy:
override func presentationTransitionDidEnd(_ completed: Bool) { super.presentationTransitionDidEnd(completed) if !completed { self.dimmView.removeFromSuperview() } }
The reverse process starts in the hide methods. But now you need to remove dimmView only if the animation has completed.
override func dismissalTransitionWillBegin() { super.dismissalTransitionWillBegin() performAlongsideTransitionIfPossible { [unowned self] in self.dimmView.alpha = 0 } } override func dismissalTransitionDidEnd(_ completed: Bool) { super.dismissalTransitionDidEnd(completed) if completed { self.dimmView.removeFromSuperview() } }
Now the background is dimming.
We control the animation
Show the controller below
Now we can animate the appearance of the controller. In the PresentationController class, return the class that will control the appearance animation:
func animationController(forPresented presented: UIViewController, presenting: UIViewController, source: UIViewController) -> UIViewControllerAnimatedTransitioning? { return PresentAnimation() }
Implementing the protocol is simple:
extension PresentAnimation: UIViewControllerAnimatedTransitioning { func transitionDuration(using transitionContext: UIViewControllerContextTransitioning?) -> TimeInterval { return duration } func animateTransition(using transitionContext: UIViewControllerContextTransitioning) { let animator = self.animator(using: transitionContext) animator.startAnimation() } func interruptibleAnimator(using transitionContext: UIViewControllerContextTransitioning) -> UIViewImplicitlyAnimating { return self.animator(using: transitionContext) } }
The key code is a little more complicated:
class PresentAnimation: NSObject { let duration: TimeInterval = 0.3 private func animator(using transitionContext: UIViewControllerContextTransitioning) -> UIViewImplicitlyAnimating {
UIViewPropertyAnimator does not work in iOS 9The workaround is quite simple: you need to use not the animator in the animateTransition code, but the old UIView.animate… api UIView.animate… For example, like this:
func animateTransition(using transitionContext: UIViewControllerContextTransitioning) { let to = transitionContext.view(forKey: .to)! let finalFrame = transitionContext.finalFrame(for: transitionContext.viewController(forKey: .to)!) to.frame = finalFrame.offsetBy(dx: 0, dy: finalFrame.height) UIView.animate(withDuration: duration, delay: 0, usingSpringWithDamping: 1, initialSpringVelocity: 0, options: [.curveEaseOut], animations: { to.frame = finalFrame }) { (_) in transitionContext.completeTransition(!transitionContext.transitionWasCancelled) } } , `interruptibleAnimator(using transitionContext:)`
If you do not make an interruptible, then the interruptibleAnimator method can be omitted. Discontinuity will be considered in the next article, subscribe.
Hide the controller down
All the same, only in the opposite direction. Whole class:
class DismissAnimation: NSObject { let duration: TimeInterval = 0.3 private func animator(using transitionContext: UIViewControllerContextTransitioning) -> UIViewImplicitlyAnimating { let from = transitionContext.view(forKey: .from)! let initialFrame = transitionContext.initialFrame(for: transitionContext.viewController(forKey: .from)!) let animator = UIViewPropertyAnimator(duration: duration, curve: .easeOut) { from.frame = initialFrame.offsetBy(dx: 0, dy: initialFrame.height) } animator.addCompletion { (position) in transitionContext.completeTransition(!transitionContext.transitionWasCancelled) } return animator } } extension DismissAnimation: UIViewControllerAnimatedTransitioning { func transitionDuration(using transitionContext: UIViewControllerContextTransitioning?) -> TimeInterval { return duration } func animateTransition(using transitionContext: UIViewControllerContextTransitioning) { let animator = self.animator(using: transitionContext) animator.startAnimation() } func interruptibleAnimator(using transitionContext: UIViewControllerContextTransitioning) -> UIViewImplicitlyAnimating { return self.animator(using: transitionContext) } }
At this place you can experiment with the parties:
- an alternative scenario may appear below;
- on the right - quick menu navigation;
- above - informational message:
Dodo Pizza , Snack and Savey
Next time, add an interactive closing with a gesture, and then make its animation interrupted. If you can’t wait, then the full project is already on the github.
Subscribe to the Dodo Pizza Mobile channel.