A couple of days ago, Google released Android Studio 3.6 Canary 11, the main innovation in which was View Binding, which was described back in May on Google I / O 2019.
View Binding is a tool that makes it easier to write code to interact with view. When you enable View Binding in a specific module, it generates binding classes for each layout file in the module. The generated binding class object contains links to all view from the markup file for which android:id is specified.
How to turn on
To enable View Binding in the module, you need to add an element to the build.gradle file:
android { ... viewBinding { enabled = true } }
You can also specify that you do not need to generate a binding class for a particular markup file. To do this, specify the tools:viewBindingIgnore="true" attribute in the root view in the desired markup file.
How to use
Each generated binding class contains a link to the root view of the markup ( root ) and links to all views that have id. The name of the generated class is formed as "markup file name" translated into camel case + "Binding".
For example, for the markup file result_profile.xml :
<LinearLayout ... > <TextView android:id="@+id/name" /> <ImageView android:cropToPadding="true" /> <Button android:id="@+id/button" android:background="@drawable/rounded_button" /> </LinearLayout>
The ResultProfileBinding class will be generated, containing 2 fields: TextView name and Button button . For ImageView nothing will be generated, as it has no id . Also in the ResultProfileBinding class ResultProfileBinding will be a getRoot() method that returns the root LinearLayout .
To create an object of the ResultProfileBinding class, you must call the static method inflate() . After that, you can use the root view as the content view in the Activity :
private lateinit var binding: ResultProfileBinding @Override fun onCreate(savedInstanceState: Bundle) { super.onCreate(savedInstanceState) binding = ResultProfileBinding.inflate(layoutInflater) setContentView(binding.root) }
Later binding can be used to get view:
binding.name.text = viewModel.name binding.button.setOnClickListener { viewModel.userClicked() }
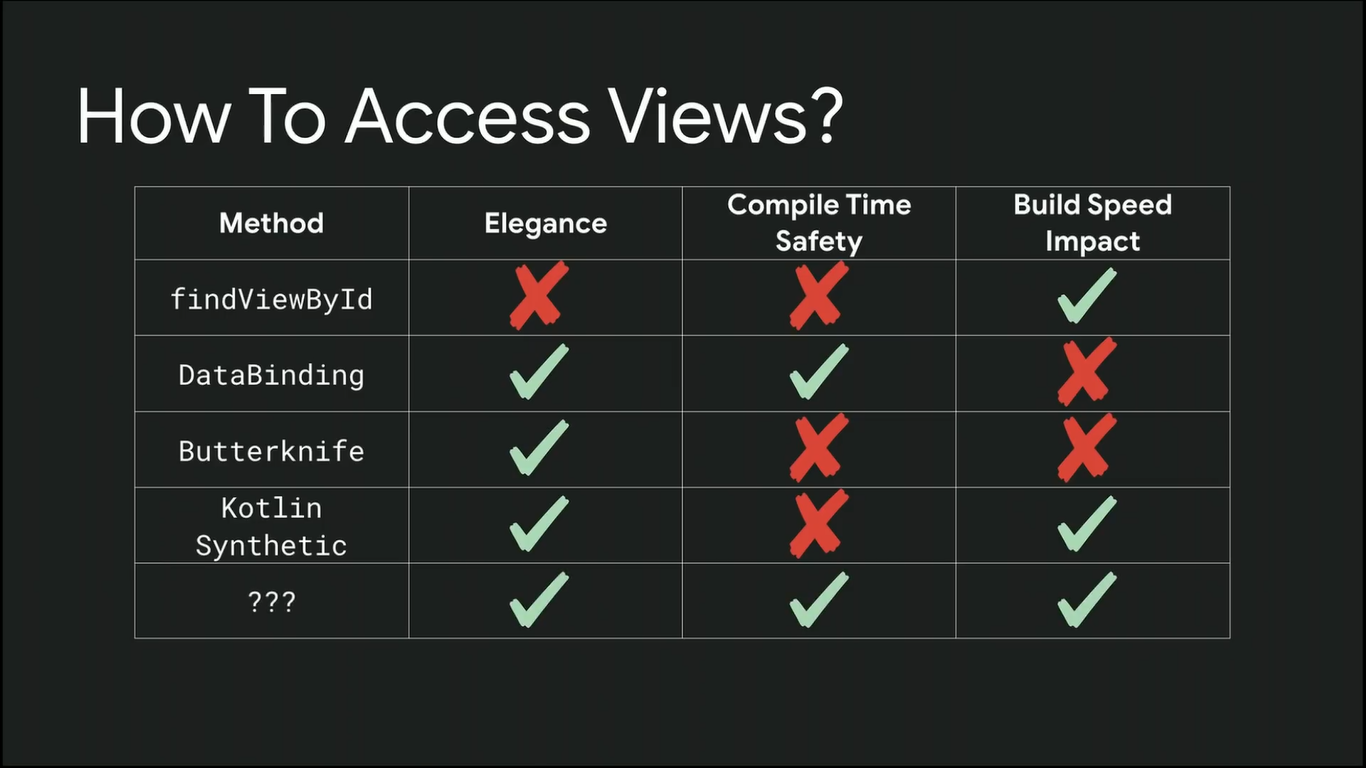
Differences from other approaches
The main advantages of View Binding are Null safety and Type safety.
At the same time, if some view is available in one markup configuration, but not in another ( layout-land , for example), then an @Nullable field will be generated for it in the binding class.
Also, if in different markup configurations there is a view with the same id, but different types, then a field with the type android.view.View will be generated for them.
(At least in version 3.6 of Canary 11)
In general, it would be convenient if the generated field had the most possible specific type. For example, for a Button in one configuration and a TextView in another, a field of type TextView ( public class Button extends TextView ) is generated.
When using View Binding, all inconsistencies between the markup and the code will be detected at the compilation stage, which will avoid unnecessary errors during application operation.
Usage in RecyclerView.ViewHolder
Nothing prevents using View Binding when creating a view for a RecyclerView.ViewHolder :
class PersonViewHolder(private val itemPersonBinding: ItemPersonBinding) : RecyclerView.ViewHolder(itemPersonBinding.root) { fun bind(person: Person) { itemPersonBinding.name.text = person.name } }
However, to create such a ViewHolder will have to write a little boilerplate:
override fun onCreateViewHolder(parent: ViewGroup, viewType: Int): PersonViewHolder { val layoutInflater = LayoutInflater.from(parent.context) val itemPersonBinding = ItemPersonBinding.inflate(layoutInflater, parent, false) return PersonViewHolder(itemPersonBinding) }
It would be more convenient if, when working with RecyclerView.ViewHolder the inflate(...) method will not have the layoutInflater parameter, but will receive it from the passed parent .
Here it is also worth mentioning that when using View Binding, the view searched through findViewById() only once when calling the inflate() method. This gives an advantage over kotlin-android-extensions , in which view caching by default worked only in Activity and Fragment , and RecyclerView.ViewHolder required additional configuration .
In general, View Binding is a very convenient thing that is easy to start using in existing projects. Creator Butter Knife already recommends switching to View Binding.
It is a pity that such an instrument did not appear several years ago.