This post was born out of our experience porting an existing project from ASP.NET MVC to ASP.NET Core. We tried to put together the entire migration process in a structured form and describe the various bottlenecks so that developers could continue to rely on this material and follow the roadmap in solving such problems.
A few words about our project. We are an open-source eCommerce platform on ASP.NET, which by the time of the transfer had already existed successfully for 9 years. We did the migration 2 years ago - but our hands got to write about it only now. At that time, we were one of the first major projects who decided on such a step.
Why switch to ASP.NET Core?
Before proceeding with the steps to migrate from ASP.NET MVC to ASP.NET Core, a few words about the benefits of this platform.
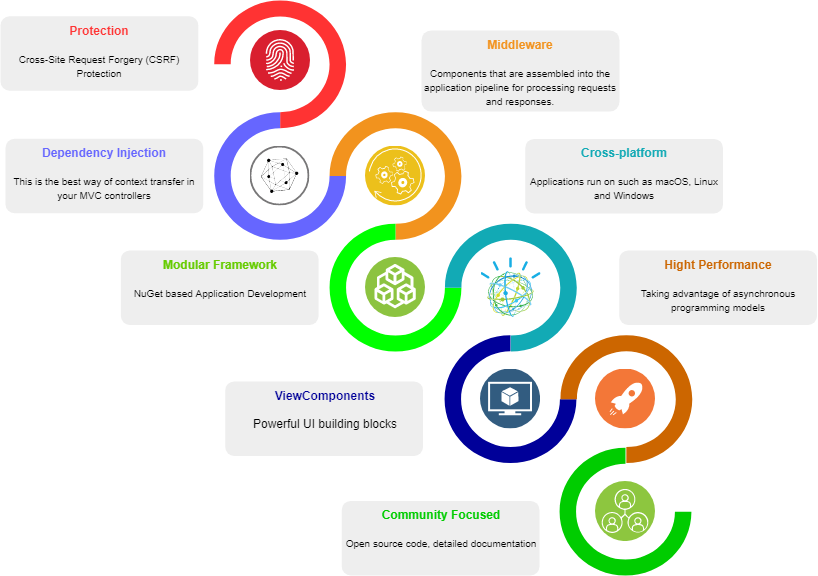
Benefits of ASP.NET CoreSo, ASP.NET Core is already a fairly well-known and developed framework, which has already undergone several major updates, which means that today it is quite stable, technologically advanced and resistant to XSRF / CSRF attacks.
Cross -
platform is one of the distinguishing features that allow him to gain more and more popularity. From now on, your web application can run both in a Windows environment and in Unix.
Modularity - ASP.NET Core comes fully in the form of NuGet packages, this allows you to optimize the application, including the selected necessary packages. This improves the performance of the solution and reduces the time it takes to upgrade individual parts. This is the second important feature that allows developers to more flexibly integrate new features into their solution.
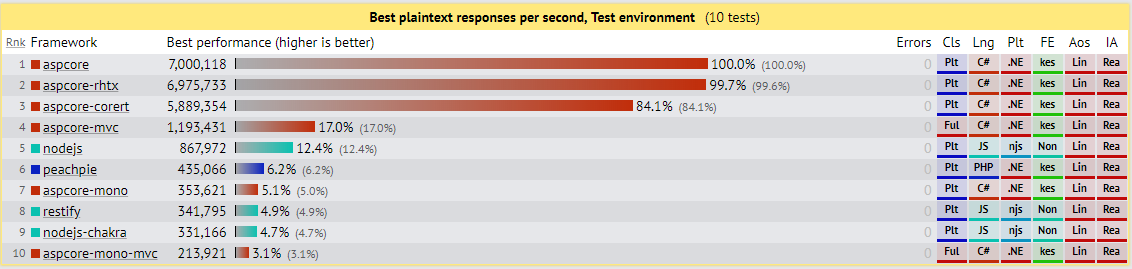
Performance is another step towards building a high-performance application, ASP.NET Core handles 2300% more requests per second than ASP.NET 4.6, and 800% more requests per second than node.js. You can examine detailed performance tests yourself
here or
here .
 Middleware
 is the new lightweight high-performance modular pipeline for in-app requests. Each piece of middleware processes an HTTP request, and then either decides to return the result, or passes the next piece of middleware. This approach gives the developer full control over the HTTP pipeline and contributes to the development of simple modules for the application, which is important for a growing open source project.
ASP.NET Core MVC provides features that simplify web development. NopCommerce already used features such as the Model-View-Controller template, Razor syntax, model binding and validation, but new tools appeared:
- Tag Helpers. This is server-side code for contributing to the creation and rendering of HTML elements in Razor files.
- View components. This is a new tool, similar to partial views, but much more powerful. nopCommerce uses view components when reusing rendering logic is required and when the task is too complex for partial presentation.
- DI in submission. Although most of the data displayed in the views is passed from the controller, nopCommerce has views in which dependency injection is more convenient.
Of course, ASP.NET Core has much more features, but we just examined the most interesting.
Now let's talk about what you should consider when porting your application to a new platform.
Migration
The text will contain a large number of links to official ASP.NET Core documentation to help get more detailed information on the topic. Especially relevant for developers who are faced with a similar task for the first time.
Step 1. Preparation of tools
The first thing you need to do is upgrade Visual Studio 2017 to version 15.3 or higher. And install the latest version of the .NET Core SDK.
Before starting the migration, we recommend that you use the .NET
.Net Portability Analyzer portability analysis tool. This is a good starting point to understand how laborious the transition from one platform to another will be. But, of course, this tool does not solve all the problems, and in the process there will be many pitfalls. Next, the main stages that will need to be passed will be described, and the solutions used in our project will be shown.
The very first thing you need is to update the links to the libraries used in the project that would support .NET Standard.
Step 2. Compatibility analysis of NuGet packages to support .Net Standard
If you use NuGet packages in your project, you need to check whether they are compatible with .NET Core. One way to do this is to use the
NuGetPackageExplorer tool.
Step 3. .NET Core uses the new csproj file format
It is important to use the new approach for adding third-party links introduced in .NET Core: when a new class library is added to the solution, you must open the main project file and replace its contents with the following:
<Project Sdk="Microsoft.NET.Sdk"> <PropertyGroup> <TargetFramework>netcoreapp2.2</TargetFramework> </PropertyGroup> <ItemGroup> <PackageReference Include="Microsoft.AspNetCore.App" Version="2.2.6" /> ... </ItemGroup> ... </Project>
Links from connected libraries will be downloaded automatically. More information on the mapping between project.json and CSPROJ properties can be found in the official documentation
here and
here .
Step 4. Updating the namespace
You must remove all uses of System.Web and replace them with Microsoft.AspNetCore.
Step 5. You must configure the Startup.cs file. instead of using global.asax
ASP.NET Core has a new mechanism for loading the application. The entry point to the application becomes
Startup , and the dependency on the
Global.asax file disappears.
Startup registers the middleware suite in the application.
Startup must include the
Configure method. In
Configure add the required middleware to the pipeline.
Startup.cs problems- Configuring middleware for MVC and WebAPI requests
- Configuration settings for:
app.UseMvc(routes => { routes.MapRoute("areaRoute", "{area:exists}/{controller=Admin}/{action=Index}/{id?}"); routes.MapRoute( name: "default", template: "{controller=Home}/{action=Index}/{id?}"); });
At the same time, the folder with the name Area, inside which the Admin folder is located, should be placed in the root of the application. Now, the
[Area("Admin")] [Route("admin")] attribute will be used to associate the controller with this area.
It remains only to create views for all the actions described in the controller.
[Area("Admin")] [Route("admin")] public class AdminController : Controller { public IActionResult Index() { return View(); } }
ValidationNow you don’t need to pass IFormCollection to the controllers, since in this case, asp.net server validation is disabled - MVC is suppressing further validation if the IFormCollection is found to be not null. The solution to the problem may be adding this property to the model, this will prevent us from passing directly to the controller method. This rule is valid only if there is a model, but if there is no model, then there will be no validation.
Child properties are no longer automatically validated. It must be specified manually.
Step 6. Transferring HTTP handlers and HTTP modules to Middleware
HTTP handlers and HTTP modules are essentially very similar to the
Middleware concept
in ASP.NET Core , but unlike modules, the middleware order is based on the order in which they are inserted into the request pipeline. The order of the modules, for the most part, is based on
application life cycle events. The order of the middleware for the answers is opposite to the order for the requests, and the order of the modules for the requests and answers is the same. Based on this, you can proceed with the upgrade.
So, what remains to be updated:
- Migration of modules for Middleware (AuthenticationMiddleware, CultureMiddleware, etc.)
- Handlers to Middleware
- Using New Middleware
Authentication in our project does not use the built-in credential system; for these purposes, middleware AuthenticationMiddleware is used, developed in accordance with the new ASP.NET Core structure.
public class AuthenticationMiddleware { private readonly RequestDelegate _next; public AuthenticationMiddleware(IAuthenticationSchemeProvider schemes, RequestDelegate next) { Schemes = schemes ?? throw new ArgumentNullException(nameof(schemes)); _next = next ?? throw new ArgumentNullException(nameof(next)); } public IAuthenticationSchemeProvider Schemes { get; set; } public async Task Invoke(HttpContext context) { context.Features.Set<IAuthenticationFeature>(new AuthenticationFeature { OriginalPath = context.Request.Path, OriginalPathBase = context.Request.PathBase }); var handlers = context.RequestServices.GetRequiredService<IAuthenticationHandlerProvider>(); foreach (var scheme in await Schemes.GetRequestHandlerSchemesAsync()) { try { if (await handlers.GetHandlerAsync(context, scheme.Name) is IAuthenticationRequestHandler handler && await handler.HandleRequestAsync()) return; } catch {
ASP.NET provides a lot of embedded middleware that you can use in your application, but note that the developer has the ability
to create his own middleware and add it to the HTTP request pipeline. To simplify this mechanism, we added a special interface, and now it’s enough to just create a class that implements it.
public interface INopStartup {
Here you can add and configure your middleware:
Step 7. Using the built-in DI
Dependency injection is one of the key features in the application design process in ASP.NET Core. It allows you to create loosely coupled applications that are more testable, modular and, as a result, maintainable. This was made possible by following the principle of dependency inversion. To install dependencies, IoC containers (Inversion of Control) are used. In ASP.NET Core, such a container is represented by the IServiceProvider interface. Services are installed in the application in the
Startup.ConfigureServices() method.
Any registered service can be configured with three scopes:
services.AddDbContext<ApplicationDbContext>(options => options.UseSqlServer(Configuration.GetConnectionString("DefaultConnection"))); services.AddSingleton<Isingleton,MySingleton>();
Step 8. Using WebAPI Project Compatibility Shells (Shim)
To simplify the migration of an existing Web API implementation, it is recommended to use the
Microsoft.AspNetCore.Mvc.WebApiCompatShim NuGet package. The following
compatible functions are supported:
- Adds ApiController Type
- Enables web API style model binding
- Extends model binding so that controller actions can accept parameters of type HttpRequestMessage.
- Adds message formatters that allow actions to return results of type HttpResponseMessage
services.AddMvc().AddWebApiConventions(); routes.MapWebApiRoute(name: "DefaultApi", template: "api/{controller}/{id?}" );
Step 9. Transfer Application Configuration
Previously, some settings were saved in the web.config file. We are now taking a
new approach based on key-value pairs established
by configuration providers . This is the recommended mechanism in ASP.NET Core, and we use the appsettings.json file.
You can also use the NuGet package
System.Configuration.ConfigurationManager if for some reason you want to continue using * .config. In this case, you will have to abandon the ability to run the application on Unix platforms and run it only under IIS.
If you want to use the
Azure Key Vault configuration provider, you should refer to the Content
Migration to Azure Key Valut content . Our project did not have such a task.
Step 10. Transferring static content to wwwroot
To serve
static content, you must tell the web host the root of the contents of the current directory. The default is wwwroot. You can customize your directory for storing static files by setting up middleware.
Step 11. Porting EntityFramework to EF Core
If the project uses some specific
features of Entity Framework 6 that are
not supported in
EF Core , then it makes sense to run the application on the
NET Framework . In this case, however, you have to sacrifice multiplatform. The application will work only on Windows and under IIS.
Let's take a look at the main changes to be taken into account:- System.Data.Entity namespace replaced by Microsoft.EntityFrameworkCore
- The signature of the DbContext constructor has been changed. Now you need to inject DbContextOptions
- HasDatabaseGeneratedOption (DatabaseGeneratedOption.None) method replaced by ValueGeneratedNever ()
- WillCascadeOnDelete (false) method replaced by OnDelete (DeleteBehavior.Restrict)
- OnModelCreating (DbModelBuilder modelBuilder) method replaced by OnModelCreating (ModelBuilder modelBuilder)
- HasOptional method is no longer available
- the configuration of objects has been changed, now you need to use OnModelCreating, because EntityTypeConfiguration is no longer available
- ComplexType attribute is no longer available
- IDbSet interface replacements with DbSet
- ComplexType - complex type support appeared in EF Core 2 with the Owned Entity type ( https://docs.microsoft.com/en-us/ef/core/modeling/owned-entities ), and tables without a Primary Key with QueryType in EF Core 2.1 ( https://docs.microsoft.com/en-us/ef/core/modeling/query-types )
- foreign keys in EF Core generate shadow properties using the [Entity] Id pattern, unlike EF6, which uses the [Entity] _Id pattern. Therefore, first add foreign keys as a regular property to the entity.
- To support DI for DbContext, configure your DbContex in
ConfigureServices
Use the
SQL Compare tool to verify that
EF Core generates a similar database schema during
migration as the
Entity Framework .
Step 12. Removing all HttpContext references, replacing obsolete classes, and changing the namespace
During the migration of your project, you will find that a sufficiently large number of classes have been renamed or moved, and now you need to bring everything into line with the new requirements. Here is a list of the main transitions that you may encounter:
- HttpPostedFileBase -> IFormFile
- Access to access HttpContext is now through IHttpContextAccessor
- HtmlHelper -> IHtmlHelper
- ActionResult -> IActionResult
- HttpUtility -> WebUtility
- Instead of HttpSessionStateBase - ISession, is accessible from HttpContext.Session. from Microsoft.AspNetCore.Http
- Request.Cookies returns IRequestCookieCollection: IEnumerable <KeyValuePair <string, string >>, so instead of HttpCookie, KeyValuePair <string, string> from Microsoft.AspNetCore.Http
Namespace replacement:
- SelectList -> Microsoft.AspNetCore.Mvc.Rendering
- UrlHelper -> WebUtitlity
- MimeMapping -> FileExtensionContentTypeProvider
- MvcHtmlString -> IHtmlString and HtmlString
- ModelState, ModelStateDictionary, ModelError -> Microsoft.AspNetCore.Mvc.ModelBinding
- FormCollection -> IFormCollection
- Request.Url.Scheme -> this.Url.ActionContext.HttpContext.Request.Scheme
Other:
- MvcHtmlString.IsNullOrEmpty (IHtmlString) -> String.IsNullOrEmpty (variable.ToHtmlString ())
- [ValidateInput (false)] - it generally is no more and it is not needed
- HttpUnauthorizedResult -> UnauthorizedResult
- [AllowHtml] - there is no more directive and it is not needed
- TagBuilder.SetInnerText method replaced - now this is InnerHtml.AppendHtml
- JsonRequestBehavior.AllowGet when returning Json is no longer needed
- HttpUtility.JavaScriptStringEncode. -> JavaScriptEncoder.Default.Encode
- Request.RawUrl. It is necessary to separately connect Request.Path + Request.QueryString
- AllowHtmlAttribute - There is no more class
- XmlDownloadResult - now you can use just return File (Encoding.UTF8.GetBytes (xml), "application / xml", "filename.xml");
- [ValidateInput (false)] - there is no more directive and it is not needed
Step 13. Updating Authentication and Authorization
I already wrote above that in our project authentication is not implemented using the built-in identity system, but is taken out in a separate layer of middleware. However, ASP.NET Core has its own mechanism for providing credentials. More details can be found in the documentation
here .
As for data protection - we no longer use
MachineKey . Instead, we use the built-in data protection feature. By default, keys are generated when the application starts. The data warehouse can be:
- File system - file system-based keystore
- Azure Storage - data protection keys in Azure Blob Storage
- Redis - data protection keys in the Redis cache
- Registry - must be used if the application does not have access to the file system
- EF Core - keys are stored in the database
If the built-in mechanisms are not suitable, you can specify your own key storage mechanism by providing a custom
IXmlRepository .
Step 14. Updating JS / CSS
The way of working with static resources has changed: now all of them should be stored in the root folder of the
wwwroot project, unless, of course, other settings are specified.
When using javascript built-in blocks, it is recommended that you move them to the end of the page. Just use the asp-location = “Footer” attribute for your tags. The same rule applies to js files.
Use the
BundlerMinifier extension as a replacement for System.Web.Optimization - this will allow you to bind and minimize JavaScript and CSS while building the project.
Link to the documentation.
Step 15. Migrating Views
Child Actions are no longer used. Instead, ASP.NET Core offers a new powerful tool -
ViewComponents , which is called asynchronously.
How to get a string from ViewComponent:
There is no need to use HtmlHelper anymore - ASP.NET Core has a large number of helper tag functions (
Tag Helpers ) built in. When the application is running, they are processed by the Razor engine on the server side and ultimately are converted to standard html elements. This greatly simplifies application development. And, of course, you can implement your own tag-helpers.
We started using dependency injection in views instead of allowing settings and services using
EngineContext .
So, the main points on the migration of views:
- Convert
Views/web.config Views/_ViewImports.cshtml - used to import namespaces and Views/web.config Views/_ViewImports.cshtml dependencies. This file does not support other Razor functions, such as function and section definitions. - Convert
namespaces.add to @using - Transferring any settings to the main application configuration
Scripts.Render and Styles.Render does not exist. Replace libman or BundlerMinifier links to output
In conclusion
We have seen from our experience that the process of migrating a large web application is a very time-consuming task that can hardly be carried out without pitfalls. We planned to switch to the new framework as soon as its first stable version was released, but we were not able to complete it right away: there were some critical functions that by that time had not yet been transferred to .NET Core, in particular, related to EntityFramework. Therefore, we had to first release the next release using a mixed approach - the .NET Core architecture with the .NET Framework dependencies.
We were able to fully adapt the project after the release of .NET Core 2.1, having at that time a stable solution already working on the new architecture - all that was left was to replace some packages and rewrite the work with EF Core. Thus, the complete migration to the new framework took several months of work.
You can learn more about our project from our
repository on GitHub .