In the life of many companies that have and develop their own stack of libraries and components, there comes a time when the volume of this stack becomes difficult to maintain.
In the case of development for the iOS platform, and in general, the Apple ecosystem, there are two options for connecting libraries as dependencies:
- Collect them every time you build the application.
- Collect them in advance using the dependencies already collected.
When choosing the second approach, it becomes logical to use CI / CD systems to build libraries into ready-to-use artifacts.
However, the need to build libraries for several platforms or processor architectures in the Apple ecosystem, often requires not always trivial operations, both when building the library and the final product that uses it.
Against this background, it was difficult not to notice and it was extremely interesting to study one of the innovations from Apple, presented at WWDC 2019 as part of the presentation of Binary Frameworks in Swift - the packaging format of the frameworks is XCFramework.
XCFramework has several advantages over established approaches:
- Dependency packaging for all target platforms and architectures in a single bundle out of the box.
- Connection bundle in XCFramework format, as a single dependency for all target platforms and architectures.
- No need to build a fat / universal framework.
- There is no need to get rid of x86_64 slice before loading final applications in the AppStore.
In this article, we will explain why this new format was introduced, what it is, and also what it gives to the developer.
Apple previously released the Swift Package Manager dependency manager .
The bottom line is that Swift PM allows you to deliver libraries in the form of open source code with a description of the dependencies.
From the perspective of the developer supplying the library, I would like to highlight two aspects of Swift PM.
- The obvious minus is that for one reason or another, not all library vendors would like to open their source code to consumers.
- An obvious plus - when compiling dependencies from sources, we get rid of the need to observe binary compatibility of libraries.
XCFramework Apple offers as a new binary format for packaging libraries, considering it as an alternative to Swift Packages.
This format, as well as the ability to connect the library assembled in XCFramework, is available starting with Xcode 11 and its beta versions.
What is XCFramework
At its core, XCFramework is a new way to package and deliver libraries, in their various versions.
Among other things, the new format also allows the packaging of static libraries along with their header files, including those written in C / Objective-C.
Consider the format in more detail.
Dependency packaging for all target platforms and architectures in a single bundle out of the box
All library assemblies for each of the target platforms and architectures can now be packaged in a single bundle with the extension .xcframework.
However, for this, at this point in time, you have to use scripts to invoke the xcodebuild with the -create-xcframework key new to Xcode 11.
The assembly and packaging process will be discussed later.
Connection bundle in XCFramework format, as a single dependency for all target platforms and architectures
Since bundle .xcframework contains all the necessary options for building a dependency, we do not need to worry about its architecture and target platform.
In Xcode 11, a library packaged in .xcframework connects just like a regular .framework.
More specifically, this can be achieved in the following ways in the target settings:
- adding .xcframework to the “Frameworks And Libraries” section of the “General” tab
- adding .xcframework to “Link Binary With Libraries” on the “Build Phases” tab
No need to build fat / universal framework
Previously, in order to support a pluggable library of several platforms and several architectures, it was necessary to prepare the so-called fat or universal frameworks.
This was done using the lipo to sew all the options of the assembled framework into a single thick binary.
More details on this can be found, for example, in the following articles:
There is no need to get rid of x86_64 slice before loading end applications in the AppStore
Typically, such a slice is used to provide libraries in the iOS simulator.
When you try to download an application with dependencies containing x86_64 slice in the AppStore, you may encounter the well-known error ITMS-90087 .
Creating and packaging XCFramework: theory
In the presentation mentioned earlier, several steps are required that are required to assemble and package the library in XCFramework format:
Project preparation
First of all, in all the project’s targets that are responsible for building the library for the target platforms, you need to enable the new Build Libraries for Distribution setting for Xcode 11.

Project assembly for target platforms and architectures
Next, we have to collect all the targets for the target platforms and architectures.
Let's consider examples of calling commands using the example of a specific project configuration.
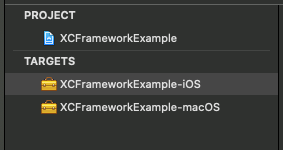
Let's say that in the project we have two schemes “XCFrameworkExample-iOS” and “XCFramework-macOS”.

Also in the project there are two targets that collect the library for iOS and macOS.

To build all the required library configurations, we need to collect both targets using the corresponding schemes.
However, for iOS, we need two assemblies: one for end devices (ARM), and the other for the simulator (x86_64).
Total we need to collect 3 frameworks.
To do this, you can use the xcodebuild command:
As a result, we got 3 assembled frameworks, which we will further pack in the .xcframework container.
Packing assembled .framework in .xcframework
You can do this with the following command:
xcodebuild -create-xcframework \ -framework "./build/ios.xcarchive/Products/Library/Frameworks/XCFrameworkExample.framework" \ -framework "./build/ios_sim.xcarchive/Products/Library/Frameworks/XCFrameworkExample.framework" \ -framework "./build/macos.xcarchive/Products/Library/Frameworks/XCFrameworkExample.framework" \ -output "./build/XCFrameworkExample.xcframework"
There can be a lot of -framework parameter -framework that point to all .framework assemblies that you want to attach to the .xcframework container.
Preparing a library project for future assembly and packaging of XCFramework
TL; DR: The finished project can be downloaded from the repository on Github .
As an example, we are implementing a library that will be available for two platforms: iOS and macOS.
We will use the project configuration mentioned in the previous section of the article: two schemes and two corresponding Framework target for iOS and macOS platforms.
Will the library itself provide us with a simple extension for String? ( Optional where Wrapped == String ), with a single property.
We call this property isNilOrEmpty and, as the name implies, will it let us know when inside String? missing value or the string stored inside is empty.
The code can be implemented as follows:
public extension Optional where Wrapped == String { var isNilOrEmpty: Bool { if case let .some(string) = self { return string.isEmpty } return true } }
We proceed directly to the creation and configuration of the project.
To begin with, we need to create a project of the “Framework” type for one of two target platforms of your choice: iOS or macOS.
You can do this in Xcode via the menu item "File" => "New" => "Project", or by using the keyboard shortcut ⇧ + + N (by default).
Next, at the top of the dialog, select the desired platform (iOS or macOS), select the type of the Framework project, and proceed to the “Next” button.
On the next screen, we need to set the project name in the "Product Name" field.
Alternatively, you can use the "base" name of the project, in the previously mentioned configuration it is "XCFrameworkExample".
In the future, when configuring the project, we will add suffixes denoting platforms to the base name used in the target's name.
After that, you need to create another Target of the "Framework" type in the project for another of the listed platforms (except the one for which the project was originally created).
To do this, use the menu item "File" => "New" => "Target".
Next, we select in the dialogue another (relative to that selected in paragraph 1) of the two platforms, after which we again select the type of project "Framework".
For the “Product Name” field, we can immediately use the name with the suffix of the platform, for which we add target in this paragraph. So, if the platform is macOS, then the name could be “XCFrameworkExample-macOS” (% base_name% -% platform%).
We’ll set up targets and charts to make them easier to distinguish.
First, rename our schemes and the targets attached to them so that their names display platforms, for example like this:
- "XCFrameworkExample-iOS"
- "XCFrameworkExample-macOS"
Next, add the file with the code of our extension for String? to the project .swift String?
Add a new .swift file named “Optional.swift” to the project.
And in the file itself we put the previously mentioned extension for Optional .
It is important not to forget to add the code file to both targets.

Now we have a project that we can put together in XCFramework using the commands from the previous stage.
At this stage, you can use the bash script in a separate file to build the library and package it in the .xcframework format. In addition, this will allow in the future to use these developments to integrate the solution into the CI / CD system.
The script looks ugly simple and, in fact, brings together the previously mentioned commands for assembly:
.Xcframework content
As a result of the assembly script from the previous paragraph of the article, we get the coveted bundle .xcframework, which can be added to the project.
If we look inside this bundle, which, like .framework, is essentially a simple folder, we will see the following structure:

Here we see that inside .xcframework are assemblies in the .framework format, broken down by platform and architecture. Also to describe the contents of bundle .xcframework, inside there is an Info.plist file.
The Info.plist file has the following contents <?xml version="1.0" encoding="UTF-8"?> <!DOCTYPE plist PUBLIC "-//Apple//DTD PLIST 1.0//EN" "http://www.apple.com/DTDs/PropertyList-1.0.dtd"> <plist version="1.0"> <dict> <key>AvailableLibraries</key> <array> <dict> <key>LibraryIdentifier</key> <string>ios-arm64</string> <key>LibraryPath</key> <string>XCFrameworkExample.framework</string> <key>SupportedArchitectures</key> <array> <string>arm64</string> </array> <key>SupportedPlatform</key> <string>ios</string> </dict> <dict> <key>LibraryIdentifier</key> <string>ios-x86_64-simulator</string> <key>LibraryPath</key> <string>XCFrameworkExample.framework</string> <key>SupportedArchitectures</key> <array> <string>x86_64</string> </array> <key>SupportedPlatform</key> <string>ios</string> <key>SupportedPlatformVariant</key> <string>simulator</string> </dict> <dict> <key>LibraryIdentifier</key> <string>macos-x86_64</string> <key>LibraryPath</key> <string>XCFrameworkExample.framework</string> <key>SupportedArchitectures</key> <array> <string>x86_64</string> </array> <key>SupportedPlatform</key> <string>macos</string> </dict> </array> <key>CFBundlePackageType</key> <string>XFWK</string> <key>XCFrameworkFormatVersion</key> <string>1.0</string> </dict> </plist>
You may notice that for the “CFBundlePackageType” key, in contrast to the .framework format, the new value “XFWK” is used, not “FMWK”.
Summary
So, the library packaging format in XCFramework is nothing more than a regular container for libraries compiled in .framework format.
However, this format allows you to separately store and independently use each of the architectures and platforms presented inside. This eliminates a number of problems inherent in the widespread approach to building fat / universal frameworks.
Be that as it may, at the moment, there is an important nuance regarding the issue of using XCFramework in real projects - dependency management, which Apple has not implemented in XCFramework format.
For these purposes, Swift PM, Carthage, CocoaPods and other dependency management systems and their assemblies are habitually used. Therefore, it is not surprising that support for the new format is already underway precisely in the CocoaPods and Carthage projects.