मैं आपको बताना चाहता हूं कि एचटीएमएल 5 में मेरा पहला मिनी-गेम कैसे बनाया जाता है (यदि अधिक सटीक: जेएस, एचटीएमएल 5, सीएसएस) बहुत अधिक कठिनाई के बिना।
खेल का सार इस प्रकार होगा: एक छोटा आदमी पत्थरों के बीच मैदान में चलता है, फूल इकट्ठा करता है, प्रत्येक फूल में 1 गार्ड होता है। प्रत्येक स्तर के साथ रंगों की संख्या बढ़ जाती है, कार्ड यादृच्छिक क्रम में बनाए जाते हैं।
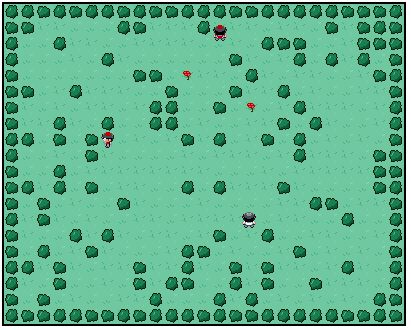
यह सब इस तरह दिखता है:
फ्रेम तैयार करना
इसलिए, हमारे कार्य के लिए मैं
craftyjs js लाइब्रेरी का उपयोग
करूंगा । चूँकि अपने आप को स्प्राइट खींचने के लिए, मेरे हाथ वहाँ से नहीं उगते हैं, मैं साइट पर एक उदाहरण से स्प्राइट उधार लूंगा, हम खरोंच से बाकी काम करेंगे, और हम लाल टोपी और टी-शर्ट में दुश्मनों के साथ ले जाने वाले स्प्राइट के पूरक होंगे:

अब यह आवेदन की रूपरेखा बनाने का समय है, यह मेरे लिए इस तरह दिखता है:

इसके अलावा, आइए हम तुरंत बनाएं:
/index.html
<! DOCTYPE html PUBLIC "-//W3C//DTD XHTML 1.0 Strict//EN"
"http://www.w3.org/TR/xhtml1/DTD/xhtml1-strict.dtd" >
< html xmlns ="http://www.w3.org/1999/xhtml" >
< head >
< script type ="text/javascript" src ="js/jquery.js" ></ script >
<script type= "text/javascript" src= "js/crafty.js" ></script>
<!-- objects -->
<script type= "text/javascript" src= "js/objects/flower.js" ></script>
<script type= "text/javascript" src= "js/objects/bush.js" ></script>
<script type= "text/javascript" src= "js/objects/grass.js" ></script>
<script type= "text/javascript" src= "js/objects/unit.js" ></script>
<script type= "text/javascript" src= "js/objects/player.js" ></script>
<script type= "text/javascript" src= "js/objects/fourway_ai.js" ></script>
<script type= "text/javascript" src= "js/objects/monster.js" ></script>
<!-- scenes -->
<script type= "text/javascript" src= "js/scenes/loading.js" ></script>
<script type= "text/javascript" src= "js/scenes/main.js" ></script>
<script type= "text/javascript" src= "js/scenes/win.js" ></script>
<script type= "text/javascript" src= "js/scenes/lose.js" ></script>

<script type= "text/javascript" src= "js/game.js" > </ script >
< link rel ="stylesheet" href ="css/game.css" type ="text/css" media ="screen" charset ="utf-8" >
< title > Simpe RPG </ title >
</ head >
< body ></ body >
</ html >

* This source code was highlighted with Source Code Highlighter .
/css/game.css
body, html { margin:0; padding: 0; overflow:hidden; font-family:Arial; font-size:20px }
#cr-stage { border:2px solid black; margin:5px auto; color:white }

* This source code was highlighted with Source Code Highlighter .
/js/game.js
var Settings = {
width: 400, //
height: 320, //
poligon: 16, // 16x16
level: 1, //
flower_count: 0 //
};

window.onload = function() {
Crafty.init(Settings.width, Settings.height); //

// sprite
Crafty.sprite(Settings.poligon, "images/sprite.png", {
grass1: [0,0],
grass2: [1,0],
grass3: [2,0],
grass4: [3,0],
flower: [0,1],
bush1: [0,2],
bush2: [1,2],
player: [0,3],
monster: [0,4]
});

//
Crafty.scene("loading");
};

* This source code was highlighted with Source Code Highlighter .
अंतिम फ़ाइल में, हम दिए गए चौड़ाई और ऊंचाई के साथ एक कैनवास बनाते हैं, हमारी फ़ाइल से स्प्राइट बनाते हैं और पहले "लोडिंग" दृश्य को चलाते हैं।
दृश्य बनाना
चलो हमारे दृश्य "लोडिंग":
/js/scenes/loading.jd
Crafty.scene("loading", function() {
Crafty.load(["images/sprite.png"], function() {
// , images/sprite.png
setTimeout(function() {
Crafty.scene("main");
}, 100);
});

//
Crafty.background("#000");
//
Crafty.e("2D, DOM, Text").attr({w: 100, h: 20, x: 150, y: 120})
.text("Loading... < br /> Level: " + Settings.level)
.css({"text-align": "center"});
});

* This source code was highlighted with Source Code Highlighter .
यहां हम बस स्प्राइट को लोड करते हैं, एक काली पृष्ठभूमि बनाते हैं और पृष्ठभूमि पर टेक्स्ट प्रदर्शित करते हैं। हम पाठ को कैसे मुद्रित करते हैं, उस पर हम वापस लौटेंगे, लेकिन अब जीतने और हारने के लिए तुरंत 2 और समान दृश्य बनाते हैं।
/js/scenes/win.js
Crafty.scene("win", function() {
Settings.level += 1;

Crafty.background("#000");
Crafty.e("2D, DOM, Text").attr({w: 100, h: 20, x: 150, y: 120})
.text("You win! < br /> Level: " + Settings.level)
.css({"text-align": "center"});

setTimeout(function() {
Crafty.scene("main");
}, 1000);
});

* This source code was highlighted with Source Code Highlighter .
/js/scenes/lose.js
Crafty.scene("lose", function() {
Settings.level = 1;

Crafty.background("#000");
Crafty.e("2D, DOM, Text").attr({w: 100, h: 20, x: 150, y: 120})
.text("You lose! < br /> Level: " + Settings.level)
.css({"text-align": "center"});

setTimeout(function() {
Crafty.scene("main");
}, 1000);
});

* This source code was highlighted with Source Code Highlighter .
मिठाई के लिए मुख्य दृश्य को छोड़ दें और वस्तुओं पर जाएं
घटक निर्माण
Craftyjs में 2 मुख्य प्रकार हैं, Crafty.c के घटक और Crafty.e की इकाइयाँ। इकाइयां घटकों के गुणों को जमा करती हैं। हमारे खेल में 6 इकाइयाँ होंगी: फूल, पत्थर, घास (पृष्ठभूमि), यूनिट (एक छोटे से आदमी का आधार वर्ग), खिलाड़ी और राक्षस। प्रत्येक इकाई के लिए, हम अपना स्वयं का घटक बनाएंगे।
चलो सबसे सरल, घास से शुरू करते हैं:
/js/objects/grass.js
Crafty.c('Grass', {
init: function() {
this.requires("2D");
this.requires("Canvas");
this.requires("grass"+Crafty.randRange(1,2));

this.attr({x: 0, y: 0});
}
});

* This source code was highlighted with Source Code Highlighter .
ध्यान दें कि यहां हमने कैनवस घटक को जोड़ा है, और दृश्यों में, हमने डोम घटक को पाठ से जोड़ा है, इससे हमें वस्तुओं का अलग व्यवहार मिलता है, उदाहरण के लिए, दृश्यों के पाठ में हमें सीएसएस विधि का उपयोग करने का अवसर मिलता है। इसके अलावा यहां हमने अपने स्प्राइट को जोड़ा, बेतरतीब ढंग से चुनते हुए कि हमारे लिए उपयोग करने के लिए 2 घास पैटर्न में से कौन सा। अब, पत्थर के लिए एक घटक भी बनाएं:
/js/objects/bush.js
Crafty.c('Bush', {
init: function() {
this.requires("2D");
this.requires("Canvas");
this.requires("bush"+Crafty.randRange(1,2));
this.requires("hard_bush");

this.attr({x: 0, y: 0, z: 2});
}
});

* This source code was highlighted with Source Code Highlighter .
यहां सब कुछ समान है, बस hard_bush पर ध्यान दें, यह जल्द ही काम में आएगा। चलो फूलों पर चलते हैं, वे हवा में विकसित होंगे:
/js/objects/flower.js
Crafty.c('Flower', {
init: function() {
this.requires("2D");
this.requires("Canvas");
this.requires("flower");
this.requires("SpriteAnimation");

this.attr({x: 0, y: 0});
this.animate("wind", 0, 1, 3);

this.bind("EnterFrame", function() {
if(!this.isPlaying())
this.animate("wind", 80);
});
},

clear: function() {
this.removeComponent('flower');
this._visible = false;
}
});

* This source code was highlighted with Source Code Highlighter .
एक एनीमेशन बनाने के लिए, हम SpriteAnimation घटक को कनेक्ट करते हैं, जो हमें तरीके देता है:
यह सार्वजनिक .animate (स्ट्रिंग आईडी, नंबर fromX, संख्या y, संख्या tox) - स्प्राइट एनीमेशन
सार्वजनिक बूलियन .isPlaying ([स्ट्रिंग रील]) - जाँच करें कि क्या एनीमेशन खेल रहा है
इसके बाद, EnterFrame ईवेंट पर, हम हवा बनाते हैं। इस घटक में भी एक स्पष्ट मॉड्यूल है जो फूल को हटा देता है यदि हमने इसे एकत्र किया है।
यूनिट बनाने के लिए आगे बढ़ने का समय है, मैं टिप्पणियों में सब कुछ बताऊंगा:
/js/objects/unit.js
Crafty.c('Unit', {
init: function() {
this.requires("2D");
this.requires("Canvas");
this.requires("SpriteAnimation");
this.requires("Collision"); //

this.attr({x: 0, y: 0, z: 1});

this.collision(); //

//

this.onHit("hard_bush", function(e) {
var object = e[0].obj;
// left
if (object.x > this.x && (this.x + Settings.poligon) > object.x) {
this.x -= this._speed;
this.stop();
}
// right
if (object.x < this.x && this.x < (object.x + Settings.poligon)) {
this.x += this._speed;
this.stop();
}
// top
if (object.y < this.y && (this.y + Settings.poligon) > object.y) {
this.y += this._speed;
this.stop();
}
// bottom
if (object.y > this.y && this.y < (object.y + Settings.poligon)) {
this.y -= this._speed;
this.stop();
}
});

// , sprite
//

this.bind("Moved", function(e) {
if(this.x < ex) {
if(!this.isPlaying("walk_left"))
this.stop().animate("walk_left", 10);
}
if(this.x > ex) {
if(!this.isPlaying("walk_right"))
this.stop().animate("walk_right", 10);
}
if(this.y < ey) {
if(!this.isPlaying("walk_up"))
this.stop().animate("walk_up", 10);
}
if(this.y > ey) {
if(!this.isPlaying("walk_down"))
this.stop().animate("walk_down", 10);
}
});
}
});

* This source code was highlighted with Source Code Highlighter .
यहां सभी जादू Collision घटक में निहित है, जो हमें टकराव की सीमाओं को निर्धारित करने और विभिन्न घटनाओं को संसाधित करने की अनुमति देता है, इस घटक में मूव्ड इवेंट को भी संभाला जाता है, हम अपने ईवेंट प्लेयर और मॉन्स्टर घटकों में यह ईवेंट जनरेट करेंगे, इस ईवेंट का पैरामीटर पिछली स्थिति का x और y होगा ।
एक खिलाड़ी बनाएँ:
/js/objects/player.js
Crafty.c('Player', {
init: function() {
this.requires("Unit"); // unit
this.requires("player"); // sprite
this.requires("Fourway"); //

this.attr({x: 0, y: 0, z: 1});

this.animate("walk_left", 6, 3, 8);
this.animate("walk_right", 9, 3, 11);
this.animate("walk_up", 3, 3, 5);
this.animate("walk_down", 0, 3, 2);

this.fourway(1);

this.onHit("flower", function(e) {
var object = e[0].obj;
object.clear();
if ((Settings.flower_count -= 1) == 0) Crafty.scene("win");
});

this.onHit("monster", function(e) {
var object = e[0].obj;
object.clear();
Crafty.scene("lose");
});
}
});

* This source code was highlighted with Source Code Highlighter .
हम पहले से बनाए गए यूनिट घटक, स्प्राइट प्लेयर और फोरवे मोशन घटक को जोड़ते हैं। फोरवे एक घटक है जो कीबोर्ड पर दबाए गए तीर के आधार पर हमारे स्प्राइट की स्थिति को बदलता है, निर्माण पर, यह आंदोलन की गति के लिए एक पैरामीटर लेता है। अगला, समान टकराव घटक का उपयोग करके, हम 2 घटनाओं को पकड़ते हैं, एक फूल के साथ टकराव (फिर हम इसे इकट्ठा करते हैं) और एक राक्षस के साथ टकराव (फिर हम मर जाते हैं)।
यह एक राक्षस बनाने का समय है:
/js/objects/monster.js
Crafty.c('Monster', {
init: function() {
this.requires("Unit");
this.requires("monster");
this.requires("FourwayAI");

this.attr({x: 0, y: 0, z: 1});

this.animate("walk_left", 6, 4, 8);
this.animate("walk_right", 9, 4, 11);
this.animate("walk_up", 3, 4, 5);
this.animate("walk_down", 0, 4, 2);

this.fourway_ai(1);
},

clear: function() {
clearInterval(this.removeComponent('monster')._interval);
}
});

* This source code was highlighted with Source Code Highlighter .
फोरवेएआई घटक पर ध्यान दें, ऐसा कोई घटक नहीं है, हमें इसे बनाने की आवश्यकता होगी। यह घटक राक्षस के स्वतंत्र आंदोलन के लिए जिम्मेदार होगा:
/js/objects/fourwai_ai.js
Crafty.c('FourwayAI', {
_speed: 3,
_interval: null,

init: function() {
this._movement= { x: 0, y: 0};

this.bind("EnterFrame",function() {
if (this.disableControls) return;

if(this._movement.x !== 0) {
this.x += this._movement.x;
this.trigger('Moved', {x: this.x - this._movement.x, y: this.y});
}
if(this._movement.y !== 0) {
this.y += this._movement.y;
this.trigger('Moved', {x: this.x, y: this.y - this._movement.y});
}
});
},

fourway_ai: function(speed) {
this._speed = speed;

this.make_step();

var kclass = this;
this._interval = setInterval(function() {
kclass.make_step();
}, 1000 * this._speed);
},

make_step: function() {
step = Crafty.randRange(-1,1);

if (Crafty.randRange(1,2) == 1) {
this._movement.x = step;
this._movement.y = 0;
} else {
this._movement.x = 0;
this._movement.y = step;
}

this.trigger('NewDirection', this._movement);
}
});

* This source code was highlighted with Source Code Highlighter .
this.trigger - जैसा कि आप अनुमान लगा सकते हैं, यह एक घटना बनाता है जिसे हम एनीमेशन के लिए पकड़ते हैं।
अब हमें केवल अंतिम मुख्य दृश्य बनाना है, जो हमारे पूरे मानचित्र को उत्पन्न करेगा और उस पर खिलाड़ी, राक्षस, पत्थर और फूल रखेगा।
सीन क्रिएशन फिर से
/js/scenes/main.js
Crafty.scene("main", function() {
var flower_count = Settings.level + 1;
Settings.flower_count = 0;

//generate the grass along the x-axis
for(var i = 0; i < 25; i++) {
//generate the grass along the y-axis
for(var j = 0; j < 20; j++) {
Crafty.e("Grass").attr({x: i * Settings.poligon, y: j * Settings.poligon});
if (i * Settings.poligon == 160 && j * Settings.poligon == 144) continue;

if(i > 0 && i < 24 && j > 0 && j < 19 && Crafty.randRange(0, 50) > 40) {
if (Crafty.randRange(1,10) == 1 && (flower_count -= 1) > 0) {
Crafty.e("Flower").attr({x: i * Settings.poligon, y: j * Settings.poligon});
Settings.flower_count += 1
// one monster for one flower
Crafty.e("Monster").attr({x: i * Settings.poligon, y: j * Settings.poligon});
} else {
Crafty.e("Bush").attr({x: i * Settings.poligon, y: j * Settings.poligon});
}
}
}
}

//create the bushes along the x-axis which will form the boundaries
for(var i = 0; i < 25; i++) {
Crafty.e("Bush").attr({x: i * Settings.poligon, y: 0});
Crafty.e("Bush").attr({x: i * Settings.poligon, y: 304});
}

//create the bushes along the y-axis
//we need to start one more and one less to not overlap the previous bushes
for(var i = 1; i < 19; i++) {
Crafty.e("Bush").attr({x: 0, y: i * Settings.poligon});
Crafty.e("Bush").attr({x: 384, y: i * Settings.poligon});
}

Crafty.e("Player").attr({x: 160, y: 144, z: 1});
});

* This source code was highlighted with Source Code Highlighter .
यहां हम अंततः अपने घटकों के लिए इकाइयां बनाते हैं, परिधि के चारों ओर पत्थरों की एक दीवार बनाते हैं, पृष्ठभूमि को घास से भरते हैं, और प्रत्येक 16x16 वर्ग के अंदर हम एक शून्य, पत्थर या फूल + दुश्मन बनाते हैं। अंत में हम अपने खिलाड़ी को रखते हैं।
यह सब है, हमने एक सरल, अंतहीन खेल बनाया - एचटीएमएल 5 में एक साहसिक कार्य। स्रोत कोड
github पर उपलब्ध है। मैक ओएस के तहत केवल क्रोम और फ़ायरफ़ॉक्स में जाँच की गई।
अगर कोई मुझे एक स्थिर सेवा बताता है जहां आप डेमो डाल सकते हैं, तो मैं आभारी रहूंगा।
UPD :
RiderSx की सलाह पर
यहां एक डेमो पोस्ट किया गया
है , मुझे उम्मीद है कि इसका सामना करना
पड़ेगा ।