सभी को अच्छा!
यह लेख क्या सिखाता है?
यह लेख अग्रदूतों और वेब डेवलपर्स के लिए उपयोगी होगा, यह खरोंच और प्रकाशन से विकास के लिए एक पूर्ण मार्गदर्शिका है। Google Play में रखे गए वास्तविक एप्लिकेशन "लागत लेखांकन" को समझता है। यह मेरा पहला आवेदन है, जो ज्ञान को शुरुआती से आवारा में स्थानांतरित कर रहा है।
- हम मूल बातें समझते हैं
- डेटाबेस के साथ काम करना
- हम लेआउट बनाते हैं
- प्रोग्राम
यह कैसे हुआ?
इस एप्लिकेशन के लेखन को मौजूदा एनालॉग्स की आवश्यक कार्यक्षमता की कमी से उकसाया गया था।
कई समान अनुप्रयोग हैं, लेकिन दुर्भाग्य से, वे अनावश्यक कार्यों के साथ अतिभारित हैं।
क्या आवश्यक था और प्राप्त किया?
मेरे आवेदन की आवश्यकताएं इस प्रकार थीं:
- चालू माह का लेखा व्यय
- "प्रमुख प्रवाह दर दर्ज करें" का उपयोग करके प्रवाह दर दर्ज करें
- इस महीने के खर्च का अवलोकन
- किसी दिए गए महीने के लिए कुल लागत का अवलोकन
- चयनित माह के लिए राशि का अवलोकन
वर्कफ़्लो के बारे में कुछ शब्द
हमेशा के लिए तैयार करने के लिए तैयार, इंटरफ़ेस का लेआउट xml का उपयोग कर। Html / css पर मैं कुछ भी बना सकता हूं, लेकिन जब यह एक समान लेआउट में आया, तो लड़ाई की भावना गायब हो गई। हम विषय पर कोई भी परिचयात्मक सामग्री नहीं हड़पते हैं: HTML / css जानने वालों के लिए xml इंटरफेस। मुझे उम्मीद है कि स्थिति जल्द ही बदल जाएगी। तत्वों के प्लेसमेंट का तर्क स्पष्ट नहीं है, सब कुछ तिरछा है और सुन नहीं रहा है। यह इंटरफ़ेस तत्वों के लिए एक अलग "बॉर्डर" (शीर्ष, बाएं) सेट करने की क्षमता को नहीं मारता है।
डिज़ाइन
आपने एमुलेटर शुरू करने के लिए ग्रहण, प्लगइन्स और शीर्ष पीसी पर (10 मिनट की कोशिश के बाद) प्रबंधित किया? अब आपके पास एंड्रॉइड के लिए विकसित करने का अवसर है, जो मोबाइल दुनिया में सबसे लोकप्रिय ऑपरेटिंग सिस्टम में से एक है।
सबसे पहले, हमारी पहली गतिविधि बनाएं, जो कि गतिविधि_main.xml एप्लिकेशन का प्रवेश बिंदु होगा। हमें एक निश्चित MVC संरचना प्रदान की जाती है:
com.laguna.sa मेरे पैकेज का नाम हैतर्क में स्थित है: project_name / src / com.laguna.sa / *
दृश्य इसमें स्थित हैं: रेस / लेआउट / *
एक गतिविधि बनाते समय, एक तर्क और प्रस्तुति फ़ाइल उत्पन्न होती है। लेआउट के दौरान हमें बहुत सारे अस्पष्ट तत्व दिए जाते हैं, जिनमें से मैंने
LinearLayout को चुना। LinearLayout आपको तत्वों को अपने आप में रखने की अनुमति देता है। ऊर्ध्वाधर और क्षैतिज की पसंद। यह एंड्रॉइड के रूप में निर्दिष्ट किया गया है: अभिविन्यास = "ऊर्ध्वाधर"। इस एप्लिकेशन में मेरी जरूरतों के लिए यह पर्याप्त है, मैंने लिनियरलेयूट 3 डीपी उच्च का उपयोग करके सीमा भी उत्सर्जित की। Html में div की तरह कुछ।
activity_main.xml लिस्टिंग भाग 1:<LinearLayout xmlns:android="http://schemas.android.com/apk/res/android" xmlns:tools="http://schemas.android.com/tools" android:layout_width="fill_parent" android:layout_height="fill_parent" android:background="#6c6c75" android:gravity="center" android:orientation="vertical" tools:context=".MainActivity" > <LinearLayout android:layout_width="fill_parent" android:layout_height="3dp" android:background="#99CC00" android:orientation="horizontal" > </LinearLayout> </LinearLayout>
अब इसमें विशेषताओं की
Android के साथ पहली मूल परत शामिल है
: layout_width और
android: layout_height, जिसे
fill_parent के रूप में सेट किया
गया है , जो परत को सब कुछ और सब कुछ भरने के लिए कहता है। हमने
Android के केंद्र में सभी सामग्री का स्थान भी निर्धारित किया है
: गुरुत्वाकर्षण = "केंद्र" ।
अगला, मैं 3Dp ऊंचाई के साथ LinearLayout का उपयोग करके एक हरे रंग की पट्टी बनाता हूं। बेशक, इस तत्व की कल्पना नहीं की गई थी, लेकिन यह एक बार पाप करना संभव है।
<LinearLayout android:layout_width="fill_parent" android:layout_height="3dp" android:background="#99CC00" android:orientation="horizontal" > </LinearLayout>
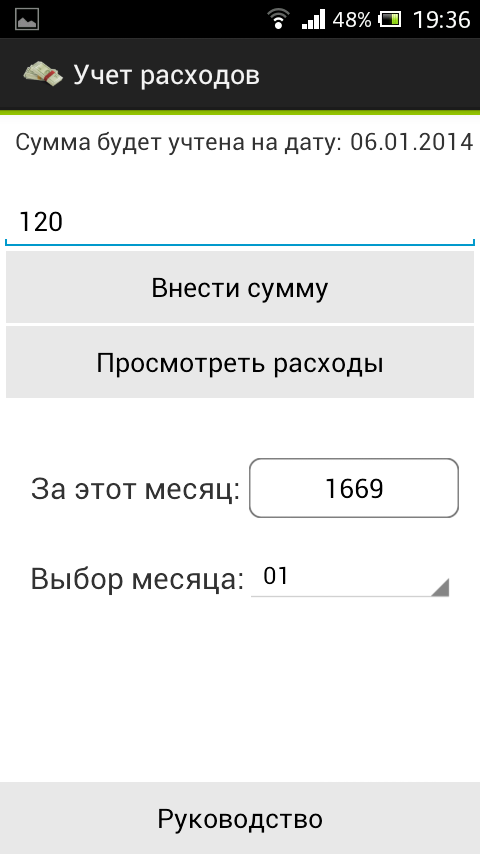
स्क्रीन पर यह इस तरह दिखता है:

पट्टी के बाद, मैं पाठ के लिए दो फ़ील्ड रखता हूं। मैं नए
रैखिकलेआउट में जगह देता हूं, जो मैं
क्षैतिज रूप से करता हूं।
<LinearLayout android:layout_width="fill_parent" android:layout_height="wrap_content" android:background="#FFf" android:orientation="horizontal" > <TextView android:id="@+id/textView2" android:layout_width="wrap_content" android:layout_height="wrap_content" android:layout_marginBottom="3dp" android:layout_marginLeft="10dp" android:layout_marginRight="5dp" android:layout_marginTop="6dp" android:text="@string/text2" android:textSize="16sp" /> <TextView android:id="@+id/textView1" android:layout_width="wrap_content" android:layout_height="wrap_content" android:layout_marginBottom="3dp" android:layout_marginTop="6dp" android:text="date" android:textSize="16sp" /> </LinearLayout>
यहां सब कुछ तार्किक रूप से स्पष्ट है, लेकिन आपको इन तत्वों के डेटा को भरने पर ध्यान देना चाहिए। हमारी परियोजना में एक
मान फ़ोल्डर है जिसमें
strings.xml फ़ाइल
संग्रहीत है । इस फ़ाइल में लाइनें हैं, जो Android के लिए धन्यवाद: text = "@ string / text2", ऊपर दिए गए TextView को लोड करती है। पाठ को सीधे कोड में निर्दिष्ट किया जा सकता है, लेकिन इस मामले में, कष्टप्रद त्रुटि प्लेट हस्तक्षेप करेगी।
लाइन फ़ाइल के लिए एक विज़ुअल एडिटर है, जो आपको कोड को डिलीट किए बिना लाइनों को संपादित करने की अनुमति देता है। न केवल लाइनों बल्कि अन्य संसाधनों को भी जोड़ने की अनुमति दें। लेकिन जैसा कि मैं समझता हूं, स्ट्रिंग्स और शैलियों को अलग-अलग संग्रहीत करने की आवश्यकता है।
स्वाभाविक रूप से, इंटरफ़ेस तत्वों को प्रोग्रामेटिक रूप से नियंत्रित किया जा सकता है। मैं एक परियोजना से एक उदाहरण दूंगा जहां परीक्षण के क्षेत्र में वर्तमान तिथि डाली गई है।
SimpleDateFormat sdf = new SimpleDateFormat("dd.MM.yyyy"); String currentDateandTime = sdf.format(new Date()); TextView textView1 = (TextView) findViewById(R.id.textView1); textView1.setText(currentDateandTime);
Activity_main.xml और उसके तर्क की पूरी सूची: <LinearLayout xmlns:android="http://schemas.android.com/apk/res/android" xmlns:tools="http://schemas.android.com/tools" android:layout_width="fill_parent" android:layout_height="fill_parent" android:background="#6c6c75" android:gravity="center" android:orientation="vertical" tools:context=".MainActivity" > <LinearLayout android:layout_width="fill_parent" android:layout_height="3dp" android:background="#99CC00" android:orientation="horizontal" > </LinearLayout> <LinearLayout android:layout_width="fill_parent" android:layout_height="wrap_content" android:background="#FFf" android:orientation="horizontal" > <TextView android:id="@+id/textView2" android:layout_width="wrap_content" android:layout_height="wrap_content" android:layout_marginBottom="3dp" android:layout_marginLeft="10dp" android:layout_marginRight="5dp" android:layout_marginTop="6dp" android:text="@string/text2" android:textSize="16sp" /> <TextView android:id="@+id/textView1" android:layout_width="wrap_content" android:layout_height="wrap_content" android:layout_marginBottom="3dp" android:layout_marginTop="6dp" android:text="date" android:textSize="16sp" /> </LinearLayout> <LinearLayout android:layout_width="match_parent" android:layout_height="wrap_content" android:layout_marginLeft="0dp" android:layout_marginRight="0dp" android:layout_marginTop="0dp" android:background="#FFf" android:gravity="bottom" android:orientation="vertical" > <EditText android:id="@+id/amount" android:layout_width="match_parent" android:layout_height="wrap_content" android:layout_marginTop="20sp" android:ems="10" android:hint="@string/amount_of_expense" > </EditText> <Button android:id="@+id/button2" android:layout_width="match_parent" android:layout_height="wrap_content" android:layout_marginLeft="4dp" android:layout_marginRight="4dp" android:background="@drawable/mybtn_style_selector" android:onClick="makebutton_Click" android:text="@string/makebutton" /> <Button android:id="@+id/button3" android:layout_width="match_parent" android:layout_height="wrap_content" android:layout_marginLeft="4dp" android:layout_marginRight="4dp" android:layout_marginTop="2dp" android:background="@drawable/mybtn_style_selector" android:onClick="costs_Click" android:text="@string/costs" /> </LinearLayout> <LinearLayout android:layout_width="match_parent" android:layout_height="80sp" android:layout_gravity="center_vertical" android:layout_marginTop="0dp" android:background="#fff" android:orientation="horizontal" > <TextView android:id="@+id/amount_per_month_text" android:layout_width="wrap_content" android:layout_height="wrap_content" android:layout_gravity="center" android:layout_marginLeft="20dp" android:layout_marginTop="20dp" android:text=" :" android:textSize="20sp" /> <Button android:id="@+id/amount_per_month" android:layout_width="140dp" android:layout_height="wrap_content" android:layout_marginLeft="5dp" android:layout_marginTop="40dp" android:onClick="reload_Click" android:background="@drawable/button321" android:text="" /> </LinearLayout> <LinearLayout android:layout_width="match_parent" android:layout_height="80sp" android:layout_gravity="center_vertical" android:layout_marginTop="0dp" android:background="#fff" android:orientation="horizontal" > <TextView android:id="@+id/amount_per_month_text2" android:layout_width="wrap_content" android:layout_height="wrap_content" android:layout_gravity="center" android:layout_marginLeft="20dp" android:layout_marginTop="0dp" android:text=" :" android:textSize="20sp" /> <Spinner android:id="@+id/spinner_month" android:layout_width="140dp" android:layout_height="wrap_content" android:layout_marginTop="20dp" > </Spinner> </LinearLayout> <LinearLayout android:layout_width="match_parent" android:layout_height="fill_parent" android:layout_marginTop="0dp" android:background="#FFf" android:gravity="bottom" android:orientation="vertical" > <Button android:id="@+id/button1" android:layout_width="match_parent" android:layout_height="wrap_content" android:background="@drawable/mybtn_style_selector" android:onClick="howtousebutton_Click" android:text="@string/howtousebutton" /> </LinearLayout> </LinearLayout>
package com.laguna.sa;
कोई विशेष रूप से जटिल क्रियाएं नहीं हैं जिन्हें स्पष्टीकरण की आवश्यकता है, केवल एक चीज जिस पर मैं ध्यान दूंगा वह है आवेदन में नेविगेशन विधि:
एक गतिविधि से दूसरी गतिविधि में संक्रमण।
डेटाबेस और इसके साथ काम करते हैं
एंड्रॉइड में, मैंने स्थानीय डेटा - SQLite और SQLiteOpenHelper हेल्पर क्लास को स्टोर करने के लिए सबसे सरल समाधान का उपयोग किया, जो मेरे लिए सभी गंदे काम करता है। काम करने वालों के लिए, उदाहरण के लिए, MySql के साथ, इसमें महारत हासिल करने और समझने में कोई विशेष कठिनाई नहीं होनी चाहिए।
SQLiteOpenHelper सिस्टम फ़ाइलों में डेटाबेस के प्रारंभिक निर्माण को नियंत्रित करता है, यदि आवश्यक हो, तो "अपग्रेड" करता है।
WorkWithDatabase.java डेटाबेस के साथ काम करने के लिए वर्ग की सूची: package com.laguna.sa; import java.text.SimpleDateFormat; import java.util.Date; import android.annotation.SuppressLint; import android.content.ContentValues; import android.content.Context; import android.database.Cursor; import android.database.sqlite.SQLiteDatabase; import android.database.sqlite.SQLiteOpenHelper; import android.widget.EditText; import android.widget.TextView; public class WorkWithDatabase extends SQLiteOpenHelper {
कृपया ध्यान दें कि डेटा डालने के लिए, उपयोग करें:
ContentValues values = new ContentValues();
सिद्धांत कॉलम -> मान के बारे में डेटा डालें।
डेटा प्राप्त करना, प्रक्रिया जटिल नहीं है। यह
कर्सर के बारे में अलग से पढ़ने लायक है। मेरे मामले में, मैं कच्चे rawQuery प्रश्नों को फ़ीड करता हूं और कर्सर के साथ काम करता हूं।
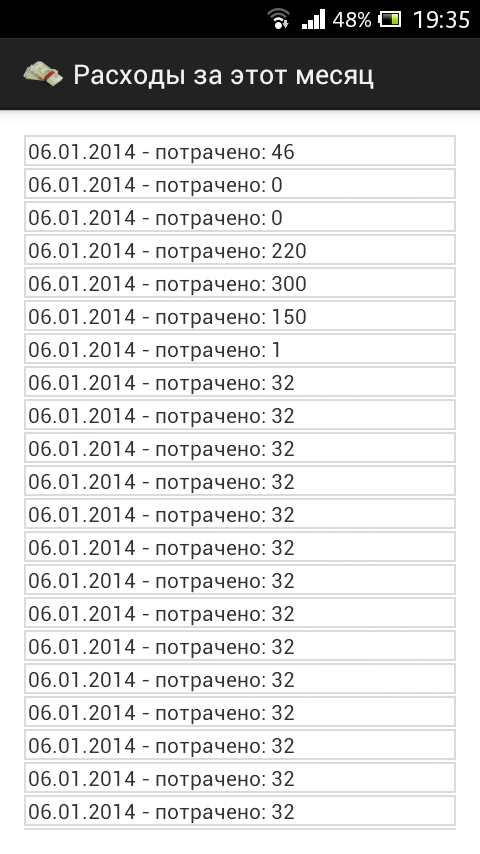
यहां डेटा आउटपुट का एक उदाहरण है, एक फ़ाइल लिस्टिंग जो एक अलग स्क्रीन पर मात्रा प्रदर्शित करती है।
CostsActivity.java फ़ाइल की सूची और उसकी प्रस्तुति <RelativeLayout xmlns:android="http://schemas.android.com/apk/res/android" xmlns:tools="http://schemas.android.com/tools" android:layout_width="match_parent" android:layout_height="match_parent" android:paddingBottom="@dimen/activity_vertical_margin" android:paddingLeft="@dimen/activity_horizontal_margin" android:paddingRight="@dimen/activity_horizontal_margin" android:paddingTop="@dimen/activity_vertical_margin" android:background="#fff" tools:context=".CostsActivity" > <ScrollView android:id="@+id/scrollView1" android:layout_width="wrap_content" android:layout_height="wrap_content" android:layout_alignParentBottom="true" android:layout_alignParentLeft="true" android:layout_alignParentRight="true" android:layout_alignParentTop="true" > <LinearLayout android:id="@+id/costslist" android:layout_width="match_parent" android:layout_height="wrap_content" android:orientation="vertical" > </LinearLayout> </ScrollView> </RelativeLayout>
package com.laguna.sa; import android.os.Build; import android.os.Bundle; import android.annotation.SuppressLint; import android.annotation.TargetApi; import android.app.ActionBar.LayoutParams; import android.app.Activity; import android.database.Cursor; import android.view.Menu; import android.widget.LinearLayout; import android.widget.TextView; public class CostsActivity extends Activity { @SuppressWarnings("deprecation") @SuppressLint("NewApi") @Override protected void onCreate(Bundle savedInstanceState) { super.onCreate(savedInstanceState); setContentView(R.layout.activity_costs); LinearLayout linearLayout = (LinearLayout)findViewById(R.id.costslist); int sdk = android.os.Build.VERSION.SDK_INT; WorkWithDatabase wwd = new WorkWithDatabase(this); Cursor cursor = wwd.obtaining_costs_for_this_month(); while (cursor.moveToNext()) { int amount = cursor.getInt(cursor.getColumnIndex("amount")); String date = cursor.getString(cursor.getColumnIndex("date")); TextView dateTv = new TextView(this); LinearLayout.LayoutParams llp = new LinearLayout.LayoutParams(LayoutParams.MATCH_PARENT, LayoutParams.MATCH_PARENT); llp.setMargins(0, 1, 0, 1);
लूप में हम सभी मूल्यों से गुजरते हैं और आवश्यक प्राप्त करते हैं। उसी स्थान पर, हम टेक्स्ट व्यू की आवश्यक संख्या बनाते हैं, शैलियों को जोड़ते हैं और आपका काम हो गया।
कार्यक्रम ने ओएस के कुछ संस्करणों द्वारा समर्थित नहीं तरीकों के बारे में शिकायत की। मुझे बैकग्राउंड सेट करने के लिए संस्करण जांच का सहारा लेना पड़ा। मैं आभारी रहूंगा यदि टिप्पणियों में वे सेटबैक ग्राउंड के बारे में सही रास्ता निर्देशित करते हैं।
प्रकाशन और परिणाम।
मुझे प्रकाशन पसंद आया, सब कुछ जल्दी और बिना अनावश्यक परेशानी के हुआ। महान डेवलपर कंसोल, सहज ज्ञान युक्त सेटिंग्स। शाम को पोस्ट किया गया एक आवेदन रात में उपलब्ध था।
आवेदन ही: