Githubが先月公開した新しい
画像表示モードを見たことは間違いありません。 これは、写真の2つのバージョンの違いを示すための非常にきれいな方法です。 この記事では、Rubyと
ChunkyPNGのみを使用して画像を単純に比較する方法を説明します。
最も単純なバージョンでは、差異の検索は、最初の画像の各ピクセルをトラバースし、このピクセルが2番目のピクセルにあるかどうかを確認することになります。 実装は次のようになります。
require 'chunky_png' images = [ ChunkyPNG::Image.from_file('1.png'), ChunkyPNG::Image.from_file('2.png') ] diff = [] images.first.height.times do |y| images.first.row(y).each_with_index do |pixel, x| diff << [x,y] unless pixel == images.last[x,y] end end puts "pixels (total): #{images.first.pixels.length}" puts "pixels changed: #{diff.length}" puts "pixels changed (%): #{(diff.length.to_f / images.first.pixels.length) * 100}%" x, y = diff.map{ |xy| xy[0] }, diff.map{ |xy| xy[1] } images.last.rect(x.min, y.min, x.max, y.max, ChunkyPNG::Color.rgb(0,255,0)) images.last.save('diff.png')
コード: Gist2つの画像を読み込んだ後、最初の画像の各ピクセルを
diffし、2番目の画像にある場合は、それを
diff配列に追加します。 その後、違いがある領域の周りにフレームを描画します。


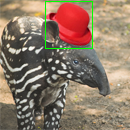
うまくいく! 最終画像では、帽子の周りにフレームがあり、これを写真に追加した結果、写真のピクセルのほぼ9%が値を変更していることがわかります。
pixels (total): 16900
pixels changed: 1502
pixels changed (%): 8.887573964497042%
このアプローチの問題は、変更を
測定せずに
識別することだけです。 違いはありません。ピクセルが少し暗くなっているか、まったく異なる色になっています。 このコードを写真のわずかに暗いバージョンに適用すると、結果は次のようになります。


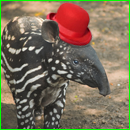
pixels (total): 16900
pixels changed: 16900
pixels changed (%): 100.0%
目にはほとんど同じですが、2つの写真は完全に異なっていることがわかります。 より正確な結果を得るには、ピクセル値の差を測定する必要があります。
色差の計算
色の違いを計算するには、メトリック
ΔE* (「デルタE」)を使用します。 このメトリックには3つの異なる式がありますが、最初の式(
CIE76 )を使用します。これは最も単純であり、複雑なものは必要ないからです。 ΔE*メトリックは、人間の視覚と最も一致する
LABカラースペース用に作成されました。 この例では、色をLABに変換せず、単にRGB色空間で作業します(これは、結果がそれほど正確ではないことに注意してください)。 さまざまな色空間の違いに興味がある場合は、
このデモをご覧ください。
前と同様に、画像内のすべてのピクセルを調べます。 それらが異なる場合、メトリックΔE*を適用し、結果を
diff配列に保存します。 また、この結果を適用して、最終的な比較画像で使用されるグレー値を計算します。
require 'chunky_png' include ChunkyPNG::Color images = [ ChunkyPNG::Image.from_file('1.png'), ChunkyPNG::Image.from_file('2.png') ] output = ChunkyPNG::Image.new(images.first.width, images.last.width, WHITE) diff = [] images.first.height.times do |y| images.first.row(y).each_with_index do |pixel, x| unless pixel == images.last[x,y] score = Math.sqrt( (r(images.last[x,y]) - r(pixel)) ** 2 + (g(images.last[x,y]) - g(pixel)) ** 2 + (b(images.last[x,y]) - b(pixel)) ** 2 ) / Math.sqrt(MAX ** 2 * 3) output[x,y] = grayscale(MAX - (score * MAX).round) diff << score end end end puts "pixels (total): #{images.first.pixels.length}" puts "pixels changed: #{diff.length}" puts "image changed (%): #{(diff.inject {|sum, value| sum + value} / images.first.pixels.length) * 100}%" output.save('diff.png')
コード: Gistこれで、違いをより正確に把握できました。 結果を見ると、写真の3%未満しか変更されていないことがわかります。
pixels (total): 16900
pixels changed: 1502
image changed (%): 2.882157784948056%
繰り返しますが、結果を保存します。今回はすでにグレーの濃淡の違いを示しています。 変化が強いほど、色は濃くなります。


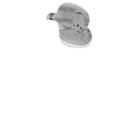
次に、2番目の画像が少し暗くなった2つの画像を試してみましょう。
pixels (total): 16900
pixels changed: 16900
image changed (%): 5.4418255392228945%

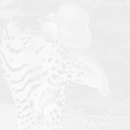
素晴らしい。 これで、プログラムは写真がわずかに異なるだけで、完全に異なるわけではないことがわかりました。 よく見ると、画像が異なる秘密の領域を見ることができます。
githubは何をしますか?
Githubは
、 Photoshopなどのフォトエディターに馴染みの
ある色差モードを使用
します 。 これはかなり簡単な方法です。 2つの画像の各ピクセルを移動し、RGBチャンネルを使用してそれらの差を計算します。
require 'chunky_png' include ChunkyPNG::Color images = [ ChunkyPNG::Image.from_file('1.png'), ChunkyPNG::Image.from_file('2.png') ] images.first.height.times do |y| images.first.row(y).each_with_index do |pixel, x| images.last[x,y] = rgb( r(pixel) + r(images.last[x,y]) - 2 * [r(pixel), r(images.last[x,y])].min, g(pixel) + g(images.last[x,y]) - 2 * [g(pixel), g(images.last[x,y])].min, b(pixel) + b(images.last[x,y]) - 2 * [b(pixel), b(images.last[x,y])].min ) end end images.last.save('diff.png')
コード: Gistこの方法を使用して、左側の2枚の写真を比較すると、右側の画像の違いの写真が得られ、変化が明確に示されます。


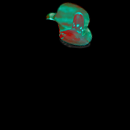
色は単一の色ではなくチャネル(R、G、およびB)で比較されるため、3つの値が返されます。 これは、結果の画像がカラーであることを意味しますが、各チャネルごとに個別にこのような比較を行うと、結果の精度に悪影響を与える可能性があります。