すべてのHabr居住者およびAndroid愛好家へのご挨拶!
私たちの場合の複合とは、「複数で構成される」ことを意味しますが、それはすでに知っています。
だから、
タスクがあります:- テキスト、画像、ボタンなどを含むデータブロックを表示する必要があります。
(私たちの場合、これはテレビでの送信の短い発表になります) - ブロックデザインは特別に雇われたデザイナーによって描かれ、そこからピクセルを取り出すことはできません
- このブロックには何らかの操作の内部ロジックがあり、コンポーネントは相互に影響を与える可能性があります(私たちにとって、「内部ロジック」は転送ヘッダーに「*」記号を設定し、「I will watch」ボタンが押された場合に背景色を変更します)
- このようなブロックは多数存在する可能性があり、それらの情報はアプリケーションのプロセスですでに取得されています
- いつものように、プロセスの中で設計をレビューできます。最初からすべてを書き換えることなく、プログラムをすばやく変更する必要があります。
実際には、それは何でも構いません-テキストフィールドのペアで構成される単純なテーブル行

またはチャート付きの複雑な財務ブロック

まず、私たちのケースに適用される代替オプションとその欠点を検討します。
カスタムコンポーネント
コンポーネントの設計と動作を変更できますが、同じコンポーネント内でのみ変更できますが、定義上、これは私たちには適していません。
例:
public class CustomImage extends ImageView {
ソフトウェアによる動的UI作成
このメソッドを使用すると
、キロバイトのコードを記述して各TextViewを手動で作成し、コンテキストを転送して、配置を記述するためのLayoutParamsを作成し、これをすべて以前に作成したLinearLayout / FrameLayout / RelativeLayoutに入れて、何百回もコードを実行する必要があります設計の一貫性を実現します。
そして、デザイナーがデザインの新しいバージョンを送信するとすぐに、穏やかに言えば、あなたはこれについてあまり満足しません...
コードで複数のフィールドを作成する抽象的な例:
public void generateLayout() { LinearLayout linearLayout = new LinearLayout(getContext()); linearLayout.setOrientation(LinearLayout.VERTICAL); TextView name = new TextView(getContext()); name.setText(getContext().getResources().getText(R.string.channel_name).toString()); name.setTextSize(TypedValue.COMPLEX_UNIT_DIP, 18);
表レイアウト
実際、これは前の段落と同じで、親テーブルのセルのみが配置に使用されます。
この方法では、すべての配置が水平および垂直のみであるため、デザインを微妙にたどることができなくなります。コンポーネントを非標準の位置に移動するには、セルとテーブルセルに埋め込まれたレイアウトの結合に頼る必要があります。
キャンバスドロー
このメソッドの本質は、UIコンポーネントであるキャンバス上に単純に描画することです。
この方法には、ポイント2(設計に応じてすべてのUI要素を手動で調整するのが難しい)の欠点があるだけでなく、別の重要な欠点もあります-標準のEditText、Botton、CheckBox、SeekBarコントロールを使用できないこと手動で記述するか、UIの上にオーバーレイする必要があります。 いずれにせよ、問題を解決するための時間と労力の不十分な支出になります。
public class DrawComponent extends View { public DrawComponent(Context context) { super(context); } @Override protected void onDraw(Canvas canvas) { super.onDraw(canvas);
LayoutInflaterを使用して複合コンポーネントを作成する
最後に、記事の本質に到達しました-与えられたタスクに応じて最適な方法でコンポーネントを作成します。
まず、すでに慣れているように、手動で、またはEclipse ADTプラグインの一部であるビジュアルエディターを使用して、XMLでレイアウト設計をレイアウトします。
UIのすべての主要な要素に固有のIDを必ず指定してください。
レイアウトの場合、RelativeLayoutを使用して、親の内部および相互に相対的なコンポーネントの相対位置を設定できるようにします。 具体的には、この場合、垂直のLinearLayoutで十分ですが、教育目的では簡単な方法を探していません。
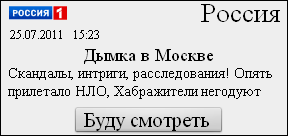
コンポーネントの幅はハードに設定されます(288dip)。これは元の画像のようになりますが、「fill_parent」の実行を妨げるものはありません。
channel_layout.xml: <?xml version="1.0" encoding="utf-8"?> <RelativeLayout xmlns:android="http://schemas.android.com/apk/res/android" android:id="@+id/program_frame" android:layout_width="288dip" android:layout_height="wrap_content" android:padding="5dip"> <ImageView android:id="@+id/channel_logo" android:layout_width="wrap_content" android:layout_height="wrap_content" android:layout_alignParentTop="true" android:layout_alignParentLeft="true" android:src="@drawable/russia"/> <TextView android:id="@+id/program_time" android:layout_width="wrap_content" android:layout_height="wrap_content" android:layout_below="@+id/channel_logo" android:layout_alignLeft="@+id/channel_logo" android:layout_marginTop="5dip" android:singleLine="true" android:textColor="@android:color/black" android:textStyle="normal" android:textSize="12dp" android:text="25.07.2011 15:23"/> <TextView android:id="@+id/channel_name" android:layout_width="wrap_content" android:layout_height="wrap_content" android:layout_alignParentTop="true" android:layout_alignParentRight="true" android:textColor="@android:color/black" android:textStyle="bold" android:textSize="16dp" android:singleLine="true" android:text=""/> <TextView android:id="@+id/program_name" android:layout_width="wrap_content" android:layout_height="wrap_content" android:layout_below="@id/program_time" android:layout_centerHorizontal="true" android:layout_marginTop="5dip" android:textColor="@android:color/black" android:textStyle="bold" android:textSize="15dp" android:singleLine="true" android:text=" "/> <TextView android:id="@+id/program_description" android:layout_width="wrap_content" android:layout_height="wrap_content" android:layout_below="@id/program_name" android:layout_centerHorizontal="true" android:layout_marginTop="5dip" android:textColor="@android:color/black" android:textStyle="normal" android:textSize="12dp" android:lines="3" android:text=", , !"/> <Button android:id="@+id/want_to_watch_button" android:layout_width="wrap_content" android:layout_height="wrap_content" android:layout_below="@id/program_description" android:layout_centerHorizontal="true" android:layout_marginTop="5dip" android:paddingLeft="10dip" android:paddingRight="10dip" android:textColor="@android:color/black" android:textStyle="bold" android:textSize="15dp" android:text=" "/> </RelativeLayout>
テキストのプロパティを設定するには、いくつかのスタイルを作成できますが、わかりやすくするために、私たちが持っているものでうまくいきましょう。 また、strings.xmlにテキストラベルを作成しなかったためにキックしないでください。読みやすさが低下し、記事内の別のファイルを引用する必要があります。
次に、コンポーネントのクラスを作成し、レイアウトで使用したクラス(RelativeLayout)から継承します。
クラスとchannel_layoutレイアウトを接続するために、LayoutInflaterを使用します。
また、クラス内のすべてのフィールドに変数を定義して、クラスのフィールドをUIに接続します。
public class ChannelFrame extends RelativeLayout { private TVProgram parentProgram; private ImageView channel_logo; private TextView channel_name; private TextView program_time; private TextView program_name; private TextView program_description; private Button want_to_watch_button; private String programName = ""; private boolean isWannaWatch = false; public ChannelFrame(Context context) { super(context); initComponent(); } private void initComponent() { LayoutInflater inflater = (LayoutInflater) getContext().getSystemService(Context.LAYOUT_INFLATER_SERVICE); inflater.inflate(R.layout.channel_layout, this); channel_logo = (ImageView) findViewById(R.id.channel_logo); channel_name = (TextView) findViewById(R.id.channel_name); program_time = (TextView) findViewById(R.id.program_time); program_name = (TextView) findViewById(R.id.program_name); program_description = (TextView) findViewById(R.id.program_description); want_to_watch_button = (Button) findViewById(R.id.want_to_watch_button); want_to_watch_button.setOnClickListener(buttonListener); updateFields(); } private void updateFields() { if (isWannaWatch) { program_name.setText(programName + "*"); this.setBackgroundResource(R.drawable.frame_bg_selected); } else { program_name.setText(programName); this.setBackgroundResource(R.drawable.frame_bg); } } public void setChannelName(String name) { channel_name.setText(name); } public void setChannelLogo(int resourceId) { channel_logo.setImageResource(resourceId); } public void setChannelLogo(Bitmap image) { channel_logo.setImageBitmap(image); } public void setProgramTime(String time) { program_time.setText(time); } public void setProgramName(String name) { programName = name; program_name.setText(programName); } public void setProgramDescription(String name) { program_description.setText(name); } private final OnClickListener buttonListener = new OnClickListener() { public void onClick(View view) { isWannaWatch = !isWannaWatch; updateFields(); } }; public TVProgram getParentProgram() { return parentProgram; } public void setParentProgram(TVProgram parentProgram) { this.parentProgram = parentProgram; updateFieldsByParent(); } private void updateFieldsByParent() { setProgramName(parentProgram.getName()); setProgramDescription(parentProgram.getDesc()); setProgramTime(SimpleDateFormat.getInstance().format(parentProgram.getTime())); setChannelLogo(parentProgram.getChannelLogo()); setChannelName(parentProgram.getChannelName()); } }
さて、ここで私がやったこと:まず、すべてのフィールドを初期化し、フィールド値を設定するための便利なメソッドを作成します。たとえば、ロゴの設定には、リソースのIDを示す方法とビットマップを送信する方法の2つの方法があります。
クラスは「TVProgram parentProgram」のラッパーでもあります-これはUIコンポーネントのフィールドを設定する別の方法です-setParentProgramを呼び出して、入力されたプログラムオブジェクトを渡すことにより、親からすべてのUIフィールドの値を自動的に設定します。
コンポーネントは準備ができており、インスタンスを作成し、フィールド値を設定し、フォームに追加します。
public class StartActivity extends Activity { private LinearLayout framesContainer; @Override public void onCreate(Bundle savedInstanceState) { super.onCreate(savedInstanceState); setContentView(R.layout.main); framesContainer = (LinearLayout) findViewById(R.id.frames_container); for (int i = 0; i < 5; i++) { ChannelFrame frame = new ChannelFrame(getApplicationContext()); frame.setProgramName("............."); frame.setProgramDescription("............."); frame.setProgramTime("............."); framesContainer.addView(frame); } } }
そして最後に、得られたもののスクリーンショット:

そして
ソース 。
あなたに成功したプロジェクト!