XNAパーティクルシステムを描画または作成します。 パートI

そして再び、ハブラビテスにこんにちは!

ほんの数日前-XNA Frameworkを使用してクールなゲームを作成する方法に関する一連の記事を開始しました。自分のスタジオは持っていないので、2Dゲームに限定します。

今回は、Drawを詳しく見て、最初のパーティクルシステムを作成します。

この記事で取り上げるトピック:

第二部で私は言う:

いつものように、最初は理論、次にコードはパイです。

SpriteBatch.Begin()メソッド


描画方法については、 以前の記事で説明しました。 これらのメソッドをもう少し詳しく見てみましょう。

spriteBatch.Begin()


spriteBatch.Begin(SpriteSortMode, BlendState, SamplerState, DepthStencilState, RasterizerState, Effect, Matrix); 


これが画面上に何かを描き始める方法です。これが最後のメソッドのオーバーロードです。ここですべてを検討します。

SpriteSortMode-スプライトをソートする方法。 面白くない。

BlendStateに含まれるもの:

添加剤 -「添加剤ブレンド」の設定。 スプライトアルファチャネルを使用して、スプライトを別のスプライトと混合します。


AlphaBlend- 「アルファブレンド」の設定。 スプライトアルファチャネルを使用して、あるスプライトを別のスプライトに重ね合わせます。


NonPremultiplied- 「非多重化アルファなしのブレンド」の設定。アルファ線の描画を使用して、スプライトを別のスプライトに重ね合わせます。


不透明 -「不透明ブレンド」に設定すると、あるスプライトを別のスプライトに「上書き」するように強制します。


SamplerStateに含まれるもの:
AnisotropicClamp-異方性フィルタリングとTextureUVのデフォルト状態を含みます-クランプ
AnisotropicWrap-異方性フィルタリングとTextureUVのデフォルト状態を含む-ラップ
...

大まかに言えば、 クランプ -テクスチャを引き伸ばし、タイルをラップ (繰り返し)します。

テクスチャ55x20を使用し、それを5回ストレッチ(クランプ)します。違いは異方性/線形、ポイント

異方性/線形


ポイント


DepthStencilState-再度並べ替え、必要ありません。
RasterizerState -2Dでは、実際には必要ありません。
効果 -描画されたオブジェクトを処理するシェーダー(効果)。
マトリックス -オブジェクト変換マトリックス(たとえば、2Dカメラを実装できます)

BeginとEndの間に含まれるメソッドを検討してください。

SpriteBatch.Draw()メソッド


 spriteBatch.Draw(Texture2D texture, Vector2D position, Rectangle sourceDest, Color color, float angle, Vector2D origin, Vector2D scale, SpriteEffects effects, float layerDepth); 


texture-描画するテクスチャ自体。

position-画面上の位置(変換マトリックスがある場合は世界、つまり「カメラ」)。

sourceDest-テクスチャの長方形(テクスチャのどの部分を描画するか、すべての場合は新しいRectangle(0、0、width_texture、height_texture)

color-オブジェクトの色。

angle-回転角。

origin-テクスチャのいわゆるオフセットまたは「重心」。 つまり、テクスチャの中心をNxMピクセルだけシフトします。

スケール -XおよびYのテクスチャサイズ

効果 -テクスチャを表示するさまざまな効果。たとえば、鏡像を描くことができます。

layerDepth-レイヤーの深さ。

描画を担当する主な機能のパラメータ-把握。
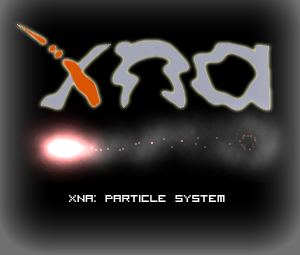
パーティクルシステム


粒子の単純なシステムを書きましょう。この場合、それはトレイル(トレイル、トレイン、テール)であり、マウスの動きから残ります。

次はコードです。

新しいParticleクラスを作成します。これは単一のパーティクル(smoke、spark、 money )になり、コメント付きでリストされます。

 using System; using System.Collections.Generic; using System.Linq; using Microsoft.Xna.Framework; using Microsoft.Xna.Framework.Audio; using Microsoft.Xna.Framework.Content; using Microsoft.Xna.Framework.GamerServices; using Microsoft.Xna.Framework.Graphics; using Microsoft.Xna.Framework.Input; using Microsoft.Xna.Framework.Media; using System.Diagnostics; namespace ParticleSystem { public class Particle { public Texture2D Texture { get; set; } //    public Vector2 Position { get; set; } //   public Vector2 Velocity { get; set; } //   public float Angle { get; set; } //    public float AngularVelocity { get; set; } //   public Vector4 Color { get; set; } //   public float Size { get; set; } //  public float SizeVel { get; set; } //    public float AlphaVel { get; set; } //    public int TTL { get; set; } //    public Particle(Texture2D texture, Vector2 position, Vector2 velocity, float angle, float angularVelocity, Vector4 color, float size, int ttl, float sizeVel, float alphaVel) //  { Texture = texture; Position = position; Velocity = velocity; Angle = angle; Color = color; AngularVelocity = angularVelocity; Size = size; SizeVel = sizeVel; AlphaVel = alphaVel; TTL = ttl; } public void Update() //   { TTL--; //    //       Position += Velocity; Angle += AngularVelocity; Size += SizeVel; Color = new Vector4(Color.X, Color.Y, Color.Z, Color.W - AlphaVel); //  . ,    Vector4,    Color,  : Color.R/G/B   Byte ( 0x00  0xFF),     ,  float  Vector4 } public void Draw(SpriteBatch spriteBatch) { Rectangle sourceRectangle = new Rectangle(0, 0, Texture.Width, Texture.Height); //   :  Vector2 origin = new Vector2(Texture.Width / 2, Texture.Height / 2); //  spriteBatch.Draw(Texture, Position, sourceRectangle, new Color(Color), Angle, origin, Size, SpriteEffects.None, 0); //   } } } 


次に、ゲーム内のすべてのパーティクルを管理するクラスを作成する必要があります。これをParticleControllerというコメント付きのリストと呼びましょう。

 using System; using System.Collections.Generic; using System.Linq; using Microsoft.Xna.Framework; using Microsoft.Xna.Framework.Audio; using Microsoft.Xna.Framework.Content; using Microsoft.Xna.Framework.GamerServices; using Microsoft.Xna.Framework.Graphics; using Microsoft.Xna.Framework.Input; using Microsoft.Xna.Framework.Media; using System.Diagnostics; namespace ParticleSystem { class ParticleController { public List<Particle> particles; private Texture2D dot; //   private Texture2D smoke; //   private Random random; public ParticleController() { this.particles = new List<Particle>(); random = new Random(); } public void LoadContent(ContentManager Manager) { dot = Manager.Load<Texture2D>("spark"); smoke = Manager.Load<Texture2D>("smoke"); } public void EngineRocket(Vector2 position) // ,     { for (int a = 0; a < 2; a++) //  2     { Vector2 velocity = AngleToV2((float)(Math.PI * 2d * random.NextDouble()), 0.6f); float angle = 0; float angleVel = 0; Vector4 color = new Vector4(1f, 1f, 1f, 1f); float size = 1f; int ttl = 40; float sizeVel = 0; float alphaVel = 0; GenerateNewParticle(smoke, position, velocity, angle, angleVel, color, size, ttl, sizeVel, alphaVel); } for (int a = 0; a < 1; a++) //  1    { Vector2 velocity = AngleToV2((float)(Math.PI * 2d * random.NextDouble()), .2f); float angle = 0; float angleVel = 0; Vector4 color = new Vector4(1.0f, 0.5f, 0.5f, 0.5f); float size = 1f; int ttl = 80; float sizeVel = 0; float alphaVel = .01f; GenerateNewParticle(dot, position, velocity, angle, angleVel, color, size, ttl, sizeVel, alphaVel); } for (int a = 0; a < 10; a++) //  10 ,    —     { Vector2 velocity = Vector2.Zero; float angle = 0; float angleVel = 0; Vector4 color = new Vector4(1.0f, 0.5f, 0.5f, 1f); float size = 0.1f + 1.8f * (float)random.NextDouble(); int ttl = 10; float sizeVel = -.05f; float alphaVel = .01f; GenerateNewParticle(smoke, position, velocity, angle, angleVel, color, size, ttl, sizeVel, alphaVel); } } private Particle GenerateNewParticle(Texture2D texture, Vector2 position, Vector2 velocity, float angle, float angularVelocity, Vector4 color, float size, int ttl, float sizeVel, float alphaVel) //    { Particle particle = new Particle(texture, position, velocity, angle, angularVelocity, color, size, ttl, sizeVel, alphaVel); particles.Add(particle); return particle; } public void Update(GameTime gameTime) { for (int particle = 0; particle < particles.Count; particle++) { particles[particle].Update(); if (particles[particle].Size <= 0 || particles[particle].TTL <= 0) //         ,   { particles.RemoveAt(particle); particle--; } } } public void Draw(SpriteBatch spriteBatch) { spriteBatch.Begin(SpriteSortMode.Deferred, BlendState.Additive); //    Addictive for (int index = 0; index < particles.Count; index++) //    { particles[index].Draw(spriteBatch); } spriteBatch.End(); } public Vector2 AngleToV2(float angle, float length) { Vector2 direction = Vector2.Zero; direction.X = (float)Math.Cos(angle) * length; direction.Y = -(float)Math.Sin(angle) * length; return direction; } } } 


メインクラスでは、適切な場所にLoadContent、Update、Drawを記述し、同時に各更新に対してパーティクルの生成を追加します。

 particleController.EngineRocket(new Vector2(Mouse.GetState().X, Mouse.GetState().Y)); 


開始し、マウスを動かして、感心します:


ご存知のように、このようなシステムはさらに美しくすることができます。シェーダーを追加します。 しかし、記事の量は十分なままにしておきましょう。 記事の第2部では、独自の目的でシェーダーを使用する方法を説明します。

ソースコードデモを適用します。

次回まで;)

UPD:記事の2番目の部分。

Source: https://habr.com/ru/post/J128286/


All Articles