Facebook Timelineは、ソーシャルネットワークの世界に大きな革命をもたらし、ユーザープロファイルに新しい外観を与えます。 今日は、jQueryとCSSを使用してこのプロジェクトを実装するのがいかに簡単かを見てみましょう。

ステップ1-HTMLレイアウト
最初に
id = "container"の DIV要素を作成します。 その中で、
id = "item"でさらにDIV要素を作成します
<div id="container"> <div class="item">1</div> <div class="item">2</div> <div class="item">3</div> <div class="item">4</div> </div>

少しシンプルなCSS:
#container{ width:860px; margin: 0 auto; } .item { width: 408px; margin: 20px 10px 10px 10px; float: left; background-color:#ffffff; border:solid 1px #B4BBCD; min-height:50px; text-align:justify; word-wrap:break-word; }
ステップ2-空き領域を避ける
jQuery Masonryプラグインを使用して、空き領域の使用を構成します。
<script type="text/javascript" src="http://ajax.googleapis.com/ajax/libs/jquery/1.5/jquery.min.js"></script> <script type="text/javascript" src="jquery.masonry.min.js"/> <script type="text/javascript" > $(function() { </script>
プラグインを適用した後。

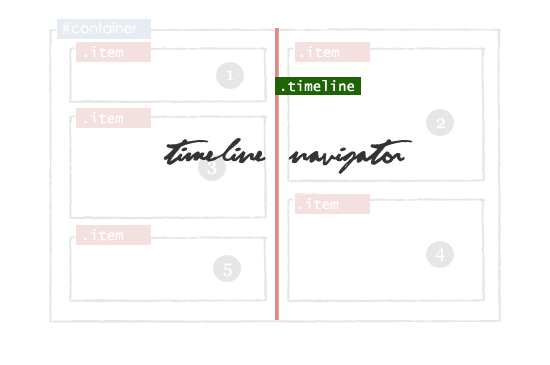
ステップ3-タイムラインナビゲーション
次に、
コンテナブロックにdiv要素-timeline_containerを作成します。 このブロックには、ID
タイムラインと
plusを持つ2つのディーバが含まれます。
<div id="container"> // Timeline <div class="timeline_container"> <div class="timeline"> <div class="plus"></div> </div> </div> <div class="item">1</div> -------- -------- </div>
作成されたブロックには、JavaScriptとCSSを追加します。
$('.timeline_container').mousemove(function(e) {
.timeline_container{ width: 16px; text-align: center; margin: 0 auto; cursor:pointer; display: block; } .timeline{ margin: 0 auto; background-color:#e08989; display: block; float: left; height: 100%; left: 428px; margin-top: 10px; position: absolute; width: 4px; } .timeline:hover{ cursor: pointer; margin: 0 auto; } .timeline div.plus{ width: 14px; height: 14px; position: relative; left: -6px; }
ステップ4-矢印を表示する
これは最も興味深い部分である
$( ' #container
')。Find( ' 。Item
') -position = 0pxの場合は矢印が必要なブロックを検索し、それから
rightCorner 、そうでない場合は
leftCornet 。
function Arrow_Points() { var s = $('#container').find('.item'); $.each(s,function(i,obj){ var posLeft = $(obj).css("left"); $(obj).addClass('borderclass'); if(posLeft == "0px") { html = "<span class='rightCorner'></span>"; $(obj).prepend(html); } else { html = "<span class='leftCorner'></span>"; $(obj).prepend(html); } }); }

次に、CSSを追加してスタイルを設定します。
.rightCorner { background-image: url("images/right.png"); display: block; height: 15px; margin-left: 408px; margin-top: 8px; padding: 0; vertical-align: top; width: 13px; z-index:2; position: absolute; } .leftCorner{ background-image: url("images/left.png"); display: block; height: 15px; width: 13px; margin-left: -13px; margin-top: 8px; position: absolute; z-index:2; }
ステップ5-ブロックの削除
各
アイテムブロックで、クラスにタグを追加し
ます -deletebox <div id="container"> <div class="item"> <a href='#' class='deletebox'>X</a> 1 </div> <div class="item"> <a href='#' class='deletebox'>X</a> 2 </div> ----------- ----------- ----------- </div>
JavaScriptを使用して要素の削除をアニメーション化します。
$(".deletebox").live('click',function() { if(confirm("Are your sure?")) { $(this).parent().fadeOut('slow');
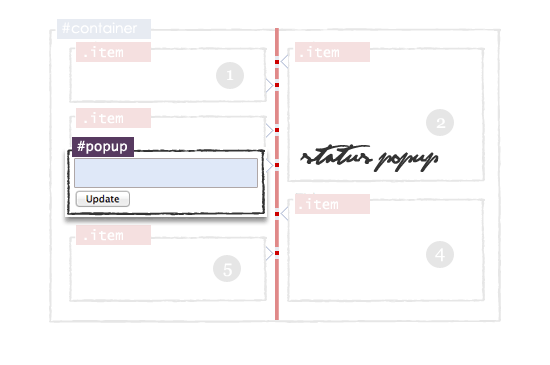
ステップ6-イベントを追加する
DIVコンテナ内に
id = "popup"の要素を作成します。 このレイヤーには、
id = "update "のtextareaテキストフィールドと
id = "update_button"の 入力が含まれます。
<div id="container"> <div class="item">1</div> -------- -------- <div id="popup" class='shade'> <div class="Popup_rightCorner" > </div> What's Up? <textarea id='update'></textarea> <input type='submit' value=' Update ' id='update_button'/> </div> </div>
私たちは復活します:
#popup{ display: block;width: 408px; float: left;margin-top:10px; background-color:#ffffff; border:solid 1px #A9B6D2; min-height:60px;display:none; position:absolute;margin:10px; }
ダウンロードするデモ