プロジェクトに特定の要素が1つ必要でした。丸いフォントのボタンです。 これはそうだと思われる-グーグルはこれを予測しなければならなかった。 しかし、結局のところ、これを標準的な方法で行うことはできず、ボタンフードを掘り下げる必要があります。 フォントの影から検索を開始しました。
しかし、このようにストロークフォントを作成しようとすると失敗します-
まず、shadowRadiusで数字を指定するほど、文字の周りの線がぼやけます。
第二に、線の幅を変更することはできません。
少し考えて、必要なことをすべて実行するクラスを実装しました。 興味のある人-猫をお願いします。
私はどこでも解決策を探しましたが見つけることができなかったので、自分の解決策を示すことにしました。 要件は、XMLからフォントの色とストロークの幅を設定できることでした。 次に、コードに移動します。
まず、ファイルres / values / attrs.xmlで、ButtonStrokeTextボタンが取るパラメーターを記述します(これを呼び出しましょう)。
<?xml version = "1.0" encoding = "utf-8" ?>
<リソース>
<declare-styleable name = "ButtonStrokeText" >
<attr name = "textStrokeColor" format = "color" />
<attr name = "textStrokeWidth" format = "dimension" />
</ declare-styleable >
</リソース>
テキスト形式のtextStrokeColorストロークカラー(および通常のボタンのテキストカラー)を受け入れ、寸法(sp、dpなど)のストローク幅を作成します。 Googleがテキストサイズにspを使用することを推奨していることを思い出させてください。
したがって、XMLのパラメーターについて説明しましたので、ButtonStrokeTextクラス自体に進みましょう。 この名前でクラスを作成し、Buttonから継承します。 いくつかのコンストラクタと1つのonDrawメソッドを書き直します。 コード自体は次のとおりです。
import android.content.Context ;
import android.content.res.TypedArray ;
import android.graphics.Canvas ;
import android.graphics.Color ;
import android.graphics.Paint.Join ;
import android.graphics.Paint.Style ;
import android.text.TextPaint ;
import android.util.AttributeSet ;
import android.widget.Button ;
パブリック クラス ButtonStrokeText は Buttonを 拡張します
{
private int strokeColor = Color 。 透明 ;
private int strokeWidth = 2 ;
public ButtonStrokeText ( コンテキストコンテキスト)
{
スーパー (コンテキスト) ;
}
public ButtonStrokeText ( コンテキストコンテキスト、 AttributeSet attrs )
{
super (コンテキスト、attrs ) ;
TypedArray a =コンテキスト。 acquireStyledAttributes ( attrs、R. styleable。ButtonStrokeText ) ;
strokeColor = a。 getColor ( R。styleable。ButtonStrokeText_textStrokeColor 、strokeColor ) ;
strokeWidth = a。 getDimensionPixelSize ( R。styleable。ButtonStrokeText_textStrokeWidth 、strokeWidth ) ;
a。 リサイクル ( ) ;
}
上書きする
public void onDraw ( Canvas canvas )
{
最終的な ColorStateList textColor = getTextColors ( ) ;
TextPaint paint = this 。 getPaint ( ) ;
ペイント。 setStyle ( Style。STROKE ) ;
ペイント。 setStrokeJoin ( Join。ROUND ) ;
ペイント。 setStrokeMiter ( 10 ) ;
これ 。 setTextColor ( strokeColor ) ;
ペイント。 setStrokeWidth ( strokeWidth ) ;
スーパー 。 onDraw (キャンバス) ;
ペイント。 setStyle ( スタイル .FILL ) ;
setTextColor ( textColor ) ;
スーパー 。 onDraw (キャンバス) ;
}
}
コードは非常に単純です-ButtonStrokeTextコンストラクター(コンテキストコンテキスト、AttributeSet attrs)では、パラメーターを処理して保存します。 getColorメソッドとgetDimensionPixelSizeメソッドの最後のパラメーターは、XMLで指定しないか、指定しない場合のデフォルトのタイプを意味します。
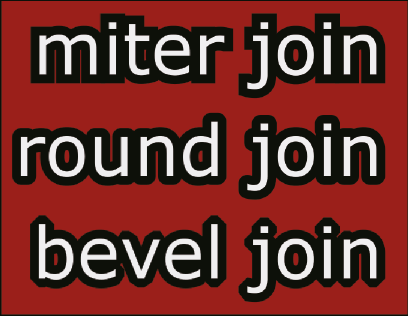
最も興味深いのは、レンダリングを担当するメソッドで起こります。 その中で、ストロークを描画し、最後の行で親メソッドを呼び出します。 また、setStrokeJoinがストロークのタイプに影響することにも言及しているため、丸めを選択しました。 この図は、パラメータに応じてストロークオプションを示しています(ストロークのエッジとコーナーを注意深く見てください)。 写真のすべてのオプションを見ることができます。
実際、それがすべてです。 これで、このクラスをXMLで使用できます。 以下の使用例。
- <com.unlim.components.ButtonStrokeText android:text = "@ string / menu_quit"
- android:textColor = "android:color / white"
- app:textStrokeWidth = "5sp" app:textStrokeColor = "android:color / black"
- android:textSize = "20sp" android:layout_width = "220dip"
- android:layout_height = "40dip" android:layout_gravity = "center_horizontal" />
まあ、そしていつものように、石を投げることは大きくない-彼は初めて書いた。 理解を期待して。