InteractionRequestクラスを使用してユーザーインタラクションリクエストを処理する方法については、Prismマニュアルで簡単に言及できます。 そこで議論されたことを思い出させてください。
インタラクションリクエストオブジェクトの使用
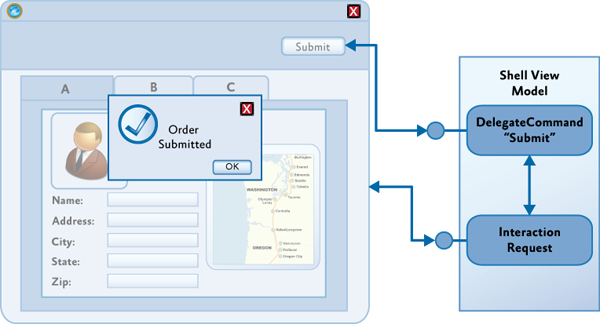
MVVMテンプレートを使用する場合のユーザーインタラクションの1つのアプローチは、ビューモデルがインタラクションリクエストをビューに直接送信できるようにすることです。 これは、ビュー内の動作に関連付けられた対話要求オブジェクトを使用して実行できます。 要求オブジェクトには、対話要求の詳細と、ダイアログが閉じるときに呼び出されるコールバックデリゲートが含まれます。 また、このオブジェクトには、相互作用の開始を報告するイベントが含まれています。 ビューはこのイベントをサブスクライブして、ユーザーとの対話を開始するコマンドを受け取ります。 ビューには通常、特定のインタラクションの外観と、ビューモデルによって提供されるリクエストオブジェクトに関連付けられた動作が含まれます。
データアプローチは、プレゼンテーションモデルとプレゼンテーションの間の責任の分離を維持する、シンプルでありながらかなり柔軟なメカニズムを提供します。 これにより、ビューモデルには対話ロジックをカプセル化できますが、ビューには視覚的な側面のみが含まれます。 プレゼンテーションモデルにあるインタラクションロジックは簡単にテストでき、ユーザーインターフェイスデザイナーはインタラクションの外観に完全に集中できます。
対話要求のアプローチは、汎用MVVMと一貫しており、ビューがビューモデルの状態の変化を表示できるようにします。 また、双方向のデータバインディングを使用して、ユーザーからプレゼンテーションモデルへ、またはその逆へのデータ転送を実現できます。 これはすべて、
DelegateCommandオブジェクトと
InvokeCommandBehavior動作に非常に似ています。
Prismライブラリは、
IInteractionRequestインターフェイスと
InteractionRequest<T>クラスを使用して、このテンプレートを直接サポートします。
IInteractionRequestインターフェイスは、相互作用イベントの開始を定義します。 ビューの動作はこのインターフェイスに関連付けられ、このイベントにサブスクライブします。
InteractionRequest<T>クラスは、
IInteractionRequestインターフェイスを実装し、必要に応じて、コールバックデリゲートだけでなく、相互作用を開始して要求コンテキストを設定するための2つの
Raiseメソッドを定義します。
ビューモデルからの相互作用の開始
InteractionRequest<T>クラスは、相互作用要求中にビューモデルとビューとの相互作用を調整します。
Raiseメソッドを使用すると、ビューモデルで対話を開始し、コンテキストオブジェクト(
Tなど)と、対話の終了時に呼び出されるコールバックデリゲートを定義できます。 コンテキストオブジェクトを使用すると、ユーザーとの対話中に使用するために、ビューモデルがデータと状態をビューに転送できます。 コールバックデリゲートが定義されている場合、コンテキストオブジェクトは呼び出し中にビューモデルに返されます。 これにより、インタラクション中に発生した変更を転送できます。
public interface IInteractionRequest { event EventHandler<InteractionRequestedEventArgs> Raised; } public class InteractionRequest<T> : IInteractionRequest { public event EventHandler<InteractionRequestedEventArgs> Raised; public void Raise(T context, Action<T> callback) { var handler = this.Raised; if (handler != null) { handler( this, new InteractionRequestedEventArgs( context, () => callback(context))); } } }
Prismは、一般的な対話シナリオをサポートする事前定義されたコンテキストクラスを提供します。
Notificationクラスは、すべてのコンテキストオブジェクトの基本クラスです。 インタラクションリクエストがアプリケーションで発生したイベントについてユーザーに通知する必要がある場合に使用されます。
Titleと
Content 2つのプロパティを提供します。 通常、このメッセージは一方向です。つまり、ユーザーは対話中にコンテキスト値を変更しないと想定されます。
Confirmationクラスは
Notificationクラスを継承し、ユーザーが操作を承認したかキャンセルしたかを判断するために使用される3番目のプロパティ
Confirmedを追加します。
Confirmationクラスは、ユーザーからyes / noの回答を取得する必要がある
MessageBoxスタイルの対話を実装するために使用されます。
Notificationクラスから継承した独自のコンテキストクラスを定義して、相互作用に必要なデータと状態を保存できます。
InteractionRequest<T>クラスを使用するには、ビューモデルでこのクラスのインスタンスを作成し、読み取り専用プロパティを設定して、ビューがこのプロパティへのバインディングを作成できるようにする必要があります。
public IInteractionRequest ConfirmCancelInteractionRequest { get { return this.confirmCancelInteractionRequest; } } this.confirmCancelInteractionRequest.Raise( new Confirmation("Are you sure you wish to cancel?"), confirmation => { if (confirmation.Confirmed) { this.NavigateToQuestionnaireList(); } }); }
動作を使用して相互作用の視覚的外観を定義する
インタラクションリクエストオブジェクトはインタラクションロジックのみを定義するため、他のすべてをビューで指定する必要があります。 このために、ビヘイビアーがよく使用されます。これにより、デザイナーは必要なビヘイビアーを選択し、プレゼンテーションモデルのインタラクションリクエストオブジェクトに関連付けることができます。
ビューは、相互作用の開始のイベントに応答し、適切な外観を提供する必要があります。 Microsoft Expression Blend Behaviors Frameworkは、トリガーとアクションの概念をサポートしています。 トリガーは、イベントが発生するたびにアクションを開始するために使用されます。
Expression Blendが提供する標準の
EventTriggerは、ビューモデルで定義されたインタラクションリクエストオブジェクトにバインドすることにより、インタラクションの開始時にイベントを追跡するために使用できます。 ただし、Prismライブラリには、
InteractionRequestTriggerと呼ばれる独自の
EventTriggerが含まれており、
IInteractionRequestインターフェイスの適切な
Raisedイベントに自動的に接続します。
イベントが発生すると、
InteractionRequestTriggerはそれに指定されたアクションを開始します。 Silverlightの場合、Prismライブラリは、ユーザーにポップアップを表示する
PopupChildWindowActionクラスを提供します。 子ウィンドウが表示された後、その
DataContext要求オブジェクトで指定されたコンテキストパラメーターに設定されます。
ContentTemplateプロパティを使用して、転送されたコンテキストの表示に使用されるデータテンプレートを定義できます。 ポップアップウィンドウのタイトルは、コンテキストオブジェクトの
Titleプロパティに関連付けられています。
次の例は、
InteractionRequestTriggerと
PopupChildWindowActionを使用して、ユーザーから確認を受け取るポップアップウィンドウを表示する方法を示しています。
<i:Interaction.Triggers> <prism:InteractionRequestTrigger SourceObject="{Binding ConfirmCancelInteractionRequest}"> <prism:PopupChildWindowAction ContentTemplate="{StaticResource ConfirmWindowTemplate}"/> </prism:InteractionRequestTrigger> </i:Interaction.Triggers> <UserControl.Resources> <DataTemplate x:Key="ConfirmWindowTemplate"> <Grid MinWidth="250" MinHeight="100"> <TextBlock TextWrapping="Wrap" Grid.Row="0" Text="{Binding}"/> </Grid> </DataTemplate> </UserControl.Resources>
ユーザーがポップアップを操作すると、コンテキストオブジェクトの
Contentプロパティの内容を表示するために使用されるポップアップまたはデータテンプレートで定義されたバインディングに従って、コンテキストオブジェクトが更新されます。 ポップアップウィンドウが閉じた後、コンテキストオブジェクトはコールバックメソッドを介してビューモデルに転送され、ユーザーが変更したすべてのデータが保存されます。 この例では、ユーザーが[
OKクリックすると、
Confirmedプロパティが
true設定され
true 。
他の相互作用メカニズムをサポートするために、他のトリガーとアクションを定義できます。
InteractionRequestTriggerおよび
PopupChildWindowActionクラスの実装は、トリガーおよびアクションを記述するためのベースとして使用できます。
カスタムポップアップ実装を作成する
デフォルトでは、Prismライブラリは、WPFにポップアップなどを表示するアクションクラスを提供しません。 この省略をさらに修正しようとします。
子ウィンドウとしてのシンプルな実装
最初に、ビューモデルを使用してメインウィンドウの空白を作成します。
<Window xmlns="http://schemas.microsoft.com/winfx/2006/xaml/presentation" xmlns:x="http://schemas.microsoft.com/winfx/2006/xaml" xmlns:i="http://schemas.microsoft.com/expression/2010/interactivity" xmlns:localInter="clr-namespace:PrismNotifications.Notifications" xmlns:inter="clr-namespace:Microsoft.Practices.Prism.Interactivity.InteractionRequest;assembly=Microsoft.Practices.Prism.Interactivity" xmlns:local="clr-namespace:PrismNotifications" x:Class="PrismNotifications.MainWindow" Title="MainWindow" Height="350" Width="525"> <Window.DataContext> <local:MainWindowsViewModel /> </Window.DataContext> <Grid> <Grid.RowDefinitions> <RowDefinition /> <RowDefinition Height="Auto" /> </Grid.RowDefinitions> <i:Interaction.Triggers> <inter:InteractionRequestTrigger SourceObject="{Binding ShowNotificationInteractionRequest}"> <localInter:ShowChildWindowsAction> <DataTemplate DataType="{x:Type inter:Notification}"> <Grid Width="200" Height="150"> <TextBlock Text="{Binding Content}" /> </Grid> </DataTemplate> </localInter:ShowChildWindowsAction> </inter:InteractionRequestTrigger> </i:Interaction.Triggers> <StackPanel HorizontalAlignment="Right" Margin="10" Grid.Row="1"> <Button Command="{Binding ShowNotificationCommand}"> Show notificaiton windows </Button> </StackPanel> </Grid> </Window>
ビューモデルはXAMLで直接作成されます。 対話要求のあるプロパティと、この要求を開始するコマンドのプロパティが含まれています。
using Microsoft.Practices.Prism.Commands; using Microsoft.Practices.Prism.Interactivity.InteractionRequest; using Microsoft.Practices.Prism.ViewModel; namespace PrismNotifications {
ご覧のとおり、ボタンがクリックされると、指定されたプロパティ
Titleおよび
Contentして、
Notificationクラスのインスタンスが渡される
Raiseメソッドが呼び出されます。 インタラクションリクエストである
ShowNotificationInteractionRequestプロパティに関連付けられた
InteractionRequestTriggerトリガーは、
Grid要素にあります。 トリガーの内部には
ShowChildWindowsActionアクションがあり、データテンプレートが指定されています。
using System.Windows; using System.Windows.Interactivity; using System.Windows.Markup; using Microsoft.Practices.Prism.Interactivity.InteractionRequest; namespace PrismNotifications.Notifications {
このクラスは、
TriggerAction<T>クラスを継承します
Tは、トリガーがアタッチされるオブジェクトのタイプです。
ContentPropertyAttribute属性を使用して、
ContentDataTemplateプロパティがコンテンツプロパティになること
ContentPropertyAttribute示します。 対話要求が発生すると、
Invokeメソッドが呼び出され、コンテキストとコールバックデリゲートを含む
InteractionRequestedEventArgs型のパラメーターが渡されます。 このメソッドが呼び出されたときに、
args.Context.Titleプロパティで定義されたヘッダーと
args.Context.Titleプロパティで指定されたコンテンツを
args.Context.Titleウィンドウが表示されるようにします。 また、ウィンドウを閉じるときにコールバックメソッド(指定されている場合)を呼び出すことを忘れないでください。
protected override void Invoke(object parameter) { var args = (InteractionRequestedEventArgs) parameter;
その結果、次のポップアップウィンドウが表示されます。

Popupクラスを使用します。
WPFプリミティブライブラリには、コンテンツを含むポップアップである素晴らしい
Popupクラスがあります。 次のように動作します。アクションをアタッチすると、ポップアップが作成され、閉じた状態のプライベートフィールドに保存されます。 このポップアップは、メインウィンドウのルート要素に追加する必要があります。 これを行うには、
Panelから派生したクラスがルート要素であるかどうかを確認し、そうであれば、その子のコレクションにポップアップを追加します。 そうでない場合は、新しい
Gridを作成してルート要素を置き換え、既存の要素を要素のコレクションに追加します。 ポップアップを開くと、ウィンドウのコンテンツがブロックされ、閉じるとロックが解除され、コールバックデリゲートが呼び出されます。 ウィンドウを移動する場合、ポップアップはデフォルトでは移動しません。そのため、手動で強制的に位置を更新する必要があります。 ポップアップを作成するとき、そのプロパティ
PopupAnimation = PopupAnimation.Fadeおよび
AllowsTransparency = trueを設定して、滑らかな外観と消失を実現できます。
using System; using System.Windows; using System.Windows.Controls; using System.Windows.Controls.Primitives; using System.Windows.Interactivity; using System.Windows.Markup; using Microsoft.Practices.Prism.Interactivity.InteractionRequest; namespace PrismNotifications.Notifications {
MainWindowsで、アクション宣言を変更します。
<i:Interaction.Triggers> <inter:InteractionRequestTrigger SourceObject="{Binding ShowNotificationInteractionRequest}"> <localInter:ShowPopupAction ContentDataTemplate="{StaticResource popupTemplate}" /> </inter:InteractionRequestTrigger> </i:Interaction.Triggers>
これで、メッセージテンプレートがリソースから取得されます。 メインウィンドウのリソースウィンドウが初期化される前にアクションが添付されるため、テンプレート宣言は
App.xamlに配置する必要があります。
<Application xmlns="http://schemas.microsoft.com/winfx/2006/xaml/presentation" xmlns:x="http://schemas.microsoft.com/winfx/2006/xaml" xmlns:localInter="clr-namespace:Microsoft.Practices.Prism.Interactivity.InteractionRequest;assembly=Microsoft.Practices.Prism.Interactivity" xmlns:i="http://schemas.microsoft.com/expression/2010/interactivity" xmlns:ei="http://schemas.microsoft.com/expression/2010/interactions" x:Class="PrismNotifications.App" StartupUri="MainWindow.xaml"> <Application.Resources> <DataTemplate DataType="{x:Type localInter:Notification}" x:Key="popupTemplate"> <Border Width="200" Height="150" Background="{StaticResource {x:Static SystemColors.WindowBrushKey}}" BorderBrush="{StaticResource {x:Static SystemColors.WindowFrameBrushKey}}" BorderThickness="1" CornerRadius="2" Padding="5"> <Grid> <Grid.RowDefinitions> <RowDefinition Height="Auto" /> <RowDefinition Height="*" /> <RowDefinition Height="Auto" /> </Grid.RowDefinitions> <TextBlock Text="{Binding Content}" HorizontalAlignment="Center" VerticalAlignment="Center" Grid.Row="1" /> <Button Content="Close" HorizontalAlignment="Right" Grid.Row="2"> <i:Interaction.Triggers> <i:EventTrigger EventName="Click"> <ei:ChangePropertyAction TargetObject="{Binding RelativeSource={RelativeSource Mode=FindAncestor, AncestorType=Popup}}" PropertyName="IsOpen" Value="False" /> </i:EventTrigger> </i:Interaction.Triggers> </Button> <TextBlock HorizontalAlignment="Center" Text="{Binding Title}" /> </Grid> </Border> </DataTemplate> </Application.Resources> </Application>
メッセージを閉じるには、要素ツリーで
Popupを見つけ、その
IsOpenプロパティを
false変更する必要があり
false 。 これは、Expression Frameworkのトリガーとアクションを使用して実行できます。 その結果、次の形式のポップアップウィンドウが表示されます。

このような簡単な方法で、プレゼンテーションとプレゼンテーションモデルの責任を完全に分離して、ユーザーとの対話を整理できます。
プロジェクトとともにアーカイブします。ブログの投稿へのリンク。