
誰もが
ツールチップとは何かを知って
います。 誰かがそれらを非常に有用であると思う一方で、誰かがそれらをバイパスします。 運命は私を最初のカテゴリーに分類することにしました。
Twitter Bootstrapで使用されている
Tipsy Tooltipは 、私自身のバージョンのヒントを開発するように促しました。 最初はそれを使用しましたが、すべてのプラグイン機能は必要としませんでした。完璧主義者であるため、余分なコードは性質を混乱させました。 決定:必要なものを書きますが、これ以上は書きません。 レシピを書いて、あえてコミュニティと共有してください。 たぶん誰かがそれを好きになるでしょう...
調理前にお読みください
私はその考えが新しいものではなく、同様の実装が存在する可能性が最も高いことに注意します。 したがって、既にいくつかのツールチップを食べたが、それを望まない場合は、このレシピを読むことを拒否してください。これは単なるレッスンであり、その主な教訓は次のとおりです。
生地を準備する-HTMLを用意する
生地を準備することが多く、歯でレシピを知っています。この段階で、通常の操作を実行します。リンクを使用してHTMLマークアップを作成します。
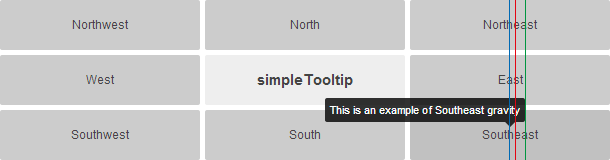
<section> <div> <a href="#" data-tooltip="nw" title="This is an example of Northwest gravity">Northwest</a> </div> <div> <a href="#" data-tooltip="north" title="This is an North gravity">North</a> </div> <div> <a href="#" data-tooltip="ne" title="This is an example of Northeast gravity">Northeast</a> </div> <div> <a href="#" data-tooltip="west" title="This is an example of West gravity">West</a> </div> <div> <h3>simpleTooltip</h3> </div> <div> <a href="#" data-tooltip="east" title="This is an example of East gravity">East</a> </div> <div> <a href="#" data-tooltip="sw" title="This is an example of Southwest gravity">Southwest</a> </div> <div> <a href="#" data-tooltip="south" title="This is an example of South gravity">South</a> </div> <div> <a href="#" data-tooltip="se" title="This is an example of Southeast gravity">Southeast</a> </div> </section>
ヒントが必要な要素には、2つの属性を割り当てる必要があります。
- data-tooltip-ツール本体のオフセット。
- nw-北西
- 北-北
- ne-北東
- 西-西
- 東-東
- sw-南西
- 南-南
- se-南東
- タイトル -テキスト。
したがって、将来の料理に備えて8つの基本が用意されています。 私たちはそれぞれ独自の方法で味付けを行い、今が詰め物の準備を始める時です。
スタッフィング:CSSを使い果たしたかどうかを確認する
詰め物はおいしいものでなければなりません。したがって、不純物や有害物質は一切使用しません。 のみと呼ばれることもありますが、自然な製品は純粋なCSSです。 疑似要素
:beforeおよび
:after 、開始行と終了行の修飾子(
^ 、
$ )および
CSS attr()関数を持つ属性セレクターが必要です。 材料が揃っていることを確認したら、調理を開始できます。
におい
悪臭を放つツールチップを食べたくないですか? 私たちは絶対にそれを望んでいないので、すぐに自分に言います。魔法の数字はありません-合理的で意味のあるコードです。
基本スタイル
#tooltip_width { float:left; } #tooltip_width, [data-tooltip]:before, [data-tooltip]:after { display:none; font:normal 11px/24px Arial; } [data-tooltip]:before, [data-tooltip]:after { position:absolute; z-index:1000; } [data-tooltip]:before { content:attr(data-title); color:#fff; padding:0 5px; border-radius:2px; background:rgba(0,0,0,.8); text-align:center; white-space:nowrap; } [data-tooltip]:after { content:''; height:0; width:0; border:solid transparent; border-width:5px; pointer-events:none; } [data-tooltip]:hover:before, [data-tooltip]:hover:after { display:block; }
擬似要素
:after after-親への装飾的な矢印ポインタ、:before-テキスト付きのツールチップの本体。 そしてもう1つ:要素のルールに
#tooltip_widthがあることに気付いた
のに 、なぜそれが必要なのか
わかりません。 したがって、彼は料理人からの特別な粉末であり、チップの幅を測定するために必要です。 最初は、将来の料理のアイデアを練る段階で、式に従って幅を計算することが計画されていました。
width = text.length * 5;
しかし、このアプローチは次の2つの理由で運命づけられました。
- ラテン文字は、平均して、キリル文字(〜6.5px)ほど広くありません(〜5px)。
- 方程式は、幅の異なる同じ数の文字を提供しませんでした。 たとえば、「
iii 」の幅は「 WWW 」と等しくなりません。
すべての機能を考慮した新しい方法は、次のように機能します:ツールチップテキストは、同じフォントサイズ設定で非表示のフローティング(
float:left )ブロックに配置され、その幅が測定され、DOMから削除されるため、次のツールチップの幅を取得できます同じ要素を使用します。
修飾子付きの属性セレクター
グループ化プロパティに適しています。 あなたはそれらなしで行うことができ、パンなしでスープ/ボルシチを食べることができますが、それでも彼らと一緒においしくなります。
次のような方向の名前:
nwおよび
neはラテン文字
nで始まり、共通の特性があります-これは私たちの手に渡り、この形式で規則を説明できます:
[data-tooltip^=n]:before, [data-tooltip^=n]:after { top:100%; } [data-tooltip^=n]:before { margin-top:5px; } [data-tooltip^=n]:after { margin-top:-5px; border-bottom-color:rgba(0,0,0,.8); }
:before擬似要素の
:beforeにテキストが配置され、
:afterが装飾的なポインタとして機能することを思い出してください。 このコードは、方向
nw 、
neおよび
northで機能し、擬似要素を100%下に移動します。テキストは5px低く移動し(5pxはポインターの高さと幅の半分です)、矢印も高くなります-これにより、ツールチップ本体に「磁化」できます。
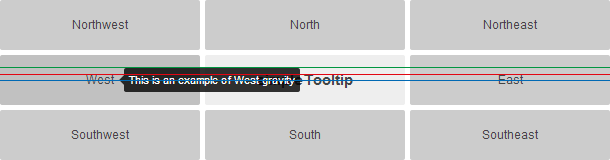
 青い
青い線は
top:100%で、
赤い線は
margin-top:5pxです。
sw 、
se 、および
southについても同じことが
言え 、オフセットのみが上に向けられます。
[data-tooltip^=s]:before, [data-tooltip^=s]:after { bottom:100%; } [data-tooltip^=s]:before { margin-bottom:5px; } [data-tooltip^=s]:after { margin-bottom:-5px; border-top-color:rgba(0,0,0,.8); }
ご想像のとおり、変位の方向の名前はすべて、グループに簡単に結合できるように選択されています。 行末修飾子を使用して、
nw 、
ne 、
sw 、
se 、
north、および
southの一般的なスタイルを説明します。
[data-tooltip$=w]:before, [data-tooltip$=w]:after, [data-tooltip$=th]:before, [data-tooltip$=th]:after { left:50%; } [data-tooltip$=w]:before { margin-left:-15px; } [data-tooltip$=w]:after, [data-tooltip$=th]:after { margin-left:-5px; } [data-tooltip$=e]:before, [data-tooltip$=e]:after { right:50%; } [data-tooltip$=e]:before { margin-right:-15px; } [data-tooltip$=e]:after { margin-right:-5px; }
 青い
青い線は
right:50% 、
赤は
margin-right:-5px 、
緑は
margin-right:-15pxです。
次に、残りの2つの方向(
東と
西)の動作について説明します。
[data-tooltip$=st]:before, [data-tooltip$=st]:after { bottom:50%; } [data-tooltip$=st]:after { margin-bottom:-5px; } [data-tooltip$=st]:before { margin-bottom:-12px; } [data-tooltip=west]:before, [data-tooltip=west]:after { left:100%; } [data-tooltip=west]:before { margin-left:10px; } [data-tooltip=west]:after { margin-right:-10px; border-right-color:rgba(0,0,0,.8); } [data-tooltip=east]:before, [data-tooltip=east]:after { right:100%; } [data-tooltip=east]:before { margin-right:10px; } [data-tooltip=east]:after { margin-left:-10px; border-left-color:rgba(0,0,0,.8); }
上記のコードでは、次のコードは奇妙に見えるかもしれません:
margin-bottom:-12px; 。 彼は、上半身の半分の変位を担当しています。 なぜ12は半分ですか? 最初に、次のルールを使用して24pxに等しい行の高さを指定したためです。
font:normal 11px/24px Arial; // Arial 11px 24px
 青い
青い線は
bottom:50% 、
赤は
margin-bottom:-5px 、
緑は
margin-bottom:-12pxです。
仕事は沸騰しています:生地が膨らんで、詰め物が間に合うのを待っています。 私たちは急いで詰め物をし、それがなければ私たちの料理が審美的に楽しいように見えないパウダーについて覚えています。
あなたはあなたの最後の料理から少しjQueryを持っていますか?
概して、ツールチップは詰め込んで食べることができますが、これを行う前に、何かを知る必要があります。
- ツールチップに多くのテキストがある場合、
white-space:nowrapおかげで、幅全体に1行で伸びwhite-space:nowrap ; - すべての要素が特定の
position規則を持たない静的な位置決め( position:static; )を持つツールチップを持つ要素の場合、ツールチップは適切に機能しません。 絶対に配置された要素です。 - ツールチップの方向が北または南に設定されている場合、絶対配置と暗黙的な幅のために、100%一致しません。
これに基づいて、次のことが確実な場合はJavaScriptを使用できません。
- 絶対的な位置に関するヒントを持つ要素。
- ツールチップの方向は、南または北を除き、任意です。
- ツールチップテキストは画面スペースをあまり占有しません。
さもなければ、ここにあなたのための粉があります:
(function(){ $.simpleTooltip = function(max){ var max = max ? max : 300, body = $('body'), t = !1; $('[data-tooltip]').each(function(){ t = $(this); t.attr('data-title', this.title).removeAttr('title'); if (t.css('position') == 'static') { t.css('position', 'relative'); } }).on('mouseenter mouseleave', function(e){ if (e.type == 'mouseenter') { t = $(this); body.append('<div id="tooltip_width">'+ t.data('title') +'</div>'); var width = $('#tooltip_width').width(), styles = ''; if (width > max) { width = max, styles = '[data-tooltip]:before{width:'+ width +'px;text-align:left;line-height:17px;padding:2px 5px;white-space:normal}'; } if (t.data('tooltip').slice(-2) == 'th') { styles += '[data-tooltip$=th]:before{margin-left:-'+ ((width + 10) / 2) +'px}'; } if (styles) { body.append('<style id="tooltip_style">'+ styles +'</style>'); } } else { $('#tooltip_style, #tooltip_width').remove(); } }); }; })(jQuery); $(document).ready(function(){ $.simpleTooltip(); });
関数への唯一の可能な引数は、ピクセル単位で定義されたすべてのツールチップの最大幅です。 次のように設定されます。
$.simpleTooltip(400);
プラグインの段階については、コードへのコメントで説明されており、アクセス可能な言語で記述されていることを望みます。
世界の料理の普及
- IE8-RGBAカラー形式をHEXに置き換え。 丸い角なし* 。
- attr()CSS関数と疑似要素をサポートする他のブラウザーは、トラブルを認識しません。
* -ソースファイルにはcorners.htcがあり、古いバージョンのMSブラウザーは強制的に端を丸めますが、このファイルのサイズは4Kbであり、これがないプロジェクト全体のファイルのサイズよりも1Kb大きくなります。
シェフから
要約:
皿の準備ができました。 それは贅沢でも風変わりでもありません。 これは、その長所と短所を備えた普通の食べ物であり、あなただけが食事を決めることができます。 しかし、注意:試してみないと、あなたは何かが好きかどうかわからないでしょう。
期待:
レシピが複雑すぎず、各アイテムに非常に明確な説明が与えられたことを願っています。 しかし、いずれにしても、質問は禁止されていません。
便利な資料
完成する
IE8
*または
1.0.1がサポートされていない
バージョン1.0 。
* - バージョン1.0では、 data-title属性にツールチップテキストを配置する必要があります。健康に使用してください!