「Volley」という言葉はまだ聞いたことがないと思います。これは、
Ficus Kirkpatrickが Google I / O 2013で発表したライブラリです。
Volleyライブラリとは何ですか?
Volleyは、Androidネットワークアプリケーションをより簡単に、そして最も重要なこととしてより高速にするライブラリです。
ネットワーク要求の処理とキャッシュを管理します。これにより、開発者が同じネットワーク要求を記述したり、キャッシュからコードを何度も読み取ったりする貴重な時間を節約できます。 そしてもう1つの利点、少ないコード、少ないエラー:)
通常、AsyncTaskで同じネットワーク要求コードを記述します。これは、Web APIからの応答を処理し、ビューに表示するためのロジックです。 OnsourceExecute()およびOnPostExecute()内のProgressBar / ProgressDialogの表示に注意する必要があります。 これは難しい作業ではなく、面倒な作業であることは知っています。 ProgressBar / ProgressDialogなどを管理するための基本クラスが定義されていても退屈な場合があります。 したがって、VolleyはAsyncTaskの強力な代替手段になり得ると言えるでしょう。
ボレーを使用する利点:
- Volleyは、すべてのネットワーク要求を自動的にコンパイルします。 Volleyは、アプリケーションのすべてのネットワーク要求を引き継いで実行し、Webサイトから応答または画像を取得します。
- Volleyは、透過的なディスクキャッシュとメモリ内キャッシュを提供します。
- Volleyは、リクエストをキャンセルするための強力なAPIを提供します。 単一のリクエストをキャンセルするか、キャンセルする複数のリクエストを設定できます。
- Volleyは強力な変更機能を提供します。
- Volleyは、デバッグおよびトレースツールを提供します。
始め方
- Volleyプロジェクトを複製します。
git clone https://android.googlesource.com/platform/frameworks/volley
- コードをプロジェクトにインポートします 。
ボレーの2つの主要なクラス
2つの主要なクラスがあります。
- リクエストキュー
- リクエスト
リクエストキュー:ネットワークリクエストの送信に使用し
ます。リクエストキュークラスはどこでも作成できますが、原則として、起動時に作成され、シングルトンとして使用されます。
要求: Web API呼び出しを作成するために必要なすべての詳細が含まれています。 例:使用するメソッド(GETまたはPOST)、要求データ、応答リスナー、エラーリスナー。
JSONObjectRequestメソッドを見てください。
/** * Creates a new request. * @param method the HTTP method to use * @param url URL to fetch the JSON from * @param jsonRequest A {@link JSONObject} to post with the request. Null is allowed and * indicates no parameters will be posted along with request. * @param listener Listener to receive the JSON response * @param errorListener Error listener, or null to ignore errors. */ public JsonObjectRequest(int method, String url, JSONObject jsonRequest, Listener<JSONObject> listener, ErrorListener errorListener) { super(method, url, (jsonRequest == null) ? null : jsonRequest.toString(), listener, errorListener); } /** * Constructor which defaults to <code>GET</code> if <code>jsonRequest</code> is * <code>null</code>, <code>POST</code> otherwise. * * @see #JsonObjectRequest(int, String, JSONObject, Listener, ErrorListener) */ public JsonObjectRequest(String url, JSONObject jsonRequest, Listener<JSONObject> listener, ErrorListener errorListener) { this(jsonRequest == null ? Method.GET : Method.POST, url, jsonRequest, listener, errorListener); }
Volleyの簡単な使用例:
VolleyライブラリをGitリポジトリから既にクローン/ダウンロードしてください。 ここで、指示に従ってJSON応答を取得する簡単な例を作成します。
ステップ1: VolleyプロジェクトをEclipseにインポートしてください。 次に、インポート後、プロジェクトをライブラリ(ライブラリプロジェクト)にする必要があります。右クリック=>プロパティ=> Android(左パネル)。
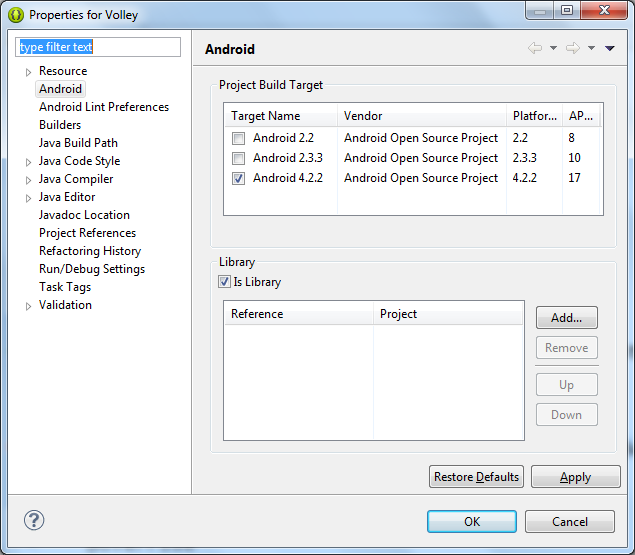 ステップ2:
新しい
VolleyExampleプロジェクトを作成します。
ステップ3: VolleyExampleを右クリックして、プロジェクトにVolleyライブラリを含めます。
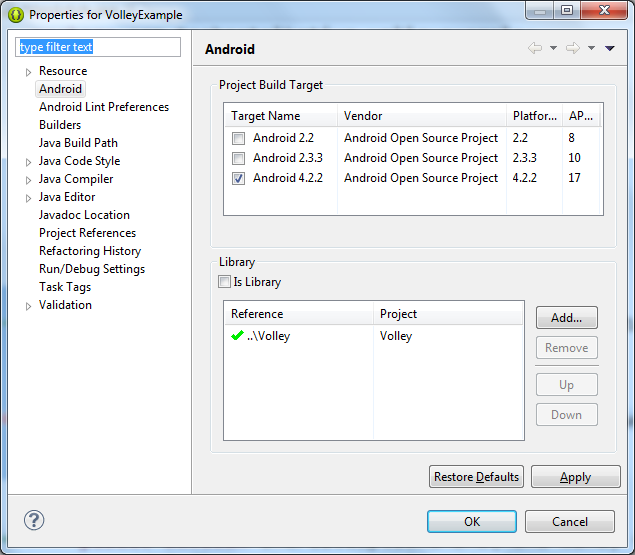 ステップ4:
 AndroidManifest.xmlでインターネット許可をオンにします
<uses-permission android:name="android.permission.INTERNET"/>
ステップ5:5.1クラスRequestQueueのオブジェクトを作成する
RequestQueue queue = Volley.newRequestQueue(this);
5.2応答およびエラーリスナーを使用してJSONObjectRequestを作成します。
String url = "https://www.googleapis.com/customsearch/v1?key=AIzaSyBmSXUzVZBKQv9FJkTpZXn0dObKgEQOIFU&cx=014099860786446192319:t5mr0xnusiy&q=AndroidDev&alt=json&searchType=image"; JsonObjectRequest jsObjRequest = new JsonObjectRequest(Request.Method.GET, url, null, new Response.Listener<JSONObject>() { @Override public void onResponse(JSONObject response) { // TODO Auto-generated method stub txtDisplay.setText("Response => "+response.toString()); findViewById(R.id.progressBar1).setVisibility(View.GONE); } }, new Response.ErrorListener() { @Override public void onErrorResponse(VolleyError error) { // TODO Auto-generated method stub } });
5.3リクエストをRequestQueueに追加します。
queue.add(jsObjRequest);
すべてのMainActivity.javaファイルコード package com.technotalkative.volleyexamplesimple; import org.json.JSONObject; import android.app.Activity; import android.os.Bundle; import android.view.Menu; import android.view.View; import android.widget.TextView; import com.android.volley.Request; import com.android.volley.RequestQueue; import com.android.volley.Response; import com.android.volley.VolleyError; import com.android.volley.toolbox.JsonObjectRequest; import com.android.volley.toolbox.Volley; public class MainActivity extends Activity { private TextView txtDisplay; @Override protected void onCreate(Bundle savedInstanceState) { super.onCreate(savedInstanceState); setContentView(R.layout.activity_main); txtDisplay = (TextView) findViewById(R.id.txtDisplay); RequestQueue queue = Volley.newRequestQueue(this); String url = "https://www.googleapis.com/customsearch/v1?key=AIzaSyBmSXUzVZBKQv9FJkTpZXn0dObKgEQOIFU&cx=014099860786446192319:t5mr0xnusiy&q=AndroidDev&alt=json&searchType=image"; JsonObjectRequest jsObjRequest = new JsonObjectRequest(Request.Method.GET, url, null, new Response.Listener<JSONObject>() { @Override public void onResponse(JSONObject response) {