 写真ソース
写真ソーステストは、アプリケーション開発中の非常に重要なプロセスです。 Androidの場合、多くのデバイスには特性(画面解像度、Androidバージョンなど)に大きな違いがあるため、アプリケーションのテストは多数のデバイスで実行する必要があります。 多数のデバイスでアプリケーションを手動でテストするプロセスは、時間がかかり、退屈で、エラーが発生しやすくなります。 より効率的で信頼性の高いアプローチは、ユーザーインターフェイスのテストを自動化することです。 UIAutomatorを使用すると、多くのAndroidデバイスで動作するテストスクリプトを開発できます
同じ精度と再現性で。
UIAutomator
UIAutomatorはGoogleによって開発され、Android SDKに同梱されています。 UIAutomatorは、AndroidアプリケーションをテストするためのAppleのUIAutomationツールに類似しています。 Android SDKには、ユーザーインターフェイスの自動機能テストをサポートする次のツールが用意されています。
- UIAutomatorviewer-Androidアプリケーションのユーザーインターフェイスコンポーネントを認識するためのグラフィカルツール。
- UIAutomator-ユーザーインターフェイステストを作成するためのメソッドを含むJava APIライブラリ。
これらのツールを使用するには、Android環境の次のコンポーネントをインストールする必要があります。
- Android SDKツール、バージョン21以降。
- API 16以上を搭載したAndroid SDKプラットフォーム。
UIAutomatorは常に更新されているため、最新のドキュメントはWebサイト(
http://developer.android.com/tools/help/uiautomator/index.html)で入手できます。
アプリケーションをテストするためのUIAutomatorの利点:
- 画面解像度に依存しません。
- アクションはAndroid UIコンポーネントにバインドされます。 これにより、ユーザーインターフェイス要素を直接操作できます。 たとえば、「OK」ボタンをクリックする必要がある場合、UIAutomator APIを使用してコマンドをスクリプトに送信できます。「OK」というラベルの付いたボタンをクリックし、クリックします。 したがって、座標にスナップする必要はありません。
- ユーザーアクションの複雑なシーケンスを再現できます。このシーケンスは常に同じです。
- テストは、Javaコードを変更することなく、さまざまなデバイスで必要な回数実行できます。
- デバイスの外部ボタンを使用できます(戻るボタン、オフ、音量など)。
しかし、欠点もあります:
- HTML 5およびOpenGLで記述されたアプリケーションには使用が困難です。これらのアプリケーションにはAndroid UI要素がないためです。 この点で、座標にアタッチするか、代替のテストオプションを探す必要があります。
- Androidアプリケーションを更新するときは、Javaスクリプトを確認し、必要に応じて更新する必要があります。
UIAutomatorを使用してアプリケーションをテストするには、次の手順を実行します。
- テストの準備:アプリケーションをデバイスにインストールし、UIコンポーネントを分析します。
- アプリケーションの自動テストを作成します。
- テストをJARファイルにコンパイルし、デバイスにコピーします。
- テストを実行し、結果を分析します。
- テスト中に見つかったさまざまなエラーの修正。
スクリプト開発
UIAutomatorテクノロジーに慣れるために、デバイスで簡単なアクションを実行する簡単なプログラムを以下に示します。 テストされたアプリケーションとして標準のAndroidアプリケーションであるメッセージングが使用され、UIAutomatorが特定の番号にSMSメッセージを送信します。
テストで実装されるアクションを定義します。
- アプリケーションを検索して起動します。
- メッセージを作成して送信します。
ご覧のとおり、すべてが非常に簡単です。
試験準備
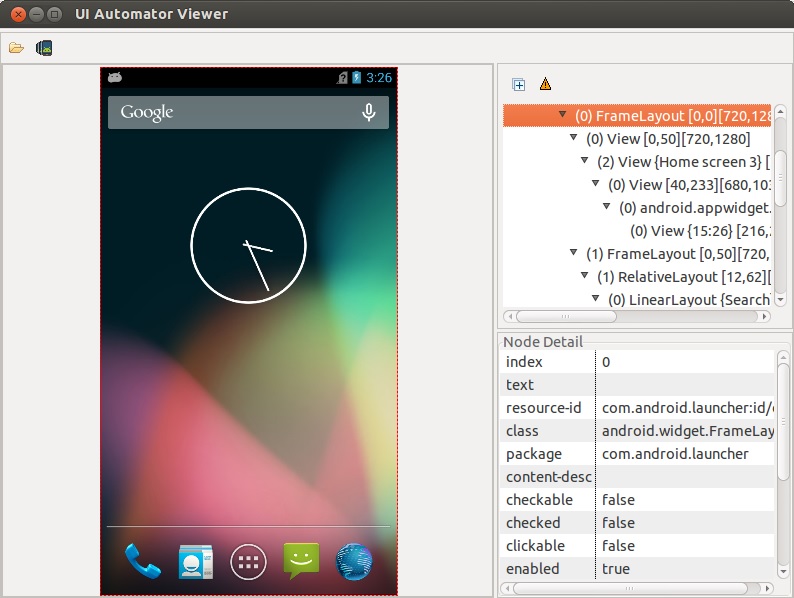
UIAutomatorviewerは、アプリケーションのユーザーインターフェイスを分析するために使用されます。 UIAutomatorviewerは、コンピューターに接続されているデバイスのスクリーンショットを取得し、レイヤーの階層を表示し、各インターフェイスコンポーネントのプロパティを個別に表示するための便利なグラフィカルインターフェイスも提供します。 この情報があると、UIAutomatorスクリプトの作成プロセスが大幅に簡素化されます。
ユーザーインターフェイスを分析するには:
- Androidデバイスをコンピューターに接続します。
- 次の場所にあるUIAutomatorviewerを起動します:<android-sdk> / tools /
$ uiautomatorviewer
- UIAutomatorviewerの[デバイススクリーンショット]ボタンをクリックして、デバイスから画像をキャプチャします。
- 特定のインターフェイス要素を選択すると、そのプロパティが右側のペインに表示されます。 これらのプロパティに基づいて、テストスクリプトで要素を簡単に見つけることができます。
UIAutomatorviewerが画像をコンポーネントに分解できない場合、アプリケーションはHTML 5またはOpenGLを使用して記述されます。
開発環境のセットアップ
Eclipseを使用している場合:
- Eclipseで新しいJavaプロジェクトを作成します。 このプロジェクトでは、UIAutomatorスクリプトを実装します。 プロジェクトに名前を付けましょう:SendMessage
- プロジェクトエクスプローラでプロジェクトを右クリックしてコンテキストメニューを呼び出し、[プロパティ]項目を選択します。 [プロパティ]で、Javaビルドパスを見つけ、必要なライブラリを追加します。
- JUnitサポートを追加するには、[ライブラリの追加]> [JUnit]を選択します。
- [外部JARの追加...]をクリックすると、<android-sdk> / platforms /にあるSDKの最新バージョンのディレクトリに移動し、その中の2つのファイルを選択する必要があります:uiautomator.jarおよびandroid.jar
別の開発環境を使用している場合は、UIAutomator.jarおよびandroid.jarファイルがプロジェクト設定に追加されていることを確認してください。
UIAutomator API
UIAutomatorがテストスクリプトを作成するためのすべての可能性について話すには、かなり長い時間が必要になります。 すべての詳細情報はウェブサイトで見つけることができます:
http :
//developer.android.com/tools/help/UIAutomator/index.htmlスクリプト作成
最初に、たとえばSendMessageという名前で、SendMessageプロジェクトのJavaクラスを使用して新しいファイルを作成します。 このクラスは、UIAutomatorTestCaseクラスから継承する必要があります。 ライブラリをEclipseに追加するには、キーボードショートカットCtrl + Shift + oを使用します。 他のライブラリも同じように追加されるので、これについてはもう説明しません。
アプリケーションの主な機能をテストするための3つの関数を作成しましょう。
- アプリケーションを検索して起動する
- SMS送信
- メインアプリケーションメニューに戻る
これらのメソッドをすべて実行する最初の関数は、メイン関数の一種で、次のようになります
public void test() {
アプリケーションを検索して起動する機能
この機能は次のアクションを実行します:ホームボタンを押してメインウィンドウに移動し、メニューを開いて目的のアプリケーションのアイコンを見つけ、このアプリケーションを起動します。
アプリケーションを検索して起動する private void findAndRunApp() throws UiObjectNotFoundException {
すべてのクラス名、ボタンテキストなど uiautomatorviewerを使用して取得されました。
SMS送信
この機能では、新しいメッセージを作成するためのボタンを検索して押し、電話番号、メッセージのテキストを入力して送信します。 数値とテキストは、関数の引数を介して渡されます。
SMS送信機能 private void sendMessage(String toNumber, String text) throws UiObjectNotFoundException {
これらのフォームにはテキストや説明がないため、番号のフィールドと通信用のフィールドを特別な標識で見つけることができませんでした。 したがって、インスタンスメソッドを使用してそれらを見つけます。 このメソッドを使用すると、インターフェイス階層のシリアル番号で要素を取得できます。
パラメーターとしてメッセージテキストだけでなく、受信者の電話番号を受信する可能性を認識しています。 デフォルトのパラメーターの初期化をtest()関数に追加する必要があります。これらは、対応する関数に引数として渡された場合、ユーザー定義の値で上書きする必要があります。
したがって、コマンドラインを介してスクリプトにパラメーターを渡すことができます。 これは、-eスイッチを使用して実行できます。 その後、パラメータ名と値の2つの値が転送されます。 たとえば、番号「777777」を受信者の番号として転送するには、パラメータ-eから777777を渡します。これらのパラメータを取得するには、スクリプトはメソッドgetParams()を使用します。
しかし、いくつかの落とし穴があります。 たとえば、一部の文字を含むテキストを送信することは不可能であり、UIAutomatorはそれらを受け入れません(スペース、&、<、>、(、)、「、」など、およびUnicode文字)。 これを行うには、これらの文字をスクリプトに提供するときに文字列で置き換えることを提案します。たとえば、スペースを文字列で置き換える:blogspaceblog。 これは、スクリプトを使用して、入力パラメーターを処理するUIAutomatorスクリプトを実行する場合に便利です。 入力パラメーターチェックに解析を追加し、次の行を置き換えます。
文字列置換コード if (toParam != null) { toNumber = toParam.trim(); } if (textParam != null) { textParam = textParam.replace("blogspaceblog", " "); textParam = textParam.replace("blogamperblog", "&"); textParam = textParam.replace("bloglessblog", "<"); textParam = textParam.replace("blogmoreblog", ">"); textParam = textParam.replace("blogopenbktblog", "("); textParam = textParam.replace("blogclosebktblog", ")"); textParam = textParam.replace("blogonequoteblog", "'"); textParam = textParam.replace("blogtwicequoteblog", "\""); text = textParam.trim(); }
メインアプリケーションメニューに戻る
この関数は、以前に実装したものの中で最も単純です。 彼女は、新しいメッセージを作成するボタンが見つかるまで、戻るボタンを押します。
private void exitToMainWindow() {
テストからのログの収集
テスト結果を記録するには、標準のAndroidバッファーを使用できます。 それを使用するには、スクリプトでライブラリを接続する必要があります。
import android.util.Log;
興味深い情報はすべてログに記録できます。 これは、次の関数を使用して実行できます。
Log.i(String title, String title);
次のコマンドを使用して、デバイスからログを読み取ることができます。
$ adb logcat
logcatの詳細については、公式Webサイト
developer.android.com/tools/help/logcat.htmlをご覧ください。
結果のコード
したがって、次のコードがあります。
コードを表示 package blog.send.message; import android.util.Log; import com.android.UIAutomator.core.UiObject; import com.android.UIAutomator.core.UiObjectNotFoundException; import com.android.UIAutomator.core.UiScrollable; import com.android.UIAutomator.core.UiSelector; import com.android.UIAutomator.testrunner.UiAutomatorTestCase; public class SendMessage extends UiAutomatorTestCase { public void test() throws UiObjectNotFoundException {
UIAutomatorテストのコンパイルと実行
- テストビルド構成ファイルを生成するには、ターミナルで次のコマンドを実行する必要があります。
$ <android-sdk>/tools/android create uitest-project -n <name> -t <target-id> -p <path>
- , UIAutomator ( : SendMessage), <target-id> - Android API Level ( : <android-sdk>/tools/android list targets) - .
ANDROID_HOME:
- , UIAutomator ( : SendMessage), <target-id> - Android API Level ( : <android-sdk>/tools/android list targets) - .
ANDROID_HOME:
- , UIAutomator ( : SendMessage), <target-id> - Android API Level ( : <android-sdk>/tools/android list targets) - .
ANDROID_HOME:
手順1で生成されたbuild.xmlファイルを含むプロジェクトのディレクトリに移動して、コマンドを実行します。
$ ant build
adb pushコマンドを使用して、アセンブルされたJARファイルをデバイスにコピーします。
$ adb push <path_to_output_jar> /data/local/tmp/
私たちの場合:
$ adb push <project_dir>/bin/SendMessage.jar /data/local/tmp/
スクリプトを実行します。
$ adb shell uiautomator runtest /data/local/tmp/SendMessage.jar –c blog.send.message.SendMessage -e to 777777
おわりに
UIAutomatorの使用は、多数のデバイス上のアプリケーションの高品質なテストに非常に便利です。 このテクノロジーを使用して、アプリケーションをデモするためのさまざまなデモを作成できます。