すべてに良い!
この記事は何を教えていますか?
この記事は、パイオニアとWeb開発者にとって有用です。これは、ゼロからの開発と出版に関する完全なガイドです。 グーグルプレイに置かれた実際のアプリケーション「コスト会計」を理解しています。 これは私の最初のアプリケーションであり、初心者から知識へと知識を伝えます。
- 基本を理解しています
- データベースでの作業
- レイアウトする
- プログラム可能
これはどのように起こりましたか?
このアプリケーションの作成は、既存の類似物の必要な機能の欠如によって引き起こされました。
同様のアプリケーションは数多くありますが、残念ながら、不必要な機能でオーバーロードされています。
必要なものと入手したものは何ですか?
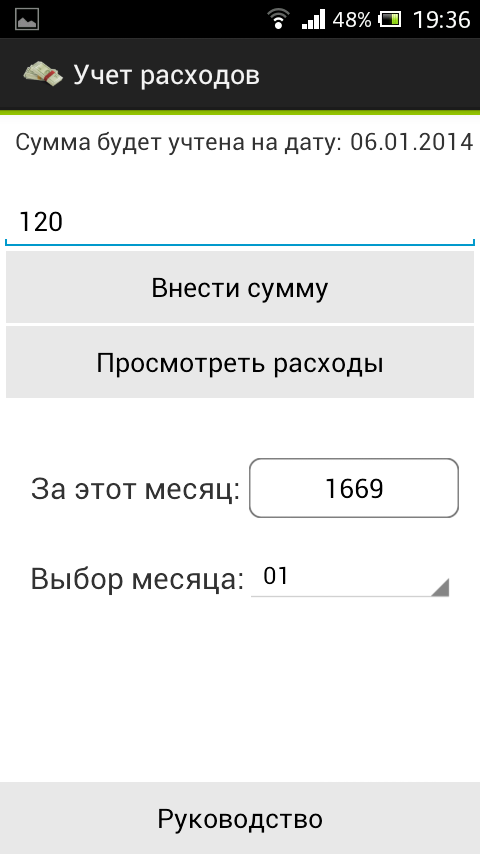
私のアプリケーションの要件は次のとおりです。
- 今月の会計費用
- 大きなキー「フローレートを入力」を使用してフローレートを入力します
- 今月の支出の概要
- 特定の月の総費用の概要
- 選択した月の金額の概要
ワークフローについて一言
永遠に気にする準備ができて、xmlを使用してインターフェイスのレイアウト。 html / cssでは何でも作成できますが、同様のレイアウトになると、闘争心は消えました。 トピックに関する入門資料は取りません:html / cssを知っている人のためのxmlインターフェイス。 状況がすぐに変わることを願っています。 要素の配置のロジックは明確ではなく、すべてが歪んでいて、聞いていません。 インターフェイス要素に個別の「境界線」(左上)を設定する機能を無効にすることはありません。
開発
エミュレータを起動するために、Eclipse、プラグインをインストールし、管理しました(トップPCで10分間試してみた後)? これで、モバイルの世界で最も人気のあるオペレーティングシステムの1つであるAndroid向けに開発する機会が得られました。
最初に、activity_main.xmlアプリケーションへのエントリポイントとなる最初のアクティビティを作成します。 特定のMVC構造が提供されます。
com.laguna.saは私のパッケージの名前ですロジックは、project_name / src / com.laguna.sa / *にあります。
ビューは次の場所にあります:res / layout / *
アクティビティを作成すると、ロジックおよびプレゼンテーションファイルが生成されます。 レイアウトの間、多くのあいまいな要素が提供されますが、そのうち
LinearLayoutを選択し
ました 。 LinearLayoutを使用すると、自分で要素を配置できます。 垂直および水平の選択。 android:orientation = "vertical"として指定されます。 このアプリケーションでの私のニーズにはこれで十分で、LinearLayout 3dp highを使用して境界線を放射しました。 htmlのdivのようなもの。
activity_main.xmlのリストパート1:<LinearLayout xmlns:android="http://schemas.android.com/apk/res/android" xmlns:tools="http://schemas.android.com/tools" android:layout_width="fill_parent" android:layout_height="fill_parent" android:background="#6c6c75" android:gravity="center" android:orientation="vertical" tools:context=".MainActivity" > <LinearLayout android:layout_width="fill_parent" android:layout_height="3dp" android:background="#99CC00" android:orientation="horizontal" > </LinearLayout> </LinearLayout>
これで、属性
android:layout_widthおよび
android:layout_heightを持つ最初の親レイヤーが含まれます
。これらは
fill_parentとして設定され、レイヤーにすべてを埋めるように指示します。 また、
アンドロイドの中心にあるすべてのコンテンツの場所を設定します
:gravity = "center" 。
次に、高さ3dpのLinearLayoutを使用して、セクシーな緑のストライプを作成します。 もちろん、この要素はこのために考案されたものではありませんが、一度このように罪を犯すことは可能です。
<LinearLayout android:layout_width="fill_parent" android:layout_height="3dp" android:background="#99CC00" android:orientation="horizontal" > </LinearLayout>
画面では次のようになります。

ストリップに続いて、テキスト用に2つのフィールドを配置します。 私は新しい
LinearLayoutに
配置します。
<LinearLayout android:layout_width="fill_parent" android:layout_height="wrap_content" android:background="#FFf" android:orientation="horizontal" > <TextView android:id="@+id/textView2" android:layout_width="wrap_content" android:layout_height="wrap_content" android:layout_marginBottom="3dp" android:layout_marginLeft="10dp" android:layout_marginRight="5dp" android:layout_marginTop="6dp" android:text="@string/text2" android:textSize="16sp" /> <TextView android:id="@+id/textView1" android:layout_width="wrap_content" android:layout_height="wrap_content" android:layout_marginBottom="3dp" android:layout_marginTop="6dp" android:text="date" android:textSize="16sp" /> </LinearLayout>
ここではすべてが論理的に明確ですが、これらの要素のデータの入力に注意を払う必要があります。 このプロジェクトには、
strings.xmlファイルが
保存されている
値フォルダーがあります。 このファイルには行が含まれており、Android:text = "@ string / text2"のおかげで、上記のTextViewがロードされます。 テキストはコードで直接指定できますが、この場合、迷惑なエラープレートが干渉します。
行ファイル用のビジュアルエディターがあり、コードを詳しく調べることなく行を編集できます。 行だけでなく、他のリソースも追加できます。 しかし、私が理解しているように、文字列とスタイルは別々に保存する必要があります。
当然、インターフェイス要素はプログラムで制御できます。 現在の日付がテストフィールドに挿入されるプロジェクトの例を示します。
SimpleDateFormat sdf = new SimpleDateFormat("dd.MM.yyyy"); String currentDateandTime = sdf.format(new Date()); TextView textView1 = (TextView) findViewById(R.id.textView1); textView1.setText(currentDateandTime);
activity_main.xmlとそのロジックの完全なリスト: <LinearLayout xmlns:android="http://schemas.android.com/apk/res/android" xmlns:tools="http://schemas.android.com/tools" android:layout_width="fill_parent" android:layout_height="fill_parent" android:background="#6c6c75" android:gravity="center" android:orientation="vertical" tools:context=".MainActivity" > <LinearLayout android:layout_width="fill_parent" android:layout_height="3dp" android:background="#99CC00" android:orientation="horizontal" > </LinearLayout> <LinearLayout android:layout_width="fill_parent" android:layout_height="wrap_content" android:background="#FFf" android:orientation="horizontal" > <TextView android:id="@+id/textView2" android:layout_width="wrap_content" android:layout_height="wrap_content" android:layout_marginBottom="3dp" android:layout_marginLeft="10dp" android:layout_marginRight="5dp" android:layout_marginTop="6dp" android:text="@string/text2" android:textSize="16sp" /> <TextView android:id="@+id/textView1" android:layout_width="wrap_content" android:layout_height="wrap_content" android:layout_marginBottom="3dp" android:layout_marginTop="6dp" android:text="date" android:textSize="16sp" /> </LinearLayout> <LinearLayout android:layout_width="match_parent" android:layout_height="wrap_content" android:layout_marginLeft="0dp" android:layout_marginRight="0dp" android:layout_marginTop="0dp" android:background="#FFf" android:gravity="bottom" android:orientation="vertical" > <EditText android:id="@+id/amount" android:layout_width="match_parent" android:layout_height="wrap_content" android:layout_marginTop="20sp" android:ems="10" android:hint="@string/amount_of_expense" > </EditText> <Button android:id="@+id/button2" android:layout_width="match_parent" android:layout_height="wrap_content" android:layout_marginLeft="4dp" android:layout_marginRight="4dp" android:background="@drawable/mybtn_style_selector" android:onClick="makebutton_Click" android:text="@string/makebutton" /> <Button android:id="@+id/button3" android:layout_width="match_parent" android:layout_height="wrap_content" android:layout_marginLeft="4dp" android:layout_marginRight="4dp" android:layout_marginTop="2dp" android:background="@drawable/mybtn_style_selector" android:onClick="costs_Click" android:text="@string/costs" /> </LinearLayout> <LinearLayout android:layout_width="match_parent" android:layout_height="80sp" android:layout_gravity="center_vertical" android:layout_marginTop="0dp" android:background="#fff" android:orientation="horizontal" > <TextView android:id="@+id/amount_per_month_text" android:layout_width="wrap_content" android:layout_height="wrap_content" android:layout_gravity="center" android:layout_marginLeft="20dp" android:layout_marginTop="20dp" android:text=" :" android:textSize="20sp" /> <Button android:id="@+id/amount_per_month" android:layout_width="140dp" android:layout_height="wrap_content" android:layout_marginLeft="5dp" android:layout_marginTop="40dp" android:onClick="reload_Click" android:background="@drawable/button321" android:text="" /> </LinearLayout> <LinearLayout android:layout_width="match_parent" android:layout_height="80sp" android:layout_gravity="center_vertical" android:layout_marginTop="0dp" android:background="#fff" android:orientation="horizontal" > <TextView android:id="@+id/amount_per_month_text2" android:layout_width="wrap_content" android:layout_height="wrap_content" android:layout_gravity="center" android:layout_marginLeft="20dp" android:layout_marginTop="0dp" android:text=" :" android:textSize="20sp" /> <Spinner android:id="@+id/spinner_month" android:layout_width="140dp" android:layout_height="wrap_content" android:layout_marginTop="20dp" > </Spinner> </LinearLayout> <LinearLayout android:layout_width="match_parent" android:layout_height="fill_parent" android:layout_marginTop="0dp" android:background="#FFf" android:gravity="bottom" android:orientation="vertical" > <Button android:id="@+id/button1" android:layout_width="match_parent" android:layout_height="wrap_content" android:background="@drawable/mybtn_style_selector" android:onClick="howtousebutton_Click" android:text="@string/howtousebutton" /> </LinearLayout> </LinearLayout>
package com.laguna.sa;
説明が必要な特に複雑なアクションはありません。注意するのは、アプリケーションのナビゲーションメソッドだけです。
あるアクティビティから別のアクティビティへの移行。
データベースと連携
Androidでは、最も単純なソリューションを使用してローカルデータを保存しました。SQLiteとSQLiteOpenHelperヘルパークラスは、すべての汚い作業を行います。 たとえばMySqlで働いた人にとっては、習得と理解に特別な困難はないはずです。
SQLiteOpenHelperは、システムファイルでのデータベースの初期作成も制御し、必要に応じて「アップグレード」を行います。
WorkWithDatabase.javaデータベースを操作するためのクラスのリスト: package com.laguna.sa; import java.text.SimpleDateFormat; import java.util.Date; import android.annotation.SuppressLint; import android.content.ContentValues; import android.content.Context; import android.database.Cursor; import android.database.sqlite.SQLiteDatabase; import android.database.sqlite.SQLiteOpenHelper; import android.widget.EditText; import android.widget.TextView; public class WorkWithDatabase extends SQLiteOpenHelper {
データを挿入するには、次を使用することに注意してください。
ContentValues values = new ContentValues();
原則列->値に関するデータを挿入します。
データを取得するプロセスは複雑ではありません。
Cursorについては個別に読む価値があります。 私の場合、生のrawQueryクエリをフィードし、Cursorを使用します。
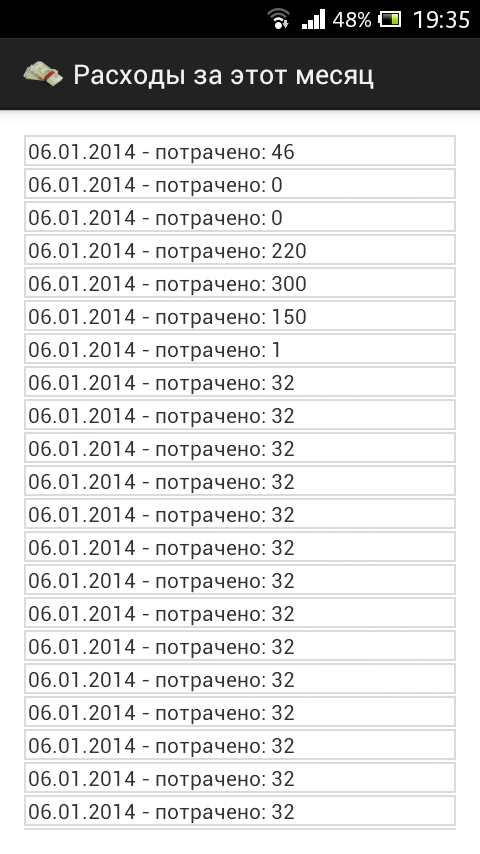
データ出力の例は次のとおりです。別の画面に金額を表示するファイルリストです。
CostsActivity.javaファイルとそのプレゼンテーションのリスト <RelativeLayout xmlns:android="http://schemas.android.com/apk/res/android" xmlns:tools="http://schemas.android.com/tools" android:layout_width="match_parent" android:layout_height="match_parent" android:paddingBottom="@dimen/activity_vertical_margin" android:paddingLeft="@dimen/activity_horizontal_margin" android:paddingRight="@dimen/activity_horizontal_margin" android:paddingTop="@dimen/activity_vertical_margin" android:background="#fff" tools:context=".CostsActivity" > <ScrollView android:id="@+id/scrollView1" android:layout_width="wrap_content" android:layout_height="wrap_content" android:layout_alignParentBottom="true" android:layout_alignParentLeft="true" android:layout_alignParentRight="true" android:layout_alignParentTop="true" > <LinearLayout android:id="@+id/costslist" android:layout_width="match_parent" android:layout_height="wrap_content" android:orientation="vertical" > </LinearLayout> </ScrollView> </RelativeLayout>
package com.laguna.sa; import android.os.Build; import android.os.Bundle; import android.annotation.SuppressLint; import android.annotation.TargetApi; import android.app.ActionBar.LayoutParams; import android.app.Activity; import android.database.Cursor; import android.view.Menu; import android.widget.LinearLayout; import android.widget.TextView; public class CostsActivity extends Activity { @SuppressWarnings("deprecation") @SuppressLint("NewApi") @Override protected void onCreate(Bundle savedInstanceState) { super.onCreate(savedInstanceState); setContentView(R.layout.activity_costs); LinearLayout linearLayout = (LinearLayout)findViewById(R.id.costslist); int sdk = android.os.Build.VERSION.SDK_INT; WorkWithDatabase wwd = new WorkWithDatabase(this); Cursor cursor = wwd.obtaining_costs_for_this_month(); while (cursor.moveToNext()) { int amount = cursor.getInt(cursor.getColumnIndex("amount")); String date = cursor.getString(cursor.getColumnIndex("date")); TextView dateTv = new TextView(this); LinearLayout.LayoutParams llp = new LinearLayout.LayoutParams(LayoutParams.MATCH_PARENT, LayoutParams.MATCH_PARENT); llp.setMargins(0, 1, 0, 1);
ループでは、すべての値を調べて必要な値を取得します。 同じ場所で、必要な数のTextViewを作成し、スタイルを追加すれば完了です。
プログラムは、OSの一部のバージョンでサポートされていないメソッドについて不平を言っていました。 バックグラウンドを設定するには、バージョンチェックに頼らなければなりませんでした。 コメントでsetBackgroundに関する真の道筋を示してくれるとありがたいです。
出版と結果。
私は出版が好きで、すべてが不必要なトラブルなしで迅速に起こりました。 優れた開発者コンソール、直感的な設定。 夜に投稿されたアプリケーションは、夜に利用可能になりました。
アプリケーション自体: