コーヒーを求めて走り回り、コーヒーメーカーのボタンを押すのにうんざりしていませんか? Webインターフェイスを作成してください!
 この記事のすべてのコードはGithubで入手できます。
準備する
Ajentiを
PyPIでダウンロードして解凍します。
依存関係をインストールします。
sudo pip install -Ur requirements.txt
さらに、
HTCPCP対応のコーヒーメーカーが必要です。お持ちでない場合は、ミルクとチョコレートの追加をサポートする
シンプルなエミュレーターを使用できます。
HTCPCPクライアント
ajenti / pluginsにhtcpcpフォルダーを作成し、その中にプラグインのファイル構造を作成します。
ajenti/plugins/htcpcp ├── __init__.py ├── client.py └── layout └── config.xml
__Init__.pyには、プラグインに関する情報が含まれています。
from ajenti.api import * from ajenti.plugins import * info = PluginInfo( title='HTCPCP Example', icon='coffee', dependencies=[ PluginDependency('main') ], ) def init(): import client import main
client.pyで、HTCPCPプロトコルを操作するためのクラスを作成します。
import requests from ajenti.api import * from ajenti.plugins.configurator.api import ClassConfigEditor @plugin class HTCPCPClientConfigEditor (ClassConfigEditor): """ A plugin that handles editing of HTCPCPClient's classconfig """ title = 'HTCPCP Client' icon = 'coffee' def init(self): self.append(self.ui.inflate('htcpcp:config'))
ここでは、
ConfigEditor APIを使用して、ユーザーが
HTCPCPClientクラスを再構成して別のコーヒーメーカーのURLを使用できるようにします。
パネルに空のセクションを作成します(
main.py ):
from ajenti.api import * from ajenti.plugins.main.api import SectionPlugin from client import HTCPCPClient @plugin class CoffeePlugin (SectionPlugin): """ A HTCPCP capable coffeepot control plugin """ def init(self): self.title = 'Coffeepot' self.icon = 'coffee' self.category = _('System')
クラスを構成してパネルを起動する小さなUIを追加します。
<bind:dict id="bind"> <formline text="Coffeepot URL"> <textbox bind="url" /> </formline> </bind:dict>
make run
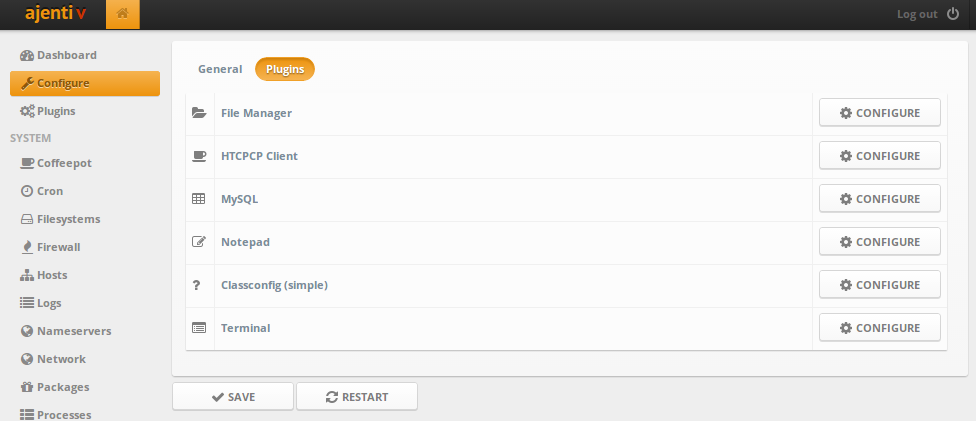
[Configure]> [Plugins]セクションに移動すると、プラグインが表示され、URLを構成できます。

インターフェース
美しいボタンを作成しましょう!
htcpcp / layout / main.xml :
<hc> <button id="brew" icon="arrow-right" text="Brew" /> <button id="retrieve" icon="coffee" text="Retrieve" /> <button id="refresh" icon="refresh" text="Refresh" /> </hc>
htcpcp / main.py :
from ajenti.api import * from ajenti.plugins.main.api import SectionPlugin from ajenti.ui import on from ajenti.ui.binder import Binder from client import HTCPCPClient @plugin class CoffeePlugin (SectionPlugin): """ A HTCPCP capable coffeepot control plugin """ def init(self): self.title = 'Coffeepot' self.icon = 'coffee' self.category = _('System') self.append(self.ui.inflate('htcpcp:main'))
これで、ボタンを押してコーヒーを作ることができます:)

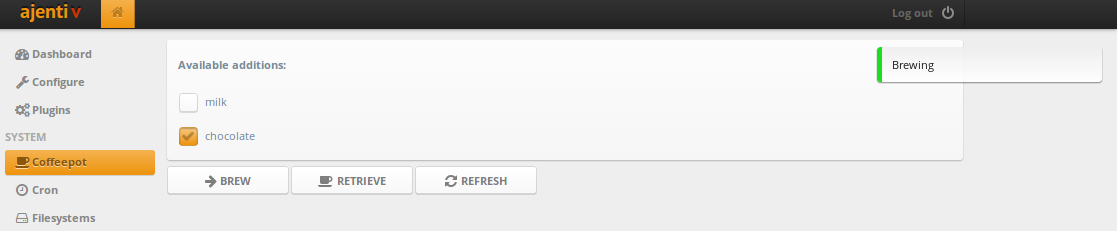
表示データ
サポートされているコーヒー添加物とその選択を表示するだけです。 このためには、
Binderクラスを直接使用してUIでデータバインディングを使用するのが最も便利です。
main.xml要素を追加して、添加剤のチェックボックスのリストを表示します。
<vc> <body> <pad id="pot-root"> <bind:collection bind="additions"> <vc bind="__items"> <label style="bold" text="Available additions:" /> </vc> <bind:template> <checkbox bind:value="selected" bind:text="name" /> </bind:template> </bind:collection> </pad> </body> <hc> <button id="brew" icon="arrow-right" text="Brew" /> <button id="retrieve" icon="coffee" text="Retrieve" /> <button id="refresh" icon="refresh" text="Refresh" /> </hc> </vc>
そしてmain.pyでは、バインダーを使用してインターフェイスにデータを入力し、添加物の状態を更新します(チェックボックスの状態に基づいて選択または非選択)。
from ajenti.api import * from ajenti.plugins.main.api import SectionPlugin from ajenti.ui import on from ajenti.ui.binder import Binder from client import HTCPCPClient @plugin class CoffeePlugin (SectionPlugin): """ A HTCPCP capable coffeepot control plugin """ def init(self): self.title = 'Coffeepot' self.icon = 'coffee' self.category = _('System') self.append(self.ui.inflate('htcpcp:main')) self.pot = HTCPCPClient.get()
完了:)
この記事のコードは
Githubで入手できることを思い出してください。また
、ドキュメントを読んで
サンプルを覗くこと
を忘れないでください。