 OpenGLアプリケーション
での
ビデオキャプチャに関する記事へのコメントの1つで、Unity3dを使用して作成されたアプリケーションでのビデオキャプチャの可能性が言及されました。 実際、このトピックに興味がありました-多くの開発者がさまざまなライブラリとフレームワークを使用してゲームを作成する場合、なぜ「クリーン」なOpenGLアプリケーションだけなのでしょうか? 本日、既製のソリューション
-Android向け
Unity3dを使用して作成されたアプリケーションでのビデオキャプチャをご
紹介します。
ボーナス!
この記事に基づいて、Unity3dにビデオキャプチャを埋め込む方法を学ぶだけでなく、Android用のUnityプラグインを作成することもできます。
次に、Unity3dでビデオキャプチャを実装するための2つのオプションを検討します。
1.フルスクリーンポストエフェクト。 このメソッドはProバージョンでのみ機能しますが、
Unity GUIはビデオにキャプチャされません
2.フレームバッファー(
FrameBuffer )を使用します。 有料および無料を含むUnity3dのすべてのバージョンで機能し、Unity GUIオブジェクトもビデオに記録されます。
何が必要ですか
プロジェクト作成
Unityエディターを開き、新しいプロジェクトを作成します。 アセットフォルダーで、
Pluginsフォルダーを作成し、その中に
Androidフォルダーを作成します。
Intel INDE Media Pack for Androidがインストールされたフォルダーの
libsディレクトリーから、2つのjarファイル(
android- <version> .jarおよびdomain- <version> .jar )をプロジェクトの
Androidフォルダーにコピーします。
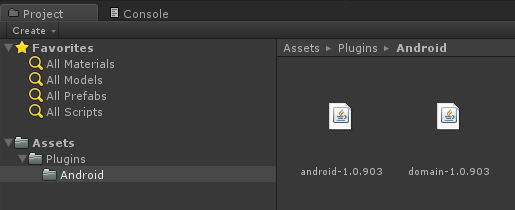
同じ
Androidフォルダーで、
Capturing.javaという新しいファイルを作成し、次のコードをそのファイルにコピーします。
Capturing.java
package com.intel.inde.mp.samples.unity; import com.intel.inde.mp.android.graphics.FullFrameTexture; import android.os.Environment; import java.io.IOException; import java.io.File; public class Capturing { private static FullFrameTexture texture; public Capturing() { texture = new FullFrameTexture(); }
今度は
VideoCapture.javaという名前の別のJavaファイルを追加します。
VideoCapture.java
package com.intel.inde.mp.samples.unity; import com.intel.inde.mp.*; import com.intel.inde.mp.android.AndroidMediaObjectFactory; import com.intel.inde.mp.android.AudioFormatAndroid; import com.intel.inde.mp.android.VideoFormatAndroid; import java.io.IOException; public class VideoCapture { private static final String TAG = "VideoCapture"; private static final String Codec = "video/avc"; private static int IFrameInterval = 1; private static final Object syncObject = new Object(); private static volatile VideoCapture videoCapture; private static VideoFormat videoFormat; private static int videoWidth; private static int videoHeight; private GLCapture capturer; private boolean isConfigured; private boolean isStarted; private long framesCaptured; private VideoCapture() { } public static void init(int width, int height, int frameRate, int bitRate) { videoWidth = width; videoHeight = height; videoFormat = new VideoFormatAndroid(Codec, videoWidth, videoHeight); videoFormat.setVideoFrameRate(frameRate); videoFormat.setVideoBitRateInKBytes(bitRate); videoFormat.setVideoIFrameInterval(IFrameInterval); } public static VideoCapture getInstance() { if (videoCapture == null) { synchronized (syncObject) { if (videoCapture == null) { videoCapture = new VideoCapture(); } } } return videoCapture; } public void start(String videoPath) throws IOException { if (isStarted()) { throw new IllegalStateException(TAG + " already started!"); } capturer = new GLCapture(new AndroidMediaObjectFactory()); capturer.setTargetFile(videoPath); capturer.setTargetVideoFormat(videoFormat); AudioFormat audioFormat = new AudioFormatAndroid("audio/mp4a-latm", 44100, 2); capturer.setTargetAudioFormat(audioFormat); capturer.start(); isStarted = true; isConfigured = false; framesCaptured = 0; } public void stop() { if (!isStarted()) { throw new IllegalStateException(TAG + " not started or already stopped!"); } try { capturer.stop(); isStarted = false; } catch (Exception ex) { } capturer = null; isConfigured = false; } private void configure() { if (isConfigured()) { return; } try { capturer.setSurfaceSize(videoWidth, videoHeight); isConfigured = true; } catch (Exception ex) { } } public void beginCaptureFrame() { if (!isStarted()) { return; } configure(); if (!isConfigured()) { return; } capturer.beginCaptureFrame(); } public void endCaptureFrame() { if (!isStarted() || !isConfigured()) { return; } capturer.endCaptureFrame(); framesCaptured++; } public boolean isStarted() { return isStarted; } public boolean isConfigured() { return isConfigured; } }
重要 :パッケージ名
com.intel.inde.mp.samples.unityに注意してください。 プロジェクト設定の名前と一致する必要があります(
プレーヤー設定/その他の設定/バンドル識別子 ):
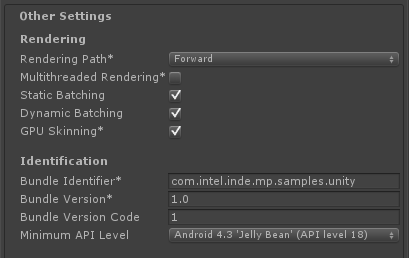
さらに、C#スクリプトで同じ名前を使用してJavaクラスを呼び出す必要があります。 これらの名前がすべて一致しない場合、ゲームは起動時にクラッシュします。
シーンに動的コンテンツを追加します。 また、Intel INDE Media Pack for Android *を既存のプロジェクトと統合し、ゼロから作成することもできません。 しかし、シーンにダイナミックな何かを持たせてください。 そうでなければ、何も変わらないビデオクリップを見るのは面白くありません。
ここで、他のAndroidアプリケーションと同様に、マニフェストを構成する必要があります。
/ Plugins / Androidフォルダーに
AndroidManifest.xmlファイルを作成し、その中にコンテンツをコピーします。
AndroidManifest.xml
<?xml version="1.0" encoding="utf-8"?> <manifest xmlns:android="http://schemas.android.com/apk/res/android" package="com.intel.inde.mp.samples.unity" android:installLocation="preferExternal" android:theme="@android:style/Theme.NoTitleBar" android:versionCode="1" android:versionName="1.0"> <uses-sdk android:minSdkVersion="18" /> <uses-permission android:name="android.permission.WRITE_EXTERNAL_STORAGE"/> <uses-permission android:name="android.permission.INTERNET"/> <!— --> <uses-permission android:name="android.permission.RECORD_AUDIO" /> <uses-feature android:glEsVersion="0x00020000" android:required="true"/> <application android:icon="@drawable/app_icon" android:label="@string/app_name" android:debuggable="true"> <activity android:name="com.unity3d.player.UnityPlayerNativeActivity" android:label="@string/app_name"> <intent-filter> <action android:name="android.intent.action.MAIN" /> <category android:name="android.intent.category.LAUNCHER" /> </intent-filter> <meta-data android:name="unityplayer.UnityActivity" android:value="true" /> <meta-data android:name="unityplayer.ForwardNativeEventsToDalvik" android:value="false" /> </activity> </application> </manifest>
次の行に注意してください。
package="com.intel.inde.mp.samples.unity"
パッケージ名は、以前に指定したものと一致する必要があります。
これで必要なものはすべて揃いました。 UnityはJavaファイルを単独でコンパイルできないため、Antスクリプトを作成します。
注 :他のクラスとライブラリを使用する場合は、それに応じてAntスクリプトを変更する必要があります(これについては
ドキュメントで詳しく
説明してい
ます )。
次のAntスクリプトは、このチュートリアル専用です。
/ Plugins / Android /フォルダーに
build.xmlファイルを作成します。
build.xml
<?xml version="1.0" encoding="UTF-8"?> <project name="UnityCapturing"> <property name="sdk.dir" value="C:\Android\sdk"/> <property name="target" value="android-18"/> <property name="unity.androidplayer.jarfile" value="C:\Program Files (x86)\Unity\Editor\Data\PlaybackEngines\androiddevelopmentplayer\bin\classes.jar"/> <property name="source.dir" value="\ProjectPath\Assets\Plugins\Android" /> <property name="output.dir" value="\ProjectPath\Assets\Plugins\Android\classes"/> <property name="output.jarfile" value="Capturing.jar"/> <target name="-dirs" depends="message"> <echo>Creating output directory: ${output.dir} </echo> <mkdir dir="${output.dir}" /> </target> <target name="compile" depends="-dirs" description="Compiles project's .java files into .class files"> <javac encoding="ascii" target="1.6" debug="true" destdir="${output.dir}" verbose="${verbose}" includeantruntime="false"> <src path="${source.dir}" /> <classpath> <pathelement location="${sdk.dir}\platforms\${target}\android.jar"/> <pathelement location="${source.dir}\domain-1.0.903.jar"/> <pathelement location="${source.dir}\android-1.0.903.jar"/> <pathelement location="${unity.androidplayer.jarfile}"/> </classpath> </javac> </target> <target name="build-jar" depends="compile"> <zip zipfile="${output.jarfile}" basedir="${output.dir}" /> </target> <target name="clean-post-jar"> <echo>Removing post-build-jar-clean</echo> <delete dir="${output.dir}"/> </target> <target name="clean" description="Removes output files created by other targets."> <delete dir="${output.dir}" verbose="${verbose}" /> </target> <target name="message"> <echo>Android Ant Build for Unity Android Plugin</echo> <echo> message: Displays this message.</echo> <echo> clean: Removes output files created by other targets.</echo> <echo> compile: Compiles project's .java files into .class files.</echo> <echo> build-jar: Compiles project's .class files into .jar file.</echo> </target> </project>
パス
source.dir 、
output.dir 、そしてもちろん、出力jarファイル
output.jarfileの名前に注意して
ください 。
コマンドラインモードで、プロジェクト
/プラグイン/ Androidフォルダーに移動し、プラグインのビルドプロセスを開始します
ant build-jar clean-post-jar
上記のすべてを行った場合、数秒後にアセンブリが正常に完了したことを示すメッセージが表示されます!

フォルダーの入り口に、プラグインのコードを含む新しい
Capturing.jarファイルが表示されます。
プラグインの準備が整いました。Unity3dコードに必要な変更を加える必要があります。まず、UnityとAndroidプラグインを接続するラッパーを作成します。 これを行うには、プロジェクトに
Capture.csファイルを作成します
Capture.cs
using UnityEngine; using System.Collections; using System.IO; using System; [RequireComponent(typeof(Camera))] public class Capture : MonoBehaviour { public int videoWidth = 720; public int videoHeight = 1094; public int videoFrameRate = 30; public int videoBitRate = 3000; private string videoDir; public string fileName = "game_capturing-"; private float nextCapture = 0.0f; public bool inProgress { get; private set; } private static IntPtr constructorMethodID = IntPtr.Zero; private static IntPtr initCapturingMethodID = IntPtr.Zero; private static IntPtr startCapturingMethodID = IntPtr.Zero; private static IntPtr captureFrameMethodID = IntPtr.Zero; private static IntPtr stopCapturingMethodID = IntPtr.Zero; private static IntPtr getDirectoryDCIMMethodID = IntPtr.Zero; private IntPtr capturingObject = IntPtr.Zero; void Start() { if(!Application.isEditor) {
このスクリプトをメインカメラに割り当てます。 ビデオをキャプチャする前に、ビデオ形式を構成する必要があります。 適切なパラメーター(videoWidth、videoHeightなど)を変更することにより、エディターで直接これを行うことができます。
Start() 、
StartCapturing()および
StopCapturing()メソッドは非常に簡単で、Unityからプラグインコードを呼び出すためのラッパーです。
さらに興味深いのは、
OnRenderImage()メソッドです。 すべてのレンダリングが既に完了した後、結果が画面に表示される直前に呼び出されます。 入力画像は
srcテクスチャに含まれています。結果を
destテクスチャに書き込む必要があります。
このメカニズムにより、最終的な画像を変更してさまざまな効果を適用できますが、これは私たちの関心の範囲外であり、私たちはそのまま画像に興味を持っています。 ビデオをキャプチャするには、最終画像をビデオにコピーする必要があります。 これを行うには、
captureFrame()を呼び出し、テクスチャー
IDを入力パラメーターとして渡すことにより、テクスチャー
IDを
Capturingオブジェクトに渡します。
画面に描画するには、
srcを
destにコピーするだけです:
Graphics.Blit(src, dest);
便宜上、ゲームインターフェースからビデオ録画を有効、無効にするボタンを作成しましょう。
これを行うには、GUIオブジェクトを作成し、それにハンドラーを割り当てます。 ハンドラーは
CaptureGUI.csファイルにあります
。CaptureGUI.cs
using UnityEngine; using System.Collections; public class CaptureGUI : MonoBehaviour { public Capture capture; private GUIStyle style = new GUIStyle(); void Start() { style.fontSize = 48; style.alignment = TextAnchor.MiddleCenter; } void OnGUI() { style.normal.textColor = capture.inProgress ? Color.red : Color.green; if (GUI.Button(new Rect(10, 200, 350, 100), capture.inProgress ? "[Stop Recording]" : "[Start Recording]", style)) { if (capture.inProgress) { capture.StopCapturing(); } else { capture.StartCapturing(); } } } }
Captureクラスのインスタンスでキャプチャフィールドを初期化することを忘れないでください。
オブジェクトをクリックすると、ビデオキャプチャプロセスが開始および停止し、結果が
/ mnt / sdcard / DCIM /フォルダーに保存されます。
前述したように、このメソッドはProバージョンでのみ動作します
(無料版では
OnRenderImage()を使用して
Graphics.Blitを呼び出すことはできません)、別の機能-最終的なビデオにはUnity GUIオブジェクトが含まれません。 これらの制限は、
FrameBufferを使用する2番目の方法によって排除されます。
フレームバッファを使用してビデオをキャプチャする
Capturing.javaファイルに変更を加えます。これはその内容を置き換えるだけです
Capturing.java
package com.intel.inde.mp.samples.unity; import com.intel.inde.mp.android.graphics.FullFrameTexture; import com.intel.inde.mp.android.graphics.FrameBuffer; import android.os.Environment; import java.io.IOException; import java.io.File; public class Capturing { private static FullFrameTexture texture; private FrameBuffer frameBuffer; public Capturing(int width, int height) { frameBuffer = new FrameBuffer(); frameBuffer.create(width, height); texture = new FullFrameTexture(); } public static String getDirectoryDCIM() { return Environment.getExternalStoragePublicDirectory(Environment.DIRECTORY_DCIM) + File.separator; } public void initCapturing(int width, int height, int frameRate, int bitRate) { VideoCapture.init(width, height, frameRate, bitRate); } public void startCapturing(String videoPath) { VideoCapture capture = VideoCapture.getInstance(); synchronized (capture) { try { capture.start(videoPath); } catch (IOException e) { } } } public void beginCaptureFrame() { frameBuffer.bind(); } public void captureFrame(int textureID) { VideoCapture capture = VideoCapture.getInstance(); synchronized (capture) { capture.beginCaptureFrame(); texture.draw(textureID); capture.endCaptureFrame(); } } public void endCaptureFrame() { frameBuffer.unbind(); int textureID = frameBuffer.getTexture(); captureFrame(textureID); texture.draw(textureID); } public void stopCapturing() { VideoCapture capture = VideoCapture.getInstance(); synchronized (capture) { if (capture.isStarted()) { capture.stop(); } } } }
ご覧のとおり、多くの変更はありません。 主なものは、新しい施設の出現です。
FrameBuffer frameBuffer;
コンストラクターは、フレームの幅と高さをパラメーターとして受け入れるようになりました。
これは、必要なサイズの
FrameBufferを作成する
ために必要です。
3つの新しいパブリックメソッドが登場しました:
frameBufferTexture() 、
beginCaptureFrame()および
endCaptureFrame() 。 C#のコードに到達すると、その意味がより明確になります。
VideoCapture.javaファイルは変更しません。
次に、Androidプラグインを作成する必要があります。これを行う方法については、上記で説明しました。
これでUnityに切り替えることができます。
Capture.csスクリプトを開き、その内容を置き換えます。
Capture.cs
using UnityEngine; using System.Collections; using System.IO; using System; [RequireComponent(typeof(Camera))] public class Capture : MonoBehaviour { public int videoWidth = 720; public int videoHeight = 1094; public int videoFrameRate = 30; public int videoBitRate = 3000; private string videoDir; public string fileName = "game_capturing-"; private float nextCapture = 0.0f; public bool inProgress { get; private set; } private bool finalizeFrame = false; private Texture2D texture = null; private static IntPtr constructorMethodID = IntPtr.Zero; private static IntPtr initCapturingMethodID = IntPtr.Zero; private static IntPtr startCapturingMethodID = IntPtr.Zero; private static IntPtr beginCaptureFrameMethodID = IntPtr.Zero; private static IntPtr endCaptureFrameMethodID = IntPtr.Zero; private static IntPtr stopCapturingMethodID = IntPtr.Zero; private static IntPtr getDirectoryDCIMMethodID = IntPtr.Zero; private IntPtr capturingObject = IntPtr.Zero; void Start() { if (!Application.isEditor) {
このコードでは、さらに多くの変更が行われましたが、作業のロジックは単純なままでした。 まず、フレームの寸法を
キャプチャコンストラクターに渡します。 新しいコンストラクタシグネチャに注意してください-
(II)V. Java側では、
FrameBufferオブジェクトを作成し、指定されたパラメーターをそれに渡します。
OnPreRender()メソッドは、カメラがシーンのレンダリングを開始する前に呼び出されます。 ここで
FrameBufferに切り替えます。 したがって、すべてのレンダリングは
FrameBufferに割り当てられたテクスチャで行われます。
OnPostRender()メソッドは、レンダリングが完了した後に呼び出されます。 フレームの終わりを待って、
FrameBufferをオフにし、
Media Packを使用してテクスチャを画面に直接コピーします
(Capturing.javaクラスの
endCaptureFrame()メソッドを参照)。
性能
多くの場合、開発者は、ビデオキャプチャがパフォーマンスにどの程度影響するか、FPSが「ドレイン」する方法を尋ねます。 結果は常に特定のアプリケーション、シーンの複雑さ、およびアプリケーションが実行されているデバイスに依存します。
パフォーマンスツールを使用できるように、単純なFPSカウンターを追加しましょう。 これを行うには、Unity GUIオブジェクトをシーンに追加し、次のコードを割り当てます:
Fps.cs
using UnityEngine; using System.Collections; public class FPSCounter : MonoBehaviour { public float updateRate = 4.0f;
これで、作業が終了したと見なし、プロジェクトを開始し、録音を試すことができます。 Unity3dとの統合または
Intel INDE Media Packの使用について質問がある場合は、コメントで喜んでお答えします。