この記事は、infoWindowをosmdroidに接続してAsyncTaskを操作するのが困難な人、および以前にこのようなことをしたことがない人を対象としています。 ここで、交通監視サービスで車に関するデータを受信するためのウィンドウを作成する方法について書きました。
一番下の行は、マーカーをクリックすると、一部のデータがオブジェクトから取得され、他のデータがAPIからロードされてアプリケーションデータベースに書き込まれ、InfoWindowオブジェクトに表示されるということです。
まず、infoWindowの説明を含むxmlファイルを作成し、トランスポート基準のヘッダーを持つフィールドを追加します。

MarkerInfoWindowを使用すると、タイトル、説明、サブデスクリプションに記録できます。必要なすべてのレコードにDescriptonのみを使用しました。 その後、データをハイフン付きの文字列としてそこに転送します。
マークアップは次のとおりです。<?xml version="1.0" encoding="UTF-8"?> <LinearLayout xmlns:android="http://schemas.android.com/apk/res/android" android:layout_width="wrap_content" android:layout_height="wrap_content" android:orientation="horizontal" android:background="@drawable/balloon_overlay_white" > <ImageView android:id="@+id/bubble_image" android:layout_width="65dp" android:layout_height="65dp" android:visibility="gone" /> <RelativeLayout android:layout_width="wrap_content" android:layout_height="wrap_content" android:paddingLeft="5dp" android:orientation="vertical" > <TextView android:id="@+id/bubble_title" android:layout_width="wrap_content" android:layout_height="wrap_content" android:textColor="#000000" android:maxEms="17" android:layout_gravity="left" android:layout_weight="1" android:text="Title" android:textSize="18dp" android:textIsSelectable="false" /> <Button android:id="@+id/bubble_moreinfo" android:background="@drawable/btn_moreinfo" android:visibility="gone" android:layout_width="wrap_content" android:layout_height="wrap_content" android:layout_gravity="right" android:layout_weight="0" /> <TextView android:id="@+id/bubble_description" android:layout_width="wrap_content" android:layout_height="wrap_content" android:textSize="14dp" android:maxEms="17" android:text="Description" android:layout_toRightOf="@+id/model" android:layout_below="@+id/bubble_title" android:lineSpacingExtra="3dp" android:layout_marginLeft="3dp" /> <TextView android:id="@+id/model" android:layout_width="wrap_content" android:layout_height="wrap_content" android:textColor="#ff6c6c6c" android:textSize="14dp" android:maxEms="17" android:text="@string/model" android:layout_below="@+id/bubble_title" android:layout_alignRight="@+id/organization" /> <TextView android:id="@+id/group" android:layout_width="wrap_content" android:layout_height="wrap_content" android:textColor="#ff6c6c6c" android:textSize="14dp" android:maxEms="17" android:text="@string/group" android:layout_below="@+id/model" android:layout_alignRight="@+id/organization" /> <TextView android:id="@+id/organization" android:layout_width="wrap_content" android:layout_height="wrap_content" android:textColor="#ff6c6c6c" android:textSize="14dp" android:maxEms="17" android:text="@string/organization" android:layout_below="@+id/group" /> <TextView android:id="@+id/speed" android:layout_width="wrap_content" android:layout_height="wrap_content" android:textColor="#ff6c6c6c" android:textSize="14dp" android:maxEms="17" android:text="@string/speed" android:layout_below="@+id/organization" android:layout_alignRight="@+id/organization" /> <TextView android:id="@+id/update" android:layout_width="wrap_content" android:layout_height="wrap_content" android:textColor="#ff6c6c6c" android:textSize="14dp" android:maxEms="17" android:text="@string/update" android:layout_below="@+id/speed" android:layout_alignRight="@+id/organization" /> <TextView android:id="@+id/bubble_subdescription" android:layout_width="wrap_content" android:layout_height="wrap_content" android:textColor="#000000" android:textSize="10dp" android:maxEms="17" android:text="Address" android:layout_below="@+id/update" /> </RelativeLayout> </LinearLayout>
次に、必要なデータを表示するために、CarInfoWindowクラスを作成します。 public class CarInfoWindow extends MarkerInfoWindow { Car mCar; Marker mMarker; CarInfoTask carInfoTask; Boolean stopped = false; Drawable icon; String active; public CarInfoWindow(int layoutResId, MapView mapView) { super(layoutResId, mapView); }
これで、マーカーを作成するときに、目的のウィンドウをマーカーにバインドするためだけに残ります
marker.setInfoWindow(infoWindow);
操作の結果、次のような結果が得られます。
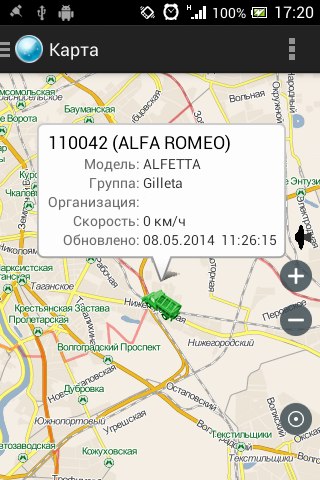
PSマーカーはトラックのアイコンであり、説明ではアルファロメオであるという事実にもかかわらず、すべてが正しく動作します。