libgdxを使用したゼロプレーヤーゲームの作成

アイデア


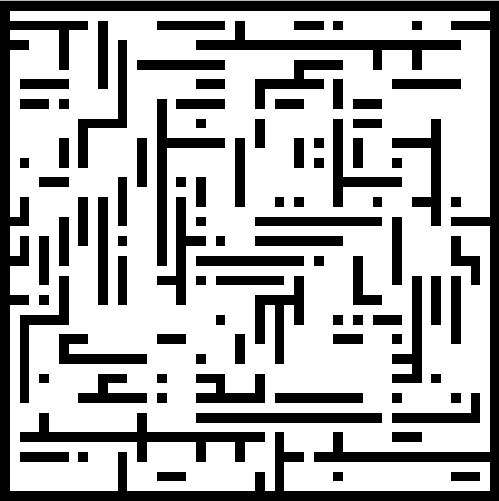
  1. ゲーム空間-フレームによって制限される市松模様のフィールド
  2. 既存の細胞タイプ:
    • 空のセル-白
    • 壁-ブラック
    • 獣-赤
    • トレイルは茶色です
    • 家は緑です
  3. 獣の動きは消えないトレイルを残す
  4. 起動時に、迷路が生成されます
  5. 獣は隣接する細胞の状態を知っており、これに基づいて移動すると地図を作成します
  6. 移動すると、獣は家の中で回復する力を消費します(+5)または任意のセルで回復します(+1)
  7. 衝突では、動物は群れにまとめられます(家は近隣のポイントに移動されます)。複数の動物が家で同時に休んでいる場合、カードは組み合わされます。
  8. (実装されていない)異なる「クラン」がランダムに参加または戦う
  9. (実装されていません)繁殖中にランダムに混合されたさまざまな動物の行動の遺伝的アルゴリズム(+突然変異)、より有望な種は戦争で生き残ります


なぜlibgdxですか?

私はさまざまなデバイス、ubuntuのホームコンピューター、win8のタブレットから開発を行いました。java+ eclipseバンドルにより、問題なくこれを行うことができました。 Libgdxは、カメラでの作業の利便性、将来的にグラフィックを追加する機能、およびAndroidバージョンを作成するために使用されます。

この記事では


実装されているゲームの収穫:


結果:


開始する


Eclipseでプロジェクトを作成してインポートした後、必要なフィールドを追加します(libgdxのバージョンによっては、一部が既に追加されている場合があります)

SpriteBatch batch;//       OrthographicCamera camera;//    Texture texture;// (   png  -     ) 


create()メソッドで、それらを初期化します:

 batch = new SpriteBatch(); batch.disableBlending(); camera = new OrthographicCamera(FIELD_SIZE, FIELD_SIZE); 


必要な定数を追加します。

 public static final int FIELD_SIZE = 51;// ( ) public static float UPDATE_TIME = 0.001f;//  ""  


さらに、セルの一般的な機能を説明する抽象クラスCellは便利です。

 public abstract class Cell { public Color color; Sprite sprite; public Cell(Texture texture, Color color){ this.color = color; sprite = new Sprite(texture); sprite.setColor(color); sprite.setSize(1, 1); } public abstract void update(Cell[][] map, int x, int y, Texture texture); public void setColor(Color color){ this.color = color; sprite.setColor(color); } public void draw(SpriteBatch batch,int x, int y){ sprite.setPosition(x-Main.FIELD_SIZE/2-sprite.getWidth()/2, y-Main.FIELD_SIZE/2-sprite.getHeight()/2); sprite.draw(batch); } } 


すぐに2つの相続人の壁と空を検討してください。

 public class Wall extends Cell { public Wall(Texture texture) { super(texture, new Color(0f, 0f, 0f, 1)); } @Override public void update(Cell[][] map, int x, int y, Texture texture) { } } public class Empty extends Cell { public Empty(Texture texture) { super(texture, new Color(1, 1, 1, 1)); } @Override public void update(Cell[][] map, int x, int y, Texture texture) { } } 


次に、迷路を作成する必要があります。 アルゴリズムについては説明しませんが、 ここで説明します 。 ゼロと1の2次元配列を返す単一のgetMaze(int size)メソッドを使用して、別のMazeGeneratorクラスでこのアルゴリズムを選択しました。0は空のセル、1は壁です。

競技場は、単純な2次元配列に格納されます。

 Cell[][] map; 


フィールドの作成は次のようになります。

 map = new Cell[FIELD_SIZE][FIELD_SIZE]; texture = new Texture(Gdx.files.internal("tile.png"));//    char[][] bmap = (new MazeGenerator()).getMaze(FIELD_SIZE - 1); for (int i = 0; i < FIELD_SIZE; i++) for (int j = 0; j < FIELD_SIZE; j++) { if (bmap[i][j] == 0) map[i][j] = new Empty(texture); if (bmap[i][j] == 1) map[i][j] = new Wall(texture); } 


これで、プログラムが起動するたびにランダムな迷路ができました。 定数をいじって、自分に最適な組み合わせを決定できます。


はい、この画面ではtile.pngは単なる白い正方形です。


人生で世界を埋める時です。

Cellの子孫を作成します。

 public class Unit extends Cell { Cell[][] my_map = new Cell[3][3];// ,      float update_time = Main.UPDATE_TIME;//  int mapX = 1, mapY = 1;//     Vector<Action> queue = new Vector<Action>();//    enum Action { left, right, up, down//  } public Unit(Texture texture, Cell[][] map, int x, int y) { super(texture, new Color(1f, 0, 0, 1)); for (int i = x - 1; i <= x + 1; i++) for (int j = y - 1; j <= y + 1; j++) my_map[i - x + 1][j - y + 1] = map[i][Main.FIELD_SIZE - j - 1]; my_map[1][1] = this; homeX = 1; homeY = 1; } private int goRight(Cell[][] map, int x, int y, Texture texture) {...}//map - ,   , x,y -     private int goLeft(Cell[][] map, int x, int y, Texture texture) {...} private int goUp(Cell[][] map, int x, int y, Texture texture) {...} private int goDown(Cell[][] map, int x, int y, Texture texture) {...} 


投稿にコードをロードしたくないので、更新方法全体を説明しません。

作業のアルゴリズムは単純です。アクションのキューが空でない場合はチェックし、タクトカウンターを減らし、空の場合は再度増やし、アクションを実行してマップ上の近傍を更新します。 アクションがない場合は、新しいルートを作成していますが、それについては後で詳しく説明します。次に、キャラクターのステップを検討します。

便宜上、各方向のステップに個別のメソッドを作成します。

 private int goRight(Cell[][] map, int x, int y, Texture texture) {...}//map - ,    private int goLeft(Cell[][] map, int x, int y, Texture texture) {...}//x,y -     private int goUp(Cell[][] map, int x, int y, Texture texture) {...} private int goDown(Cell[][] map, int x, int y, Texture texture) {...} 


「ステップ」はいくつかのアクションで構成されます。


ルート定義

私の意見では、最も簡単な解決策は、ランダムな空のセルにルートを構築するウェーブアルゴリズムです
これを行うために、静的メソッドを持つ新しいWavePathクラスを追加しました。

 public static Vector<Action> getPath(Cell[][] my_map, int x, int y, int nx,int ny){...} 


このメソッドは、ランダムに選択されたポイントに到達するための一連のステップを返します。

最後の仕上げ


これで、画面上にこれをすべて描画し、マップ配列をソートして、セルの状態を更新するだけです。

 @Override public void render() { this.update();//  Gdx.gl.glClearColor(0, 0, 0, 1); Gdx.gl.glClear(GL20.GL_COLOR_BUFFER_BIT); batch.setProjectionMatrix(camera.combined); batch.begin(); for (int i = 0; i < FIELD_SIZE; i++) for (int j = 0; j < FIELD_SIZE; j++) if(!(map[i][j] instanceof Wall))//       map[i][j].draw(batch, i, j); batch.end(); } public void update() { Input input = Gdx.input; for (int i = 0; i < FIELD_SIZE; i++) for (int j = 0; j < FIELD_SIZE; j++) map[i][j].update(map, i, j, texture);// if(input.isKeyPressed(Input.Keys.W))// , , ,  camera.zoom-=Gdx.graphics.getDeltaTime(); if(input.isKeyPressed(Input.Keys.S)) camera.zoom+=Gdx.graphics.getDeltaTime(); if(input.isKeyPressed(Input.Keys.Q)) camera.rotate(Gdx.graphics.getDeltaTime()*90); if(input.isKeyPressed(Input.Keys.E)) camera.rotate(-Gdx.graphics.getDeltaTime()*90); if(input.isKeyPressed(Input.Keys.CONTROL_LEFT)) UPDATE_TIME+=Gdx.graphics.getDeltaTime(); if(input.isKeyPressed(Input.Keys.SHIFT_LEFT)) UPDATE_TIME-=Gdx.graphics.getDeltaTime(); if(input.isKeyPressed(Input.Keys.LEFT)) camera.translate(new Vector2(-Gdx.graphics.getDeltaTime()*50,0)); if(input.isKeyPressed(Input.Keys.RIGHT)) camera.translate(new Vector2(Gdx.graphics.getDeltaTime()*50,0)); if(input.isKeyPressed(Input.Keys.UP)) camera.translate(new Vector2(0,Gdx.graphics.getDeltaTime()*50)); if(input.isKeyPressed(Input.Keys.DOWN)) camera.translate(new Vector2(0,-Gdx.graphics.getDeltaTime()*50)); if(input.isKeyPressed(Input.Keys.SPACE)){//  UPDATE_TIME = 1f; camera = new OrthographicCamera(FIELD_SIZE, FIELD_SIZE); } camera.update(); if (input.isTouched()) {//    float stepX = Gdx.graphics.getWidth() / FIELD_SIZE; float stepY = Gdx.graphics.getHeight() / FIELD_SIZE; float x = input.getX(); float y = input.getY(); for (int i = 0; i < FIELD_SIZE; i++) for (int j = 0; j < FIELD_SIZE; j++) { if (x >= stepX * i && x <= stepX * (i + 1) && y >= stepY * j && y <= stepY * (j + 1)) if (map[i][FIELD_SIZE - j - 1] instanceof Empty) map[i][FIELD_SIZE - j - 1] = new Unit(texture, map, i, j); } } } 


おわりに


素材の完全なプレゼンテーションではなく、エラーについて事前に謝罪します。 githubのソース。

誰かが興味があるなら、続編を書きます。

Source: https://habr.com/ru/post/J224525/


All Articles