前回の記事で、 AutoCAD用のプラグインの開発に関するいくつかの小さなメモを書くことを約束しました。 このトピックに関するHabréの情報はほとんどありません。おそらく、クリップにさらにいくつかのマテリアルを追加できます。 この記事では、AutoCADリボン上にいくつかのコントロールを持つ新しいタブを作成する例を示します。
public static string disclaimer = " AutoCAD. – .";
はじめに
テープを適切な時期に使い始めたとき、
ここで説明した例が最も役に立ちました。 基本的に、私はそれに依存します。
さらに、Kean Walmsley
によるこの投稿からいくつかの情報を収集できます。
最初に、AutoCADでのテープの外観を思い出しましょう。

上部にはリボンタブのリストがあります(
ホーム、メッシュモデリング、レンダリングなど )。 タブを選択すると、リボンにこのタブのコントロールがパネルにグループ化されて表示されます(
モデリング、メッシュ、ソリッド編集... )。
さあ、始めましょう。
1.新しいプラグインプロジェクトの作成
これは
前の記事の主題でした。
.NET Framework 3.5は、次の例で.NET Frameworkの必須バージョンとしてリストされています。
コードフレームワークをすぐに追加できます。 using System; using Autodesk.AutoCAD.Runtime; using Autodesk.Windows; namespace MyAutoCADDll { public class Commands : IExtensionApplication { // AutoCAD "TestCommand" [CommandMethod("TestCommand")] public void MyCommand() { } // Initialize() Terminate() , IExtensionApplication public void Initialize() { } public void Terminate() { } } }
2.必要なライブラリへのリンクを追加する
この場合、
AcMgd.dll 、
AcDbMgd.dll 、
AdWindows.dllという名前のAutoCAD .NET APIライブラリ
が役立ちます (
CopyLocal ! さらに、.NET自体の3つのアセンブリへのリンクを追加する必要があります:
プレゼンテーションコア 、
プレゼンテーションフレームワーク、および
WindowsBase 。
3.実際にコードを書いて新しいタブを作成する
コードの観点から見ると、すべてが非常に単純に見えます。 AutoCAD .NET APIには、テープを操作するためのクラスが既にあります。 これらは、
Autodesk.Windows名前空間にあります(
AdWindows.dllコンテナが含まれています)。
リボンに新しいタブを作成するには、以下を行う必要があります。
- インターフェイス要素を作成します。
- これらのアイテムをコンテナにグループ化します
- これらのコンテナが配置されるパネルを作成します。
- これらのパネルが配置されるタブを作成します。
- 作成したタブをAutoCADリボンに追加します。
コード: // AutoCAD «TestCommand» [CommandMethod("TestCommand")] public void MyCommand() { // Autodesk.Windows.RibbonCombo comboBox1 = new RibbonCombo(); comboBox1.Id = "_combobox1"; // Autodesk.Windows.RibbonButton button1 = new Autodesk.Windows.RibbonButton(); button1.Id = "_button1"; // Autodesk.Windows.RibbonPanelSource rbPanelSource = new Autodesk.Windows.RibbonPanelSource(); rbPanelSource.Title = " "; // rbPanelSource.Items.Add(comboBox1); rbPanelSource.Items.Add(new RibbonSeparator()); rbPanelSource.Items.Add(button1); // RibbonPanel rbPanel = new RibbonPanel(); // rbPanel.Source = rbPanelSource; // RibbonTab rbTab = new RibbonTab(); rbTab.Title = " "; rbTab.Id = "HabrRibbon"; // rbTab.Panels.Add(rbPanel); // AutoCAD Autodesk.Windows.RibbonControl rbCtrl = ComponentManager.Ribbon; // rbCtrl.Tabs.Add(rbTab); // ("") rbTab.IsActive = true; }
プロジェクトを組み立て、AutoCADを起動し、NETLOADコマンドを使用してプラグインをロードし、TestCommandコマンドを実行します...

はい、最も印象的な結果ではありません。 :)
しかし、何もせず、少し後でタブをもっと楽しくします。 それまでの間、何がすでにあるのかを理解しましょう。
4.リボン上のアイテムを検索する
ComponentManager.Ribbon.FindTab(string id)メソッドを使用して、リボン上のタブを検索できます。 引数として、作成時に指定されたタブの
Id指定する必要があります。
パネル(
ComponentManager.Ribbon.FindPanel(string id, bool SearchActiveTabOnly) )およびその他のコントロール(
ComponentManager.Ribbon.FindItem(string id, bool SearchActiveTabOnly) )を見つけるための同様のメソッドがあります。
要素が正常に見つかった場合、上記の関数は対応するオブジェクトを返します。それ以外の場合は
nullが返されます。
5.ボタンクリック処理
ボタンクリックハンドラーをバインドするには、
CommandHandlerクラスの
CommandHandlerプロパティを使用します。 このプロパティでは、
System.Windows.Input.ICommandインターフェイスを実装するメソッドを指定する必要があります。
ICommandインターフェイス内で、クラスは
CanExecuteChangedイベントと、
CanExecuteおよび
Execute関数を実装する必要があります。
ボタンクリックハンドラーのサンプルコード: using System; using Autodesk.AutoCAD.Runtime; using Autodesk.Windows; namespace MyAutoCADDll { public class Commands : IExtensionApplication { // AutoCAD "TestCommand" [CommandMethod("TestCommand")] public void MyCommand() { // Autodesk.Windows.RibbonCombo comboBox1 = new RibbonCombo(); comboBox1.Id = "_combobox1"; // Autodesk.Windows.RibbonButton button1 = new Autodesk.Windows.RibbonButton(); button1.Id = "_button1"; // button1.CommandHandler = new CommandHandler_Button1(); // Autodesk.Windows.RibbonPanelSource rbPanelSource = new Autodesk.Windows.RibbonPanelSource(); rbPanelSource.Title = " "; // rbPanelSource.Items.Add(comboBox1); rbPanelSource.Items.Add(new RibbonSeparator()); rbPanelSource.Items.Add(button1); // RibbonPanel rbPanel = new RibbonPanel(); // rbPanel.Source = rbPanelSource; // RibbonTab rbTab = new RibbonTab(); rbTab.Title = " "; rbTab.Id = "HabrRibbon"; // rbTab.Panels.Add(rbPanel); // AutoCAD Autodesk.Windows.RibbonControl rbCtrl = ComponentManager.Ribbon; // rbCtrl.Tabs.Add(rbTab); // ("") rbTab.IsActive = true; } // Initialize() Terminate() , IExtensionApplication public void Initialize() { } public void Terminate() { } } // public class CommandHandler_Button1 : System.Windows.Input.ICommand { public event EventHandler CanExecuteChanged; public bool CanExecute(object param) { return true; } public void Execute(object parameter) { System.Windows.MessageBox.Show("Habr!"); } } }
注意:CanExecuteChangedイベントは、実行可能性の変更の可能性に関するコマンドをユーザーに通知します(要するに、機能するか機能しない)。 CanExecute関数を使用すると、特定の時間にコマンドを実行できるかどうかを知ることができます。 また、関数Executeは、実際には、コマンドが呼び出されたときにコマンドが実行するアクションです。
この例では、コマンドは常に使用可能であり、この状態は変わりません。 私の実際のタスクでは、最初の2つのパラメーターを何らかの形で使用する必要もありませんでした。)
これで、ボタンをクリックすると、メッセージボックスが画面に表示されます。

6.ドロップダウンリストとの相互作用( RibbonCombo )
6.1リスト項目の追加、変更、削除
RibbonComboドロップダウンリストのすべての要素は、
Itemsプロパティに含まれています。
System.Collections.ObjectModel.ObservableCollection型を持ち、
System.Objectはコンテンツ型として機能します。 したがって、コレクションの要素は、任意のクラスのオブジェクトにすることができます。 残念ながら、この配列に単純に複数のテキスト行を追加すると、目的の効果が得られません。
comboBox1.Items.Add(""); comboBox1.Items.Add(""); comboBox1.Items.Add("");

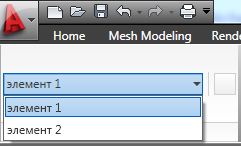
適切なドロップダウンリストを取得するには、上記の
RibbonButtonクラスのインスタンスを要素として使用できます。
Autodesk.Windows.RibbonButton tempRibBut1 = new Autodesk.Windows.RibbonButton(); tempRibBut1.Id = "_temp_button_1"; tempRibBut1.Text = " 1"; tempRibBut1.ShowText = true; Autodesk.Windows.RibbonButton tempRibBut2 = new Autodesk.Windows.RibbonButton(); tempRibBut2.Id = "_temp_button_2"; tempRibBut2.Text = " 2"; tempRibBut2.ShowText = true; comboBox1.Items.Add(tempRibBut1); comboBox1.Items.Add(tempRibBut2);
その結果、これが表示されます。
必要に応じて、特に
ObservableCollectionに埋め込まれたプロパティとメソッドを使用できます。
- メソッド
Remove(object item) -指定されたアイテムを削除します。 RemoveAt(int index)メソッドRemoveAt(int index) -指定された位置の要素を削除します。Clear()メソッド-コレクションからすべての要素を削除します。Countプロパティ-コレクション内の要素の数を取得します。
現在の
RibbonButtonリスト
RibbonButtonは、
Currentプロパティに保存されます。
注意:通常、リストアイテムはサブジェクトエリアの何らかの種類のオブジェクトに関連付けられます。 このリスト項目またはそのリスト項目が何にマップされているかを迅速に判断できるようにするには、
RibbonButtonクラスの
Tagプロパティを使用できます。
Autodesk.Windows.RibbonButton tempRibBut1 = new Autodesk.Windows.RibbonButton(); tempRibBut1.Id = "_temp_button_1"; tempRibBut1.Text = " 1"; tempRibBut1.ShowText = true; tempRibBut1.Tag = "elementTag"; // comboBox1.Items.Add(tempRibBut1);
次に、リストアイテムを処理するときに、設定されたタグを確認できます。
object obj = comboBox1.Items[0]; string itemTag = (obj as RibbonButton).Tag;
さらに先へ進むことができます。
Tagプロパティは
System.Object型であるため、プログラマーによって作成されたものを含む任意のクラスのオブジェクトはタグとして機能できます。
tempRibBut1.Tag = new MyClass("objectDecription");
その後、このオブジェクトの任意のプロパティにアクセスできます。
object obj = comboBox1.Items[0]; MyClass itemTag = (obj as RibbonButton).Tag as MyClass; string myClassDecription = itemTag.Description;
行を保存したいという強い要望がある場合、次の形式の構造を書くことができます。 string myClassDecription = ((comboBox1.Items[0] as RibbonButton).Tag as MyClass).Description
もちろん、実際のコードでは、取得した値が
nullないことを確認する必要があり
null 。
6.2リスト項目選択イベントの処理
RibbonComboリスト
RibbonComboと、
CurrentChangedイベントが
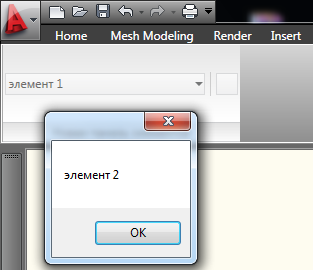
CurrentChangedます。 このようなイベントのハンドラーの簡単な例を次に示します。
// public static void comboBox1_CurrentChanged(object o, RibbonPropertyChangedEventArgs args) { if (args.NewValue != null) { System.Windows.MessageBox.Show((args.NewValue as RibbonButton).Text); } }
完全なサンプルコード: using System; using Autodesk.AutoCAD.Runtime; using Autodesk.Windows; namespace MyAutoCADDll { public class Commands : IExtensionApplication { // AutoCAD "TestCommand" [CommandMethod("TestCommand")] public void MyCommand() { // Autodesk.Windows.RibbonCombo comboBox1 = new RibbonCombo(); comboBox1.Id = "_combobox1"; // Autodesk.Windows.RibbonButton tempRibBut1 = new Autodesk.Windows.RibbonButton(); tempRibBut1.Id = "_temp_button_1"; tempRibBut1.Text = " 1"; tempRibBut1.ShowText = true; tempRibBut1.Tag = "btn1"; Autodesk.Windows.RibbonButton tempRibBut2 = new Autodesk.Windows.RibbonButton(); tempRibBut2.Id = "_temp_button_2"; tempRibBut2.Text = " 2"; tempRibBut2.ShowText = true; tempRibBut2.Tag = "btn2"; comboBox1.Items.Add(tempRibBut1); comboBox1.Items.Add(tempRibBut2); // comboBox1.CurrentChanged += comboBox1_CurrentChanged; // Autodesk.Windows.RibbonButton button1 = new Autodesk.Windows.RibbonButton(); button1.Id = "_button1"; // button1.CommandHandler = new CommandHandler_Button1(); // Autodesk.Windows.RibbonPanelSource rbPanelSource = new Autodesk.Windows.RibbonPanelSource(); rbPanelSource.Title = " "; // rbPanelSource.Items.Add(comboBox1); rbPanelSource.Items.Add(new RibbonSeparator()); rbPanelSource.Items.Add(button1); // RibbonPanel rbPanel = new RibbonPanel(); // rbPanel.Source = rbPanelSource; // RibbonTab rbTab = new RibbonTab(); rbTab.Title = " "; rbTab.Id = "HabrRibbon"; // rbTab.Panels.Add(rbPanel); // AutoCAD Autodesk.Windows.RibbonControl rbCtrl = ComponentManager.Ribbon; // rbCtrl.Tabs.Add(rbTab); // ("") rbTab.IsActive = true; } // public static void comboBox1_CurrentChanged(object o, RibbonPropertyChangedEventArgs args) { if (args.NewValue != null) { System.Windows.MessageBox.Show((args.NewValue as RibbonButton).Text); } } // Initialize() Terminate() , IExtensionApplication public void Initialize() { } public void Terminate() { } } // public class CommandHandler_Button1 : System.Windows.Input.ICommand { public event EventHandler CanExecuteChanged; public bool CanExecute(object param) { return true; } public void Execute(object parameter) { System.Windows.MessageBox.Show("Habr!"); } } }
結果:
7.コントロールの外観の設定
私の意見では、AutoCAD .NET APIで使用できるクラスには、外観をカスタマイズするための最も広い可能性はありません。 しかし、確かに基本的なことがあります。
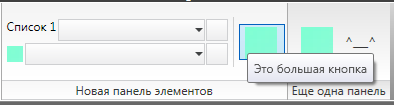
まず、コントロールを下に配置できます。これは、ドロップダウンリストのような「狭い」要素を使用する場合に特に便利です。
次に、各コントロールには、外観を変更できるプロパティがあります。 たとえば、ドロップダウンリストの場合、ボタンのタイトルと幅、サイズ(大または小)および署名を指定できます。 さらに、ツールチップを追加できます(この例では、3番目のボタンに追加されます)。
コード(アセンブリとSystem.Drawing名前空間への参照が追加されていることに注意してください): using System; using System.Drawing; using Autodesk.AutoCAD.Runtime; using Autodesk.Windows; namespace MyAutoCADDll { public class Commands : IExtensionApplication { // AutoCAD "TestCommand" [CommandMethod("TestCommand")] public void MyCommand() { // ( ) Bitmap bmp = new Bitmap(1, 1); bmp.SetPixel(0, 0, Color.Aquamarine); bmp = new Bitmap(bmp, 1024, 1024); IntPtr hBitmap = bmp.GetHbitmap(); System.Windows.Media.Imaging.BitmapSource bs = System.Windows.Interop.Imaging.CreateBitmapSourceFromHBitmap( hBitmap, IntPtr.Zero, System.Windows.Int32Rect.Empty, System.Windows.Media.Imaging.BitmapSizeOptions.FromEmptyOptions()); // Autodesk.Windows.RibbonCombo comboBox1 = new RibbonCombo(); comboBox1.Id = "_combobox1"; comboBox1.Width = 200; comboBox1.Text = " 1"; comboBox1.ShowText = true; Autodesk.Windows.RibbonCombo comboBox2 = new RibbonCombo(); comboBox2.Id = "_combobox2"; comboBox2.Width = 200; comboBox2.Image = bs; comboBox2.ShowImage = true; // Autodesk.Windows.RibbonButton button1 = new Autodesk.Windows.RibbonButton(); button1.Id = "_button1"; Autodesk.Windows.RibbonButton button2 = new Autodesk.Windows.RibbonButton(); button2.Id = "_button2"; // , Autodesk.Windows.RibbonRowPanel RowPanel1 = new Autodesk.Windows.RibbonRowPanel(); Autodesk.Windows.RibbonRowPanel RowPanel2 = new Autodesk.Windows.RibbonRowPanel(); // RowPanel1.Items.Add(comboBox1); RowPanel1.Items.Add(new RibbonRowBreak()); RowPanel1.Items.Add(comboBox2); RowPanel2.Items.Add(button1); RowPanel2.Items.Add(new RibbonRowBreak()); RowPanel2.Items.Add(button2); // Autodesk.Windows.RibbonButton button3 = new Autodesk.Windows.RibbonButton(); button3.Id = "_button3"; button3.IsToolTipEnabled = true; button3.ToolTip = " "; button3.Size = Autodesk.Windows.RibbonItemSize.Large; button3.LargeImage = bs; Autodesk.Windows.RibbonButton button4 = new Autodesk.Windows.RibbonButton(); button4.Id = "_button4"; button4.Text = "^___^"; button4.ShowText = true; button4.Size = Autodesk.Windows.RibbonItemSize.Large; button4.LargeImage = bs; // Autodesk.Windows.RibbonPanelSource rbPanelSource1 = new Autodesk.Windows.RibbonPanelSource(); rbPanelSource1.Title = " "; Autodesk.Windows.RibbonPanelSource rbPanelSource2 = new Autodesk.Windows.RibbonPanelSource(); rbPanelSource2.Title = " "; // rbPanelSource1.Items.Add(RowPanel1); rbPanelSource1.Items.Add(RowPanel2); rbPanelSource1.Items.Add(new RibbonSeparator()); rbPanelSource1.Items.Add(button3); rbPanelSource2.Items.Add(button4); // RibbonPanel rbPanel1 = new RibbonPanel(); RibbonPanel rbPanel2 = new RibbonPanel(); // rbPanel1.Source = rbPanelSource1; rbPanel2.Source = rbPanelSource2; // RibbonTab rbTab = new RibbonTab(); rbTab.Title = " "; rbTab.Id = "HabrRibbon"; // rbTab.Panels.Add(rbPanel1); rbTab.Panels.Add(rbPanel2); // AutoCAD Autodesk.Windows.RibbonControl rbCtrl = ComponentManager.Ribbon; // rbCtrl.Tabs.Add(rbTab); // ("") rbTab.IsActive = true; } // Initialize() Terminate() , IExtensionApplication public void Initialize() { } public void Terminate() { } } }
結果:

この記事で終わりになります。 次回は、レイヤーとシンプルなグラフィックオブジェクトの操作について説明します。