アプリケーションのロード速度とそのパフォーマンスを高速化するには、さまざまな方法があります。
特に、ページ要素の
遅延ロードを使用するか
、コンテンツの
増分ロードを使用
できます 。 ページをより速くロードするためのこれらの方法と、以下のその他の推奨事項をお読みください。
ページ要素の読み込みの遅延
アプリケーションを読み込むときに、すぐにいくつかの要素を必要としない場合があります。 この場合、すぐにダウンロードできないため、アプリケーションの起動が高速化され、後で必要になったときにのみダウンロードできます。
例を見てみましょう。 次のコードをページのXAMLに追加します。
<Grid HorizontalAlignment="Center" Background="{ThemeResource ApplicationPageBackgroundThemeBrush}"> <StackPanel x:Name="SomeHiddenPanel" Visibility="Collapsed" Width="100" Height="100" Background="Yellow"> </StackPanel> <Button x:Name="btnShow" Click="btnShow_Click"> </Button> </Grid>
コードからわかるように、StackPanel要素は非表示になっています。 アプリケーションを起動します。 StackPanelアプリケーションウィンドウでは、黄色は表示されません。 しかし、動的なビジュアルツリー(ちなみに、これはVisual Studio 2015の新機能です)では、起動直後に、SomeHiddenPanelという非表示の要素を見ることができます。
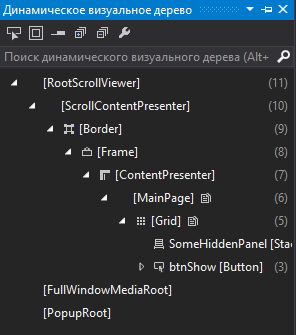
折りたたんだという事実は、起動しないという意味ではありません。 コントロールはウィンドウインターフェイススペースを占有しませんが、リソースをロードして使用します。 必要に応じて、次のようにしてページに表示できます。
SomeHiddenPanel.Visibility = Visibility.Visible;
StackPanel要素にx:DeferLoadStrategy = "Lazy"属性を追加した後、次のコードを取得します。
<Grid HorizontalAlignment="Center" Background="{ThemeResource ApplicationPageBackgroundThemeBrush}"> <StackPanel x:Name="SomeHiddenPanel" x:DeferLoadStrategy="Lazy" Visibility="Collapsed" Width="100" Height="100" Background="Yellow"> </StackPanel> <Button x:Name="btnShow" Click="btnShow_Click"> </Button> </Grid>
これで、アプリケーションの起動後、StackPanel要素は実際に存在しなくなります。
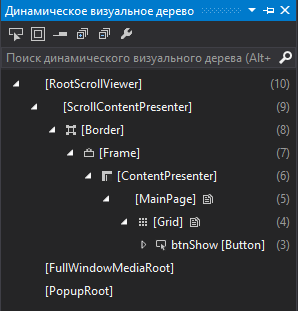
コードからSomeHiddenPanel要素にアクセスして、たとえばその可視性を変更しようとすると
SomeHiddenPanel.Visibility = Visibility.Visible;
その後、System.NullReferenceExceptionを取得します。 そのとおりです。なぜなら、この要素は本当に存在しないからです。
適切なタイミングで要素をロードするには、FindNameメソッドを使用できます。
通話後
FindName("SomeHiddenPanel");
XAML要素がロードされます。 あとは表示するだけです:
SomeHiddenPanel.Visibility = Visibility.Visible;
出来上がり:

遅延読み込み要素
xを読み込む他の方法
:DeferLoadStrategy =“ Lazy”は次のとおりです。
1.バインドを使用します。これは、アンロードされたアイテムを指します。
2. VisualState状態では、アンロードされたアイテムを参照するセッターまたはアニメーションを使用します。
3.アンロードされたアイテムに影響するアニメーションを呼び出します。
最後の方法を確認してください。 StoryBoardページをリソースに追加します。
<Page.Resources> <Storyboard x:Name="SimpleColorAnimation"> <ColorAnimation BeginTime="00:00:00" Storyboard.TargetName="SomeHiddenPanel" Storyboard.TargetProperty="(StackPanel.Background).(SolidColorBrush.Color)" From="Yellow" To="Green" Duration="0:0:4" /> </Storyboard> </Page.Resources>
btnShow_Clickイベントで、アニメーションを実行します。
SimpleColorAnimation.Begin(); SomeHiddenPanel.Visibility = Visibility.Visible;
ボタンをクリックすると、アイテムが表示されます。
ちょっとした理論:
x:DeferLoadStrategy属性は、UIElement要素にのみ追加でき
ます (FlyoutやMenuFlyoutなど、FlyoutBaseから継承するクラスを除く)。 この属性をページまたはユーザーコントロールのルート要素、またはResourceDictionaryにある要素に適用することはできません。 XamlReader.Loadを使用してXAMLコードをダウンロードする場合、この属性には意味がないため、XamlReader.Loadでは使用できません。
多数のインターフェイス要素を非表示にするとき、および一度にすべてを表示するときは、プログラムに問題が生じる可能性があるので注意してください。
Windows 8.1アプリケーションでの増分読み込み
XAML ListView / GridView要素には通常、データ配列バインディングが含まれます。 大量のデータがある場合、一度にロードすると、それらはすべて表示されますが、もちろん表示できず、アプリケーションウィンドウのスクロールは断続的になります(これは、画像がデータとして使用される場合に特に顕著です)。
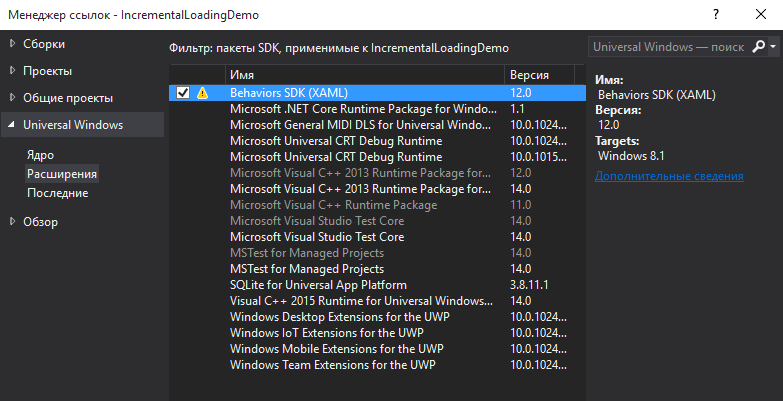
Windows 8.1でブートをどのように優先順位付けできますか? Behaviors SDK(XAML)拡張機能を使用します。
リンクを追加しました。 [プロジェクト]メニュー-[リンクの追加]。 拡張機能グループで、動作SDK(XAML)が選択されました。
次に、ルートページ要素に名前空間へのリンクが追加されました。
xmlns:Interactivity="using:Microsoft.Xaml.Interactivity" xmlns:Core="using:Microsoft.Xaml.Interactions.Core"
その後、テンプレートで、次の方法でダウンロードの優先順位を設定できます。
<Image Source="ms-appx:///Assets/placeHolderImage.png" Height="100" Width="60" VerticalAlignment="Center" Margin="0,0,10,0"> <Interactivity:Interaction.Behaviors> <Core:IncrementalUpdateBehavior Phase="0"/> </Interactivity:Interaction.Behaviors> </Image>
例を考えてみましょう。
placeHolderImage.jpgという名前でAssetsフォルダーのプロジェクトにスタブ画像を追加します。
上記のように、ビヘイビアーSDK(XAML)へのリンクを追加します。
データクラスを作成する
ImageInfoデータクラスコード public class ImageInfo { private string _name; private Uri _url; public string Name { get { return _name; } set { _name = value;} } public Uri Url { get { return _url; } set { _url = value; } } }
MainPage.xamlのPageタグに名前空間宣言を追加します。
xmlns:Interactivity="using:Microsoft.Xaml.Interactivity" xmlns:Core="using:Microsoft.Xaml.Interactions.Core"
プロジェクトの名前空間へのリンク(IncrementalLoadingDemoがあります)
xmlns:local="using:IncrementalLoadingDemo"
これで、要素テンプレートを内部に含むListViewを追加し、読み込みフェーズを指定できます(3つ以下のフェーズが必要です)。
<ListView ItemsSource="{Binding}" HorizontalContentAlignment="Center" Width="200" Height="500" BorderThickness="1" BorderBrush="Black"> <ListView.ItemTemplate> <DataTemplate x:DataType="local:ImageInfo"> <StackPanel Orientation="Vertical"> <TextBlock Text="{Binding Name}" > <Interactivity:Interaction.Behaviors> <Core:IncrementalUpdateBehavior Phase="1"/> </Interactivity:Interaction.Behaviors> </TextBlock> <Grid> <Image Source="Assets/placeHolderImage.jpg" Height="100" Width="100" VerticalAlignment="Center" Margin="0"> <Interactivity:Interaction.Behaviors> <Core:IncrementalUpdateBehavior Phase="0"/> </Interactivity:Interaction.Behaviors> </Image> <Image Source="{Binding Path=Url}" Height="100" Width="100" VerticalAlignment="Center" Margin="0"> <Interactivity:Interaction.Behaviors> <Core:IncrementalUpdateBehavior Phase="3"/> </Interactivity:Interaction.Behaviors> </Image> </Grid> </StackPanel> </DataTemplate> </ListView.ItemTemplate> </ListView>
そして、コードビハインドでデータを入力します。
ObservableCollection<ImageInfo> myimages = new ObservableCollection<ImageInfo>(); public MainPage() { this.InitializeComponent(); this.DataContext = myimages; int i; for (i=0; i < 20000; i++) { myimages.Add(new ImageInfo { Name = " 1", Url = new Uri("http://www.alexalex.ru/TesT.png") }); myimages.Add(new ImageInfo { Name = " 2", Url = new Uri("http://www.alexalex.ru/RedactoR.jpg") }); myimages.Add(new ImageInfo { Name = " 3", Url = new Uri("http://www.alexalex.ru/TesT.gif") }); } }
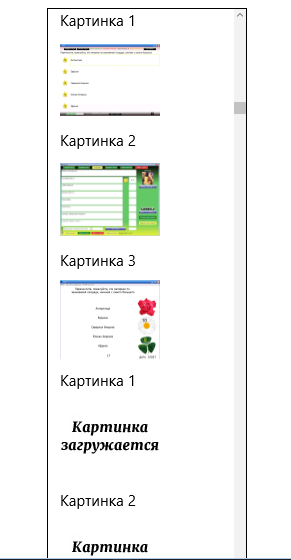
まず、ローカル画像placeHolderImage.pngがロードされ、ネットワークからの画像がロードされてグリッドに表示され、スタブ画像が見えなくなります。 リストをすばやくスクロールすると、Web画像を読み込む時間がなく、スタブ画像がスキップされることがあります。
ContainerContentChangingイベントを使用したデータバインディングなしの増分読み込み
Windows 8.xアプリケーションでは、Behaviors SDKを使用できましたが、ContainerContentChangingイベントを使用して、コードから描画フェーズを設定できました。 ContainerContentChangingを使用したメソッドの実装はもう少し複雑ですが、アプリケーションの速度が向上します。 これにより、高速スクロールで、ウィンドウに現在表示されている要素のみがロードされます。 このメソッドは、データバインディングが存在せず、C#コードからコンテンツを強制的にロードすることを意味します。
サンプルを変更します。
ItemTemplateテンプレートが必要です。 ItemViewerという名前のユーザーコントロールとそのようなXAMLコードを作成します。
ここにコード <UserControl x:Class="IncrementalLoadingDemo.ItemViewer" xmlns="http://schemas.microsoft.com/winfx/2006/xaml/presentation" xmlns:x="http://schemas.microsoft.com/winfx/2006/xaml" xmlns:local="using:IncrementalLoadingDemo" xmlns:d="http://schemas.microsoft.com/expression/blend/2008" xmlns:mc="http://schemas.openxmlformats.org/markup-compatibility/2006" mc:Ignorable="d" d:DesignHeight="300" d:DesignWidth="400"> <StackPanel Orientation="Vertical"> <TextBlock x:Name="txtName" Text="{Binding Name}" ></TextBlock> <Grid> <Image x:Name="imgHolder" Source="Assets/placeHolderImage.jpg" Height="100" Width="100" VerticalAlignment="Center" Margin="0" /> <Image x:Name="imgUrl" Height="100" Width="100" VerticalAlignment="Center" Margin="0" /> </Grid> </StackPanel> </UserControl>
ユーザーコントロールクラスのコードにいくつかのメソッドを追加します。 1つの方法はテキストを表示し、別の画像は画像を置き換え、3番目の画像はインターネットからダウンロードされ、最後に4番目はデータをクリアします。
C#クラスコード public sealed partial class ItemViewer : UserControl { private ImageInfo _item; public ItemViewer() { this.InitializeComponent(); } public void ShowPlaceholder() { imgHolder.Opacity = 1; } public void ShowTitle(ImageInfo item) { _item = item; txtName.Text = _item.Name; txtName.Opacity = 1; } public void ShowImage() { imgUrl.Source = new BitmapImage(_item.Url); imgUrl.Opacity = 1; imgHolder.Opacity = 0; } public void ClearData() { _item = null; txtName.ClearValue(TextBlock.TextProperty); imgHolder.ClearValue(Image.SourceProperty); imgUrl.ClearValue(Image.SourceProperty); } }
次に、MainPage.xamlファイルのXAMLで、新しく作成されたカスタム要素へのリンクを追加します。 これをテンプレートとして使用します。
<Page.Resources> <DataTemplate x:Key="FrontImageTemplate"> <local:ItemViewer/> </DataTemplate> </Page.Resources>
そして、ListView要素自体を追加します
<ListView ItemsSource="{Binding}" HorizontalContentAlignment="Center" Width="200" Height="500" BorderThickness="1" BorderBrush="Black" ShowsScrollingPlaceholders="True" ItemTemplate="{StaticResource FrontImageTemplate}" ContainerContentChanging="ItemListView_ContainerContentChanging"> </ListView>
その中で、テンプレートとContainerContentChangingイベントを指定しました。 このイベントのコードは、現在の読み込み段階に応じて要素を表示します。
void ItemListView_ContainerContentChanging private void ItemListView_ContainerContentChanging(ListViewBase sender, ContainerContentChangingEventArgs args) { ItemViewer iv = args.ItemContainer.ContentTemplateRoot as ItemViewer; if (args.InRecycleQueue == true) { iv.ClearData(); } else if (args.Phase == 0) { iv.ShowTitle(args.Item as ImageInfo);
また、デリゲートを使用したコールバックも必要です(MainPage.xaml.csにも追加します)。
private TypedEventHandler<ListViewBase, ContainerContentChangingEventArgs> ContainerContentChangingDelegate { get { if (_delegate == null) { _delegate = new TypedEventHandler<ListViewBase, ContainerContentChangingEventArgs>(ItemListView_ContainerContentChanging); } return _delegate; } } private TypedEventHandler<ListViewBase, ContainerContentChangingEventArgs> _delegate;
この方法は、Windows 8.xアプリケーションとWindows 10アプリケーションの両方で使用できます。
Windows UAPアプリケーションでの増分読み込み
Windows 10およびUWPのリリースでは、コンパイルされたx:バインドバインディングを使用できるようになったため、より便利で高速な方法が登場しました。
最近それらについて書い
た-Windows 10アプリケーションでコンパイルされたデータバインディング少し繰り返して、既にx:Bindを使用して同じ例を示します。
リンクを画像にバインドするには、コンバーターが必要です
コンバーターコード class ConverterExample : IValueConverter { public object Convert(object value, Type targetType, object parameter, string language) { if (value == null) return string.Empty; System.Uri u = (System.Uri)value; Windows.UI.Xaml.Media.Imaging.BitmapImage bitmapImage = new Windows.UI.Xaml.Media.Imaging.BitmapImage(u); return bitmapImage; } public object ConvertBack(object value, Type targetType, object parameter, string language) {
ページページのXAMLリソースで、リンクを追加します
<Page.Resources> <local:ConverterExample x:Name="ThatsMyConverter"/> </Page.Resources>
そして、テンプレートの読み込みフェーズの要素を示すListViewを追加できます(3つのフェーズしかありません)
<ListView ItemsSource="{x:Bind myimages}" HorizontalContentAlignment="Center" Width="200" Height="500" BorderThickness="1" BorderBrush="Black"> <ListView.ItemTemplate> <DataTemplate x:DataType="local:ImageInfo"> <StackPanel Orientation="Vertical"> <TextBlock Text="{x:Bind Name}" x:Phase="0" ></TextBlock> <Grid> <Image Source="Assets/placeHolderImage.jpg" Height="100" Width="100" VerticalAlignment="Center" Margin="0" /> <Image Source="{x:Bind Url,Converter={StaticResource ThatsMyConverter}}" Height="100" Width="100" VerticalAlignment="Center" Margin="0" x:Phase="3" /> </Grid> </StackPanel> </DataTemplate> </ListView.ItemTemplate> </ListView>
この例はより単純になり、もちろん、アプリケーションはより高速になりました。 どうすればさらに最適化できますか?
大きな画像の読み込みを最適化するために、
DecodePixelHeightと
DecodePixelWidthを使用することができます(Windows 8.x以前では可能だった)。 これらの属性の値を設定すると、BitmapImage値は通常ではなく、表示されたサイズでキャッシュされます。 比率を自動的に保持する場合は、DecodePixelHeightまたはDecodePixelWidthのみを指定できますが、両方は指定できません。
つまり、この場合、1行追加することでコンバーターのConvertメソッドのコードを少し変更できます(高さ100ピクセルの画像を出力することがわかっています)。
public object Convert(object value, Type targetType, object parameter, string language) { if (value == null) return string.Empty; System.Uri u = (System.Uri)value; Windows.UI.Xaml.Media.Imaging.BitmapImage bitmapImage = new Windows.UI.Xaml.Media.Imaging.BitmapImage(u); bitmapImage.DecodePixelHeight = 100;
いくつかの一般的な推奨事項:アプリケーションをWindows 8.xからWindows 10に変換すると、パフォーマンスが向上します。
プロファイラーを使用して、コードのボトルネックを検索します。
禅を知ろう。 最速のコードは、存在しないコードです。 多数の機能とアプリケーションの速度から選択します。
アプリケーションで使用される画像のサイズを最適化します。
データテンプレートの要素の数を減らします。 グリッド内のグリッドは良い解決策ではありません。
アプリケーションをポンピングするのに役立つ資料:x:DeferLoadStrategy属性XAMLパフォーマンス:XAMLで構築されたユニバーサルWindowsアプリエクスペリエンスを最大化するための手法C#およびXAMLを使用したWindowsストアアプリのインクリメンタルロードクイックスタート