はじめに、1人のhabrayuzerの誕生日おめでとうございます。 大きく成長し、スマートになり、最終的にGraphics2Dキャンバスフレームワークを許容範囲内に仕上げます。
誕生日おめでとう。 :P今年の夏、面白い考えが浮かびました。キャンバスのマイクロライブラリを100行で書いているとしたら、そこに何が収まりますか?..最も詳細な答えは、夕方に書くことができます。 そして、この記事のアイデアが生まれました。
私は、OOP、イベント、およびアニメーションをキャンバスに実装することを提案します-最も頻繁に必要な(IMHO)もの...そして、これらすべてを100行で行います。 パート1
免責事項:ここでは、(場合によっては)完全に不必要な歪みを待って、いくつかのコード文字を保存しています。 著者(これは私です)は、これがマイクロライブラリでも可能であり、非常に頻繁に行われると信じています。 もちろん、これがパフォーマンスに違反しない場合。
カットの下であなたに会えてうれしい;)
アイデアから始めましょう(最初に、OOP)。 3つの主なオブジェクト:パス、画像、テキスト。 たとえば、ミニライブラリに長方形や円を実装する必要はありません。これらはパスを介して簡単に作成できます。 スプライトのように、写真を通して。 等
オブジェクトの最初の引数はそのコンテンツです。
2つ目は、描画前にキャンバスに設定されるスタイルです。
私はそれをラットと呼びます:P
Rat = function(context){ this.context = context; };
方法
このような何かがいいだろう:

var path = rat.path([ ['moveTo', 10, 10], ['lineTo', 100, 100], ['lineTo', 10, 100], ['closePath'] ], { fillStyle: 'red', strokeStyle: 'green', lineWidth: 4 });
3つのオブジェクトすべてについて、コンテキストプロパティ、スタイルのオブジェクトなどを設定する必要があります。
Rat.init = function(cls, arg){ cls.opt = arg[0]; cls.style = arg[1] || {}; cls.context = arg[2]; cls.draw(arg[2].context); };
すべてがはっきりしているように見える? 各オブジェクトには、opt(1引数)、style(2nd)、context(context)、およびこのオブジェクトを描画するdraw(ctx)関数の3つのプロパティがあります。
私たちのクラス:
Rat.Path = function(opt, style, context){ Rat.init(this, arguments); };
はい、奇妙なことに、デザイナーがすべてです。
最も重要な:レンダリング:
Rat.Path.prototype = { draw: function(ctx){ this.process(function(ctx){ if(this.style.fillStyle) ctx.fill(); if(this.style.strokeStyle) ctx.stroke(); }, ctx); }, process: function(callback, ctx){ ctx = ctx || this.context.context; Rat.style(ctx, this.style); ctx.beginPath(); this.opt.forEach(function(func){ ctx[func[0]].apply(ctx, func.slice(1)); }); var result = callback.call(this, ctx); ctx.restore(); return result; } };
ここでのプロセス関数は偶然ではありません。あちこちで必要になります。
isPointIn: function(x,y, ctx){ return this.process(function(ctx){ return ctx.isPointInPath(x, y); }, ctx); }
なぜコールバックするのですか? うーん...美のために。
3つのオブジェクトすべてに共通する
Rat.style関数は、単にプロパティをキャンバスに転送します。 変換も必要であることを忘れないでください:
あぁ、負けないで、すべてを説明します。
!~Rat.notStyle.indexOf(key)は
Rat.notStyle.indexOf(key) != -1と同じです。 ただし、これはマイクロライブラリです。
最後に、クラスのインスタンスを作成して返すコンテキスト関数:
Rat.prototype = { path : function(opt, style){ return new Rat.Path(opt, style, this); }, };
すべて、パスを描くことができます。 やった!
そして、基本的なスタイルに加えて、Rat.styleに見られるように、変換があります:
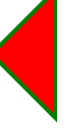
var path = rat.path([ ['moveTo', 10, 10], ['lineTo', 100, 100], ['lineTo', 10, 100], ['closePath'] ], { fillStyle: 'red', strokeStyle: 'green', lineWidth: 4, rotate: 45 / 180 * Math.PI, origin: [55, 55] });
画像がトリミングされているのは ゼロ座標で描画されます。写真
2つの引数の原則に従って、このようなクラスが必要です。
var img = new Image(); img.src = "image.jpg"; img.onload = function(){ rat.image(img); }
さらに、スタイルでは、パラメータ
width 、
heightおよび
crop (4つの数字の配列)を渡すことができます。 すべてが元の
drawImage CanvasRendering2DContextと同じです。
再びクラスコンストラクター:
Rat.Image = function(opt, style, context){ Rat.init(this, arguments); };
レンダリングは次のようになります。
Rat.Image.prototype.draw = function(ctx){ Rat.style(ctx, this.style); if(this.style.crop) ctx.drawImage.apply(ctx, [this.opt, 0, 0].concat(this.style.crop)); else ctx.drawImage(this.opt, 0, 0, this.style.width || this.opt.width, this.style.height || this.opt.height); ctx.restore(); };
すべてがシンプルなようです。
そして最後に、もちろん:
Rat.prototype = { ... image : function(opt, style){ return new Rat.Image(opt, style, this); }, };
ほら、写真があります。
テキスト
3番目のグローバルオブジェクト:
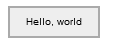
var text = rat.text("Hello, world!", { fillStyle: 'blue' });
maxWidthプロパティもあります。コンストラクター:
Rat.Text = function(){ Rat.init(this, arguments); };
レンダリングは非常に簡単です。 そして、いつものように、解決策はあまりきれいではありませんが、うまくいきます)。
Rat.Text.prototype.draw = function(ctx){ Rat.style(ctx, this.style); if(this.style.fillStyle) ctx.fillText(this.opt, 0, 0, this.style.maxWidth || 999999999999999); if(this.style.strokeStyle) ctx.strokeText(this.opt, 0, 0, this.style.maxWidth || 9999999999999999); ctx.restore(); };
キャンバス上のテキストを測定することもできます。 幅、はい。 高さはフォントサイズによって決まります。
Rat.Text.prototype.measure = function(){ var ctx = this.context.context; Rat.style(ctx, this.style); var w = ctx.measureText(this.opt).width; ctx.restore(); return w; };
忘れないでください:
Rat.prototype = { ... image : function(opt, style){ return new Rat.Image(opt, style, this); }, };
ささいなこと
時には、許し、忘れ、すべてを捨て、ゼロから始める必要があります。 そのような場合には、明確な機能があります:
Rat.prototype = { ... clear: function(){ var cnv = this.context.canvas; this.context.clearRect(0, 0, cnv.width, cnv.height); } };
それ以外には、
drawがあり、配列からすべてのオブジェクトを描画します。
Rat.prototype = { ... draw: function(elements){ var ctx = this.context; elements.forEach(function(element){ element.draw(ctx); }); } };
例:
さて、今...例えば、キャンバスにボタンを配置しましょう(最も簡単なもの):
そして放してください...マウスをホバーすると、ハイライトされます:
var bounds = ctx.canvas.getBoundingClientRect(); var hover = false; ctx.canvas.addEventListener('mousemove', function(e){ var x = e.clientX - bounds.left, y = e.clientY - bounds.top; if(x > 10 && x < 100 && y > 10 && y < 40){ if(hover) return; hover = true; path.style.fillStyle = '#ccc'; rat.clear(); rat.draw([path, text]); } else if(hover){ hover = false; path.style.fillStyle = '#eee'; rat.clear(); rat.draw([path, text]); } });

なんで?
最も興味深いのは、ベースキャンバスで、ほぼ同じ量のコードをほぼ同じように入力できることです。
しかし、これは100行が書かれて初めて明らかになりました...
github.com/keyten/Rat.js/blob/master/rat.jsさて...次のパート(このトピックがHabrahabrにとって興味深い場合)では、マウス処理の実装とパート3-アニメーションを示します。 すべてが100行に戻っています(うまくいくかどうかを確認しましょう)。
私は誕生日を祝います。
すべての興味深いコード!