この記事では、Microsoft AzureでのPostgreSQLの使用に関する一連のメモを開始します。
最初の記事は、PostgreSQLクラスターのインストールと構成に関するものです。
- Azureリソースの紹介
- Azure CLIによる管理
- 適切なストレージの選択
- 1つの可用性グループでクラシックマスタースレーブバンドルを構築する
このパートの目的は、Azureリソースの次のコンポーネントを含むスキームを実装することです。
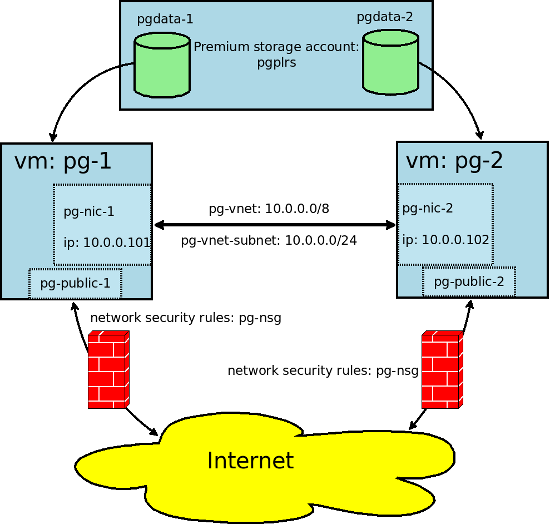
これを紺のcliで行います。 azure-cliをインストールして、 portal.azure.com Webインターフェースからすべてを実行することはできませんが、cliを介した管理と作成はより視覚的に思えました。
azure cliユーティリティはクロスプラットフォームであり、nodejsが動作する場所であればどこでも動作します。 次のようにLinuxにインストールできます:
ここで基本的なazure cliコマンドを確認してください 。 後続のすべてのazure cliコマンドは、仕事用コンピューターから起動されます。 まず、システムを紹介してトークンを取得する必要があります。
azure login
認証方法の詳細については、 こちらをご覧ください 。
北ヨーロッパでリソースグループ(リソースコンテナ)を作成します。
azure group create --name pg-resource-group --location northeurope
仮想ローカルネットワーク10.0.0.0/8およびサブネット10.0.0.0/24を作成します。
azure network vnet create -g pg-resource-group -l northeurope --address-prefixes 10.0.0.0/8 --name pg-vnet azure network vnet subnet create -g pg-resource-group --vnet-name pg-vnet --address-prefix 10.0.0.0/24 --name pg-vnet-subnet
外部IPアドレスを使用してsshで管理するため、ファイアウォールルールを作成し、ポート22への外部接続のみを許可します。
azure network nsg create -g pg-resource-group -l northeurope --name pg-nsg azure network nsg rule create -g pg-resource-group --nsg-name pg-nsg --name AllowSSH --protocol Tcp --access Allow --destination-port-range 22 --priority 200 --direction Inbound
外部IPアドレス(public-ip)、プライベートネットワークを備えたネットワークアダプター、およびホストのサブネットをセットアップします。
azure network public-ip create -g pg-resource-group -l northeurope --allocation-method Static --name pg-public-1 azure network nic create -g pg-resource-group -l northeurope --subnet-name pg-vnet-subnet --subnet-vnet-name pg-vnet --private-ip-address 10.0.0.101 --network-security-group-name pg-nsg --name pg-nic-1
可用性グループを作成します。 要するに、それは、同時にアクセスできないことができないグループ(ドメイン)に分割されたマシンのクラスターです:
azure availset create -g pg-resource-group -l northeurope --name pg-availability-set
アクセシビリティグループの詳細についてはこちらをご覧ください 。
仮想マシンを構成します。 使用可能な仮想マシンの種類とその制限は、次のコマンドで確認できます。
azure vm sizes -l northeurope
リストには50種類以上の車が含まれます 。価格はこちらで確認できます 。 少ないドライブを安価なドライブに接続できます(ドライブの合計数は1〜40です)。 ウィザードのテストでは、Standard_DS4_v2が選択されました:8 CPU、28GB RAM、最大16台のプレミアムストレージドライブを接続できます。
仮想マシンを作成するコマンド。これは、sudo権限を持ち、sshキーを使用したsshログインを許可されたpgユーザーを意味します。
azure vm create -g pg-resource-group -l northeurope --nic-name pg-nic-1 --os-type Linux --image-urn OpenLogic:CentOS:7.2:latest --admin-username pg --ssh-publickey-file ~/.ssh/id_rsa.pub --vm-size Standard_DS4_v2 --public-ip-name pg-public-1 --availset-name pg-availability-set --name pg-1
次のコマンドを使用して、作成したマシンのパラメーターと外部IPを表示できます。
azure vm show -g pg-resource-group --name pg-1
これで、CentOS 7.2がインストールされた仮想マシンがあり、IPアドレス10.0.0.101とパブリックpg-public-1を使用してpg-vnetプライベート仮想ネットワークで実行され、外部からsshにアクセスできます。 PostgreSQLのデータを配置するディスクを作成する必要があります。 さまざまな種類のストレージについてはこちらをご覧ください 。 まず、ストレージテストの結果を示しましょう。

pgplrsという名前のPremium LRSボールトアカウントを作成します(azure内で一意である必要があります)。
azure storage account create -g pg-resource-group -l northeurope --type PLRS pgplrs
ディスクを作成し、仮想マシンに接続します。
azure vm disk attach-new -g pg-resource-group -l northeurope --vm-name pg-1 --lun 1 --size-in-gb 512 --vhd-name pgdata-1 --host-caching ReadOnly --storage-account-name pgplrs
pg-2仮想マシンを作成して実行します。
azure network public-ip create -g pg-resource-group -l northeurope --allocation-method Static --name pg-public-2 azure network nic create -g pg-resource-group -l northeurope --subnet-name pg-vnet-subnet --subnet-vnet-name pg-vnet --private-ip-address 10.0.0.102 --network-security-group-name pg-nsg --name pg-nic-2 azure vm create -g pg-resource-group -l northeurope --nic-name pg-nic-2 --os-type Linux --image-urn OpenLogic:CentOS:7.2:latest --admin-username pg --ssh-publickey-file ~/.ssh/id_rsa.pub --vm-size Standard_DS4_v2 --public-ip-name pg-public-1 --availset-name pg-availability-set --name pg-2 azure vm disk attach-new -g pg-resource-group -l northeurope --vm-name pg-2 --lun 1 --size-in-gb 512 --vhd-name pgdata-2 --host-caching ReadOnly --storage-account-name pgplrs azure vm start -g pg-resource-group pg-2
これで、ユーザーpgとしてssh経由でpg-1に接続できます。
ssh pg-public-1 -l pg -i ~/.ssh/id_rsa
マシンpg-1で実行するその他のすべてのアクション。 ディスクを接続した直後に、仮想マシンで使用可能な物理ブロックデバイスにマップする必要があります。 これを行うには、次のコマンドを実行します。
[root@pg-1 ~] $ dmesg | tail -n 10 [ 488.417024] Adjusting hyperv_clocksource more than 11% (1945964553 vs 1862270976) [ 525.969741] scsi 5:0:0:0: Direct-Access Msft Virtual Disk 1.0 PQ: 0 ANSI: 4 [ 526.001471] sd 5:0:0:0: Attached scsi generic sg3 type 0 [ 526.018792] sd 5:0:0:0: [sdc] 1073741824 512-byte logical blocks: (549 GB/512 GiB) [ 526.039690] sd 5:0:0:0: [sdc] 4096-byte physical blocks [ 526.053643] sd 5:0:0:0: [sdc] Write Protect is off [ 526.065818] sd 5:0:0:0: [sdc] Mode Sense: 0f 00 10 00 [ 526.065985] sd 5:0:0:0: [sdc] Write cache: enabled, read cache: enabled, supports DPO and FUA [ 526.091754] sdc: unknown partition table [ 526.105263] sd 5:0:0:0: [sdc] Attached SCSI disk
これらのメッセージから、マップされたドライブに割り当てられたブロックデバイスの名前は/ dev / sdcであることがわかります。 ファイルシステムを作成します。
[root@pg-1 ~] $ mkfs.ext4 /dev/sdc mke2fs 1.42.9 (28-Dec-2013) /dev/sdc is entire device, not just one partition! Proceed anyway? (y,n) y
ここで、fstabにエントリを作成する必要があります。 デバイスのUUIDを取得します。
[root@pg-1 ~] $ blkid /dev/sdc /dev/sdc: UUID="8cb25a32-175b-4c78-b557-8153327d48ba" TYPE="ext4"
そして、最初にマウントポイントを作成し、fstabにエントリを追加して、ドライブをマウントします。
[root@pg-1 ~] $ mkdir -p /var/lib/pgsql [root@pg-1 ~] $ echo 'UUID=8cb25a32-175b-4c78-b557-8153327d48ba /var/lib/pgsql ext4 defaults 0 0' >> /etc/fstab [root@pg-1 ~] $ mount -a
ソフトウェアをインストールし、リポジトリを接続します。
[root@pg-1 ~] $ rpm -ivh http://repo.postgrespro.ru/pgpro-9.5/keys/postgrespro-9.5.centos95.noarch.rpm
ソフトウェアをインストールします。
[root@pg-1 ~] $ yum install postgrespro95-server postgrespro95-contrib
サービスをオンにして、DBMSインスタンスを初期化します。
[root@pg-1 ~] $ chkconfig postgresql-9.5 on [root@pg-1 ~] $ service postgresql-9.5 initdb [root@pg-1 ~] $ service postgresql-9.5 start
postgresユーザーの下でさらにコマンドを実行します。
[root@pg-1 ~] $ su -l postgres
レプリケーションのためにip 10.0.0.101-102でpg_hbaのサーバーへの接続を許可します。
[postgres@pg-1 ~] $ echo 'host replication replication 10.0.0.101/30 md5' >> /var/lib/pgsql/9.5/data/pg_hba.conf
レプリケーション用のユーザーを作成します。
[postgres@pg-1 ~] $ /usr/pgsql-9.5/bin/psql -U postgres postgres postgres=$ CREATE ROLE replication WITH REPLICATION PASSWORD 'password' LOGIN; CREATE ROLE
このマシンをレプリケーションの主要なサーバーとして使用できるようにするパラメーターを設定します。
[postgres@pg-1 ~] $ /usr/pgsql-9.5/bin/psql -U postgres postgres postgres=$ alter system set listen_addresses to '*'; ALTER SYSTEM postgres=$ alter system set wal_level to hot_standby; ALTER SYSTEM postgres=$ alter system set max_wal_senders to 3; ALTER SYSTEM postgres=$ alter system set wal_keep_segments to 128; ALTER SYSTEM
パラメーターが適用されているかどうかを確認します。
postgres=$ select * from pg_file_settings where not applied; sourcefile | sourceline | seqno | name | setting | applied ----------------------------------------------+------------+-------+------------------+-------------+--------- /var/lib/pgsql/9.5/data/postgresql.auto.conf | 3 | 20 | wal_level | hot_standby | f /var/lib/pgsql/9.5/data/postgresql.auto.conf | 4 | 21 | max_wal_senders | 3 | f /var/lib/pgsql/9.5/data/postgresql.auto.conf | 6 | 23 | listen_addresses | * | f (3 rows)
サービスを再起動します。
[postgres@pg-1 ~] $ /usr/pgsql-9.5/bin/pg_ctl restart -D /var/lib/pgsql/9.5/data -w
これで、ユーザーpgとしてssh経由でpg-2に接続できます。
ssh pg-public-2 -l pg -i ~/.ssh/id_rsa
pg-2マシンでさらにコマンドを実行します。 レプリカに取り組む時が来ました:同様に、ディスクを接続してpostgresproをインストールします。 そして、ユーザーpostgresとしてpg-2にログインします。
[root@pg-2 ~] $ su -l postgres
その後、1つのコマンドでレプリカを準備します。
[postgres@pg-2 ~] $ /usr/pgsql-9.5/bin/pg_basebackup -U replication -D /var/lib/pgsql/9.5/data -R -x -P -c spread -h 10.0.0.101 -W Password: 38895/38895 kB (100%), 1/1 tablespace
これで、 /var/lib/pgsql/9.5/data完全なコピーと登録済みのrecovery.confファイルが作成されました。このファイルにトリガーファイルに関する情報を追加することをお勧めします。作成時に、このDBMSインスタンスはスレーブから本格的なマスターサーバーに変わります。 したがって、ファイルの内容は次のようになります。
[postgres@pg-2 ~] $ cat /var/lib/pgsql/9.5/data/recovery.conf standby_mode = 'on' primary_conninfo = 'user=replication password=password host=10.0.0.101 port=5432 sslmode=prefer sslcompression=1 krbsrvname=postgres' trigger_file = '/var/lib/pgsql/stop_replication_trigger'
レプリカを使用してインスタンスを開始します。
[postgres@pg-2 ~] $ /usr/pgsql-9.5/bin/pg_ctl start -w -D /var/lib/pgsql/9.5/data
そして、WALレシーバーが実行されているかどうかを確認します(walレシーバープロセス):
[postgres@pg-2 ~] $ ps axufwwww postgres 29423 0.1 0.2 372920 16564 ? S 09:07 0:00 /usr/pgsql-9.5/bin/postmaster -D /var/lib/pgsql/9.5/data postgres 29425 0.0 0.0 225568 1608 ? Ss 09:07 0:00 \_ postgres: logger process postgres 29426 0.1 0.0 372960 2464 ? Ss 09:07 0:00 \_ postgres: startup process recovering 0000010000000000000003 postgres 29427 0.0 0.0 372920 1964 ? Ss 09:07 0:00 \_ postgres: checkpointer process postgres 29428 0.0 0.0 372920 1976 ? Ss 09:07 0:00 \_ postgres: writer process postgres 29429 0.2 0.0 379640 3360 ? Ss 09:07 0:00 \_ postgres: wal receiver process streaming 0/3000060
合計で、ストリーミング非同期レプリケーションが構成されている2つの仮想マシンがあり、同じ可用性グループで動作しています。 この記事の次の部分では、バックアップと顧客のバランス調整について説明します。
継続をお待ちください!