本日、Node.js、Vue.js、MongoDBを使用したBudget Managerアプリケーションの開発に関する一連の資料の第3部を公開します。
最初と
2番目の部分では、サーバーを作成し、認証メカニズムをセットアップし、フロントエンドをセットアップしました。 この記事では、システムのクライアント部分とサーバー部分の作業を続けます。 すでに作成されたものは、これまでのところ、財務ドキュメントで動作するように設計されたアプリケーション自体のロジックにはほとんど関係していません。 したがって、とりわけ、プロジェクトのこの側面を扱います。

いくつかの修正
まず、ユーザー
@OmgImAlexisに、背景画像の問題を指摘し、それを使用する権利がないこと、および
このリソースを自由に配布された画像で推奨することを感謝します。
したがって、今日はプロジェクトで使用されている背景画像を
これで置き換えることから始め
ます (アプリケーションをデプロイする場合は、画像を縮小することを忘れないでください)。 サムネイルをすぐに使用する場合は、
リポジトリから取得でき
ます 。
イメージをロードした後、コンポーネント
App.vueファイルに移動して、以前のイメージを置き換えます。 さらに、スタイルを編集します。
<style lang="scss"> @import "./assets/styles"; body { background: url('./assets/images/background.jpg') no-repeat center center fixed; background-size: cover; &:after { content: ''; position: fixed; width: 100%; height: 100%; top: 0; left: 0; background-color: $background-tint; opacity: .3; z-index: -1; } .application { background: none; } } </style>
ここで、
background-size: coverプロパティと次の構成を追加しました。
.application { background: none; }
これは、Vuetifyがアプリケーションのページに白い背景を使用しているためです。 ここで、まだ
App.vueファイルにいる間に、テンプレートにいくつかの変更を加えます。
<template> <v-app> <v-container> <router-view/> </v-container> </v-app> </template>
ここでは、
div id="app"を
v-appに変更しました。これはVuetifyのメインコンポーネントです。
Authentication.vueコンポーネントファイルを開き、スタイルにいくつかの変更を加えます。
<style lang="scss"> @import "./../../../assets/styles"; .l-auth { background-color: $background-color; padding: 15px; margin: 45px auto; min-width: 272px; max-width: 320px; animation: bounceIn 1s forwards ease; label, input, .icon { color: #29b6f6!important; } .input-group__details { &:before { background-color: $border-color-input !important; } } } .l-signup { @extend .l-auth; animation: slideInFromLeft 1s forwards ease; } </style>
ここでは、いくつかのVuetifyスタイルを再定義しました。その理由は
v-app機能にあります。 また、
l-authクラスを拡張しました
l-signupクラスはまったく同じであるため、唯一の違いはアニメーションにあります。 その結果、アプリケーションは次のようになります。

次に、
Authenticationフォルダーにある
index.jsファイルに移動します。 最初に、
authenticate方法を変更します。
authenticate (context, credentials, redirect) { Axios.post(`${BudgetManagerAPI}/api/v1/auth`, credentials) .then(({data}) => { context.$cookie.set('token', data.token, '1D') context.$cookie.set('user_id', data.user._id, '1D') context.validLogin = true this.user.authenticated = true if (redirect) router.push(redirect) }).catch(({response: {data}}) => { context.snackbar = true context.message = data.message }) },
ここでは、この
idを保存するため、
dataオブジェクトを解析し、そこからユーザーIDを抽出するようにプロミスを変更しました。
次に、
signup方法を編集します。
signup (context, credentials, redirect) { Axios.post(`${BudgetManagerAPI}/api/v1/signup`, credentials) .then(() => { context.validSignUp = true this.authenticate(context, credentials, redirect) }).catch(({response: {data}}) => { context.snackbar = true context.message = data.message }) },
POST要求から応答を受け取らないため、最初のプロミスを矢印関数に置き換えました。 また、ここではトークンを設定しなくなりました。 代わりに、
authenticateメソッドを呼び出します。
プロジェクトにこれらの修正を加えました。さもないと、システムに登録した後、ユーザーは認証されたかのようにリダイレクトされますが、認証されないため、システムは期待どおりに動作しません。
次に、
signupメソッドのすぐ下に、
signup signoutメソッドを追加し
signout 。
signout (context, redirect) { context.$cookie.delete('token') context.$cookie.delete('user_id') this.user.authenticated = false if (redirect) router.push(redirect) },
次に、
signoutメソッドの直後に、
signoutメソッド
signout小さな変更を加えます。
checkAuthentication () { const token = document.cookie this.user.authenticated = !!token },
ここでは、すべてをそのままにするか、
token定数を論理値に変換するために、三項比較演算子を使用できます。
JSコードの一般的な欠点は、感嘆符の構造を使用する代わりに、論理式を使用して特定の値を論理型にキャストすることです。 通常、このオプションは次のようになります。
this.user.authenticated = token ? true : false
ヘッダーコンポーネントの開発
ホームページのコンポーネントに取り組む前に、そのヘッダーを作成します。 これを行うには、
componentsフォルダーに移動し、
Header.vueファイルを作成します。
<template> <header class="l-header-container"> <v-layout row wrap> <v-flex xs12 md5> <v-text-field v-model="search" label="Search" append-icon="search" color="light-blue lighten-1"> </v-text-field> </v-flex> <v-flex xs12 offset-md1 md1> <v-btn block color="light-blue lighten-1">Clients</v-btn> </v-flex> <v-flex xs12 offset-md1 md2> <v-select label="Status" color="light-blue lighten-1" v-model="status" :items="statusItems" single-line> </v-select> </v-flex> <v-flex xs12 offset-md1 md1> <v-btn block color="red lighten-1 white--text" @click.native="submitSignout()">Sign out</v-btn> </v-flex> </v-layout> </header> </template> <script> import Authentication from '@/components/pages/Authentication' export default { data () { return { search: '', status: '', statusItems: [ 'All', 'Approved', 'Denied', 'Waiting', 'Writing', 'Editing' ] } }, methods: { submitSignout () { Authentication.signout(this, '/login') } } } </script> <style lang="scss"> @import "./../assets/styles"; .l-header-container { background-color: $background-color; margin: 0 auto; padding: 0 15px; min-width: 272px; label, input, .icon, .input-group__selections__comma { color: #29b6f6!important; } .input-group__details { &:before { background-color: $border-color-input !important; } } .btn { margin-top: 15px; } } </style>
これで、かなり簡単なコンポーネントの準備ができました。 searchからのデータに関連付けられた検索クエリを入力するフィールド、クライアントページに移動するボタン、後で処理するボタン、ドキュメントをフィルタするスイッチ、システムを終了するボタンのみがあります。
_variables部分テンプレートを開き、そこに色情報を追加し、
background-color不透明度を
0.7設定し
background-color 。
// Colors $background-tint: #1734C1; $background-color: rgba(0, 0, 0, .7); $border-color-input: rgba(255, 255, 255, 0.42);
次に、ルーターのコンポーネントを定義します。 これを行うには、
routerフォルダーの
index.jsファイルを開き、次のフォームに移動します。
// Pages import Home from '@/components/pages/Home' import Authentication from '@/components/pages/Authentication/Authentication' // Global components import Header from '@/components/Header' // Register components Vue.component('app-header', Header) Vue.use(Router)
ここでは、最初に
Homeコンポーネント、次に
Headerインポートし、登録します
webpackを使用するときの
@記号は
srcフォルダーのエイリアスであることに
webpackしてください。
App-headerは、
Headerコンポーネントの出力に使用するタグの名前です。
タグ名については、Vue.jsの
ドキュメントからの抜粋を提供したいと思います。
Vueは、カスタムタグ名のW3Cルールへの準拠を必要としないことに注意してください(小文字とハイフンのみを使用する要件など)。ただし、これらの規則に従うことをお勧めします。次はルーターの番です。
const router = new Router({ routes: [ { path: '/', name: 'Home', components: { default: Home, header: Header }, meta: { requiredAuth: true } }, { path: '/login', name: 'Authentication', component: Authentication } ] })
ここでは、ホームページのデフォルトコンポーネントが
Homeであることを示し、このページに
Headerコンポーネントも含めます。 ここでは、ログインルートに変更を加えないことに注意してください。 ここでは、ページ
Header表す
Headerコンポーネントは必要ありません。
Headerコンポーネントは後ほど扱いますが、作業のこの段階では、現在の状態に満足しています。
ホームコンポーネント開発
いつものように-行うコンポーネントファイルを開きます。 これを行うには、
pagesフォルダーに移動し、
Home.vueファイルを開きます。
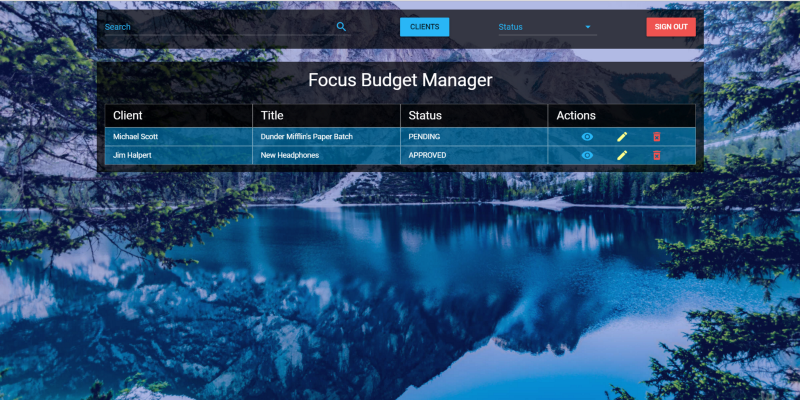
<template> <main class="l-home-page"> <app-header></app-header> <div class="l-home"> <h4 class="white--text text-xs-center my-0"> Focus Budget Manager </h4> <budget-list> <budget-list-header slot="budget-list-header"></budget-list-header> <budget-list-body slot="budget-list-body" :budgets="budgets"></budget-list-body> </budget-list> </div> </main> </template> <script> import Axios from 'axios' import Authentication from '@/components/pages/Authentication' import BudgetListHeader from './../Budget/BudgetListHeader' import BudgetListBody from './../Budget/BudgetListBody' const BudgetManagerAPI = `http://${window.location.hostname}:3001` export default { components: { 'budget-list-header': BudgetListHeader, 'budget-list-body': BudgetListBody }, data () { return { budgets: [] } }, mounted () { this.getAllBudgets() }, methods: { getAllBudgets () { Axios.get(`${BudgetManagerAPI}/api/v1/budget`, { headers: { 'Authorization': Authentication.getAuthenticationHeader(this) }, params: { user_id: this.$cookie.get('user_id') } }).then(({data}) => (this.budgets = data)) } } } </script> <style lang="scss" scoped> @import "./../../assets/styles"; .l-home { background-color: $background-color; margin: 25px auto; padding: 15px; min-width: 272px; } </style>
ここでは、アプリケーションの名前を含む
h4タグで表されるヘッダーを表示します。 次のクラスが彼に割り当てられています。
white--text : white--text色を白にするために使用されます。
text-xs-center : x軸に沿ってテキストを中央に配置するために使用されます。
my-0 : y軸フィールドを0に設定するために使用され0 。
ここでは、
budget-listコンポーネントが使用されます。これは以下で作成します。 コンポーネント
budget-list-headerおよび
budget-list-body 、これらはデータを配置するためのスロットとして機能します。
さらに、プロパティとして、
budgets財務ドキュメントの配列を
budget-list-bodyに渡します。このデータは、コンポーネントのマウント時に抽出されます。 APIを操作する機会を与える
Authorizationヘッダーを渡します。 また、パラメータ
user_idとしてここに渡され
user_id 。これにより、データを要求しているユーザーを指定できます。
ドキュメントのリストを操作するためのコンポーネントの開発
componentsフォルダーに移動し、その中に新しい
Budgetフォルダーを作成します。 このフォルダー内で、
BudgetListHeader.vueコンポーネント
BudgetListHeader.vue作成し
BudgetListHeader.vue 。
<template> <header class="l-budget-header"> <div class="md-budget-header white--text">Client</div> <div class="md-budget-header white--text">Title</div> <div class="md-budget-header white--text">Status</div> <div class="md-budget-header white--text">Actions</div> </header> </template> <script> export default {} </script> <style lang="scss"> @import "./../../assets/styles"; .l-budget-header { display: none; width: 100%; @media (min-width: 601px) { margin: 25px 0 0; display: flex; } .md-budget-header { width: 100%; background-color: $background-color; border: 1px solid $border-color-input; padding: 0 15px; display: flex; height: 45px; align-items: center; justify-content: center; font-size: 22px; @media (min-width: 601px) { justify-content: flex-start; } } } </style>
これは、ドキュメントリストページの単なるヘッダーです。
次に、同じフォルダーに別のコンポーネントファイルを作成し、
BudgetListBody.vueという名前を
BudgetListBody.vueます。
<template> <section class="l-budget-body"> <div class="md-budget" v-if="budgets != null" v-for="budget in budgets"> <div class="md-budget-info white--text">{{ budget.client }}</div> <div class="md-budget-info white--text">{{ budget.title }}</div> <div class="md-budget-info white--text">{{ budget.state }}</div> <div class="l-budget-actions"> <v-btn small flat color="light-blue lighten-1"> <v-icon small>visibility</v-icon> </v-btn> <v-btn small flat color="yellow accent-1"> <v-icon>mode_edit</v-icon> </v-btn> <v-btn small flat color="red lighten-1"> <v-icon>delete_forever</v-icon> </v-btn> </div> </div> </section> </template> <script> export default { props: ['budgets'] } </script> <style lang="scss"> @import "./../../assets/styles"; .l-budget-body { display: flex; flex-direction: column; .md-budget { width: 100%; display: flex; flex-direction: column; margin: 15px 0; @media (min-width: 960px) { flex-direction: row; margin: 0; } .md-budget-info { flex-basis: 25%; width: 100%; background-color: rgba(0, 175, 255, 0.45); border: 1px solid $border-color-input; padding: 0 15px; display: flex; height: 35px; align-items: center; justify-content: center; &:first-of-type, &:nth-of-type(2) { text-transform: capitalize; } &:nth-of-type(3) { text-transform: uppercase; } @media (min-width: 601px) { justify-content: flex-start; } } .l-budget-actions { flex-basis: 25%; display: flex; background-color: rgba(0, 175, 255, 0.45); border: 1px solid $border-color-input; align-items: center; justify-content: center; .btn { min-width: 45px !important; margin: 0 5px !important; } } } } </style>
ここでは、ページの本文と、さまざまな環境でどのように表示されるかについて説明します。さらに、モバイルデバイスに焦点を当てます。
最後に、同じフォルダーに
BudgetList.vueファイルを作成し、対応するコンポーネントのコードを追加します。
<template> <section class="l-budget-list-container"> <slot name="budget-list-header"></slot> <slot name="budget-list-body"></slot> </section> </template> <script> export default {} </script>
slotタグに注意してください。 それらで、コンポーネントを導出します。 これらのタグは名前付きスロットと呼ばれます。
次に、ルーターに
BudgetListコンポーネントを追加する必要があります。
// ... // Global components import Header from '@/components/Header' import BudgetList from '@/components/Budget/BudgetList' // Register components Vue.component('app-header', Header) Vue.component('budget-list', BudgetList) // ... const router = new Router({ routes: [ { path: '/', name: 'Home', components: { default: Home, header: Header, budgetList: BudgetList }, meta: { requiredAuth: true } }, { path: '/login', name: 'Authentication', component: Authentication } ] }) // ... export default router
前と同じように、ここでコンポーネントをインポートして登録し、
Homeコンポーネントがそれらを使用できるようにします。
RESTful APIの改良
プロジェクトのサーバー側に戻り、APIを操作しましょう。 手始めに-少しきれいに。 これを行うには、
services/BudgetManagerAPI/app/apiフォルダーから
user.jsファイルを開いて、
user.jsます。
const mongoose = require('mongoose'); const api = {}; api.signup = (User) => (req, res) => { if (!req.body.username || !req.body.password) res.json({ success: false, message: 'Please, pass an username and password.' }); else { const user = new User({ username: req.body.username, password: req.body.password }); user.save(error => { if (error) return res.status(400).json({ success: false, message: 'Username already exists.' }); res.json({ success: true, message: 'Account created successfully' }); }); } } module.exports = api;
ここで、
setupメソッドと
indexメソッドを削除しました。 アカウントを作成する手段がすでにあるため、
setup方法は必要ありません。 すべての登録ユーザーをリストするわけではないため、
indexメソッドは必要ありません。 さらに、
signupメソッドで
console.logを削除し、新しいユーザーを作成するメソッドでクライアントの空の配列から削除しました。
ここで、
services/BudgetManagerAPI/app/routesフォルダーに保存されている
user.jsファイルを操作しましょう。
const models = require('@BudgetManager/app/setup'); module.exports = (app) => { const api = app.BudgetManagerAPI.app.api.user; app.route('/api/v1/signup') .post(api.signup(models.User)); }
ここでは、古いメソッドに必要なルートを削除しました。
モデルの改善
BudgetManagerAPI/app/ある
modelsフォルダーに移動して、
models改善します。
user.jsファイルを開きます。 ここでは、ユーザーデータスキームを変更します。
const Schema = mongoose.Schema({ username: { type: String, unique: true, required: true }, password: { type: String, required: true } });
さらに、さらにいくつかのモデルを作成します。
client.jsファイルに含まれるモデルから始めましょう。
const mongoose = require('mongoose'); const Schema = mongoose.Schema({ name: { type: String, required: true }, email: { type: String, required: true }, phone: { type: String, required: true }, user_id: { type: mongoose.Schema.Types.ObjectId, ref: 'User' } }); mongoose.model('Client', Schema);
次に、
budget.jsファイルに含まれるモデルで作業を
budget.jsます。
const mongoose = require('mongoose'); const Schema = mongoose.Schema({ client: { type: String, required: true }, state: { type: String, required: true }, title: { type: String, required: true }, total_price: { type: Number, required: true }, client_id: { type: mongoose.Schema.Types.ObjectId, ref: 'Client' }, items: [{}] }); mongoose.model('Budget', Schema);
現在、変更可能な配列を使用する必要はありません。 代わりに、リンクを使用して、
refおよび
ObjectIDを使用する必要があるユーザーとクライアントを示します。
setupフォルダーから
index.jsファイルを開き、次のフォームに移動します。
const mongoose = require('mongoose'), UserModel = require('@BudgetManagerModels/user'), BudgetModel = require('@BudgetManagerModels/budget'), ClientModel = require('@BudgetManagerModels/client'); const models = { User: mongoose.model('User'), Budget: mongoose.model('Budget'), Client: mongoose.model('Client') } module.exports = models;
API拡張
ここで、新しいモデルのメソッドをAPIに追加する必要があるため、
apiフォルダーに移動して、
client.js新しい
client.jsファイルを作成し
client.js 。
const mongoose = require('mongoose'); const api = {}; api.store = (User, Client, Token) => (req, res) => { if (Token) { const client = new Client({ user_id: req.body.user_id, name: req.body.name, email: req.body.email, phone: req.body.phone, }); client.save(error => { if (error) return res.status(400).json(error); res.status(200).json({ success: true, message: "Client registration successfull" }); }) } else return res.status(403).send({ success: false, message: 'Unauthorized' }); } api.getAll = (User, Client, Token) => (req, res) => { if (Token) { Client.find({ user_id: req.query.user_id }, (error, client) => { if (error) return res.status(400).json(error); res.status(200).json(client); return true; }) } else return res.status(403).send({ success: false, message: 'Unauthorized' }); } module.exports = api;
新しい顧客を作成し、完全なリストを取得する方法があります。 これらのメソッドは、JWT認証を使用して保護されています。
次に別のファイルを作成し、
budget.jsという
budget.jsます。
const mongoose = require('mongoose'); const api = {}; api.store = (User, Budget, Client, Token) => (req, res) => { if (Token) { Client.findOne({ _id: req.body.client_id }, (error, client) => { if (error) res.status(400).json(error); if (client) { const budget = new Budget({ client_id: req.body.client_id, user_id: req.body.user_id, client: client.name, state: req.body.state, title: req.body.title, total_price: req.body.total_price, items: req.body.items }); budget.save(error => { if (error) res.status(400).json(error) res.status(200).json({ success: true, message: "Budget registered successfully" }) }) } else { res.status(400).json({ success: false, message: "Invalid client" }) } }) } else return res.status(403).send({ success: false, message: 'Unauthorized' }); } api.getAll = (User, Budget, Token) => (req, res) => { if (Token) { Budget.find({ user_id: req.query.user_id }, (error, budget) => { if (error) return res.status(400).json(error); res.status(200).json(budget); return true; }) } else return res.status(403).send({ success: false, message: 'Unauthorized' }); } api.getAllFromClient = (User, Budget, Token) => (req, res) => { if (Token) { Budget.find({ client_id: req.query.client_id }, (error, budget) => { if (error) return res.status(400).json(error); res.status(200).json(budget); return true; }) } else return res.status(403).send({ success: false, message: 'Unauthorized' }); } module.exports = api;
前の例と同様に、そのメソッドはJWT認証によって保護されています。 これら3つの方法の1つを使用して新しいドキュメントを作成し、2つ目-ユーザーアカウントに関連付けられたすべてのドキュメントのリストを取得し、もう1つ-特定のクライアントのすべてのドキュメントを取得します。
ドキュメントとクライアントのルートの作成と保護
routesフォルダーに移動して、
budget.jsファイルを作成します。
module.exports = (app) => { const api = app.BudgetManagerAPI.app.api.budget; app.route('/api/v1/budget') .post(passport.authenticate('jwt', config.session), api.store(models.User, models.Budget, models.Client, app.get('budgetsecret'))) .get(passport.authenticate('jwt', config.session), api.getAll(models.User, models.Budget, app.get('budgetsecret'))) .get(passport.authenticate('jwt', config.session), api.getAllFromClient(models.User, models.Budget, app.get('budgetsecret'))) }
次に、
client.jsファイルを作成し
client.js 。
const passport = require('passport'), config = require('@config'), models = require('@BudgetManager/app/setup'); module.exports = (app) => { const api = app.BudgetManagerAPI.app.api.client; app.route('/api/v1/client') .post(passport.authenticate('jwt', config.session), api.store(models.User, models.Client, app.get('budgetsecret'))) .get(passport.authenticate('jwt', config.session), api.getAll(models.User, models.Client, app.get('budgetsecret'))); }
これらのファイルは両方とも互いに似ています。 それらでは、まず
passport.authenticateメソッドを呼び出し、次にAPIメソッドを呼び出して、モデルと秘密鍵を渡します。
結果
ここで、Postmanを使用してクライアントとクライアントに関連するドキュメントを登録すると、結果は次のようになります。
結果と宿題
この資料では、いくつかの欠点を修正し、アプリケーションのクライアント部分とサーバー部分に取り組み、そのメインロジックの実装を開始しました。 次回は、プロジェクトの開発を継続します。特に、新規顧客を登録し、関連する財務書類を作成するメカニズムを開発します。
現在、このシリーズの次の記事はまだリリースされていませんが、演習として、この資料の著者の
リポジトリをフォークし
、クライアントとドキュメントを登録する手段を独自に実装しようとするすべての人に提供します。
親愛なる読者! 宿題をすることに決めた場合は、何が起こったか教えてください。