
Kotlinのリリースから1年以上が経過し、 Springブートが変更されました。 KotlinとSpringブートを使用して簡単なRESTfulサービスを作成する方法についての記事に出会ったので、私はこれが今日どのように行われるかについて書きたいと思いました。
この短い記事は、Kotlinコードを記述したことがなく、Springブートを使用したことがない人を対象としています。
プロジェクトの準備
必要なもの:
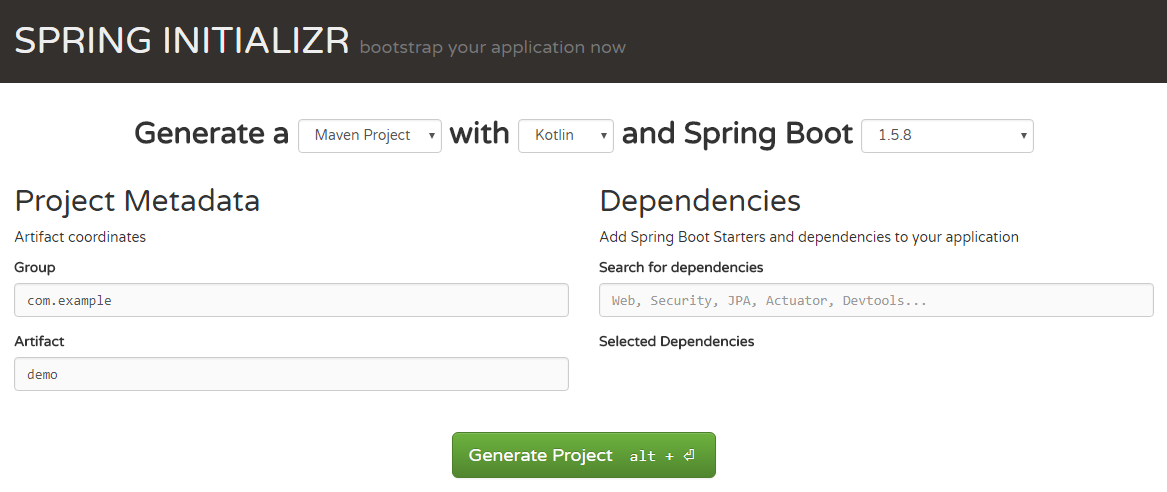
まず、 Spring Initializr Webサイトにアクセスして、アプリケーションテンプレートを作成します。 フォームに記入し、結果の空白をダウンロードします。
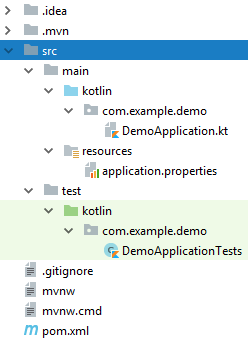
次の構造を持つプロジェクトテンプレートを取得します。
MVCの実装に必要な依存関係をいくつか追加します(アプリケーションテンプレートの生成時に指定できます)。
<dependency> <groupId>org.springframework.boot</groupId> <artifactId>spring-boot-starter-data-jpa</artifactId> </dependency> <dependency> <groupId>org.springframework.boot</groupId> <artifactId>spring-boot-starter-data-rest</artifactId> </dependency>
データベースドライバー(この場合、MySql)と同様に
<dependency> <groupId>mysql</groupId> <artifactId>mysql-connector-java</artifactId> <scope>runtime</scope> <version>6.0.6</version> </dependency>
コード
サービスは、 nameとdescriptionプロパティを持つ1つのProductエンティティで構成されます。 RepositoryとControllerについても説明しRepository 。 com.example.demo.systemパッケージに「ユーザー」用ではないすべてのコードを記述し、クライアントコードをcom.example.demo.service配置します。
製品の本質
models.ktファイルをcom.example.demo.system com.example.demo.system作成し、次のコードを追加します。
package com.example.demo.system import javax.persistence.* import com.fasterxml.jackson.annotation.* @Entity // @Table(name = "products") // data class Product( // equals hashCode copy @JsonProperty("name") // JSON @Column(name = "name", length = 200) // val name: String = "", // (, ) name, @JsonProperty("description") @Column(name = "description", length = 1000) val description: String = "", @Id // ORM - Primary Key @JsonProperty("id") @Column(name = "id") @GeneratedValue(strategy = GenerationType.AUTO) // - Autoincrement val id: Long = 0L )
ProductRepositoryリポジトリ
3行のコードでcom.example.demo.system com.example.demo.system repositories.ktファイルを作成しrepositories.kt 。
package com.example.demo.system import org.springframework.data.repository.* interface ProductRepository : CrudRepository<Product, Long> // CRUD
サービス層ProductService
次のコードを使用して、com.example.demo.service com.example.demo.service ProductService.ktファイルを作成します。
package com.example.demo.service import com.example.demo.system.* import org.springframework.stereotype.Service @Service // IoC class ProductService(private val productRepository: ProductRepository) { // fun all(): Iterable<Product> = productRepository.findAll() // , fun get(id: Long): Product = productRepository.findOne(id) fun add(product: Product): Product = productRepository.save(product) fun edit(id: Long, product: Product): Product = productRepository.save(product.copy(id = id)) // id . Kotlin - ( ) copy ( ) fun remove(id: Long) = productRepository.delete(id) }
製品コントローラーコントローラー
次のコードを使用して、com.example.demo.system com.example.demo.system controllers.ktファイルを作成します。
package com.example.demo.system import com.example.demo.service.* import org.springframework.http.HttpStatus import org.springframework.web.bind.annotation.* @RestController // http ( JSON ) @RequestMapping("products") // class ProductsController(private val productService: ProductService) { // @GetMapping // GET url fun index() = productService.all() // all . @PostMapping // POST url @ResponseStatus(HttpStatus.CREATED) // HttpStatus fun create(@RequestBody product: Product) = productService.add(product) // Product add @GetMapping("{id}") // GET url (http://localhost/products/{id}) @ResponseStatus(HttpStatus.FOUND) fun read(@PathVariable id: Long) = productService.get(id) // id Long get @PutMapping("{id}") fun update(@PathVariable id: Long, @RequestBody product: Product) = productService.edit(id, product) // url, PUT edit @DeleteMapping("{id}") fun delete(@PathVariable id: Long) = productService.remove(id) }
アプリケーションのセットアップ
demoという名前のデータベーススキーマを作成し、 application.propertiesファイルを次のように変更しapplication.properties 。
#------------------------- # Database MySQL #------------------------- # spring.datasource.driver-class-name=com.mysql.cj.jdbc.Driver # spring.datasource.username=**** # spring.datasource.password=**** # , spring.datasource.url=jdbc:mysql:
すべて準備ができました、テストできます
テスト中
com.example.demo com.example.demo DemoApplicationTestsファイルを次のように変更します。
機能テスト package com.example.demo import org.junit.* import org.junit.runner.RunWith import org.junit.runners.MethodSorters import org.springframework.http.MediaType import org.springframework.test.web.servlet.MockMvc import org.springframework.boot.test.context.SpringBootTest import org.springframework.test.context.junit4.SpringRunner import org.springframework.web.context.WebApplicationContext import org.springframework.beans.factory.annotation.Autowired import org.springframework.test.web.servlet.setup.MockMvcBuilders.* import org.springframework.test.web.servlet.result.MockMvcResultMatchers.* import org.springframework.test.web.servlet.request.MockMvcRequestBuilders.* @SpringBootTest @RunWith(SpringRunner::class) @FixMethodOrder(MethodSorters.NAME_ASCENDING) // class DemoApplicationTests { private val baseUrl = "http://localhost:8080/products/" private val jsonContentType = MediaType(MediaType.APPLICATION_JSON.type, MediaType.APPLICATION_JSON.subtype) // http private lateinit var mockMvc: MockMvc // mock @Autowired private lateinit var webAppContext: WebApplicationContext // @Before // fun before() { mockMvc = webAppContextSetup(webAppContext).build() // } @Test fun `1 - Get empty list of products`() { // val request = get(baseUrl).contentType(jsonContentType) // GET http://localhost:8080/products/ http Content-Type: application/json mockMvc.perform(request) // .andExpect(status().isOk) // http 200 OK .andExpect(content().json("[]", true)) // JSON } // @Test fun `2 - Add first product`() { val passedJsonString = """ { "name": "iPhone 4S", "description": "Mobile phone by Apple" } """.trimIndent() val request = post(baseUrl).contentType(jsonContentType).content(passedJsonString) val resultJsonString = """ { "name": "iPhone 4S", "description": "Mobile phone by Apple", "id": 1 } """.trimIndent() mockMvc.perform(request) .andExpect(status().isCreated) .andExpect(content().json(resultJsonString, true)) } @Test fun `3 - Update first product`() { val passedJsonString = """ { "name": "iPhone 4S", "description": "Smart phone by Apple" } """.trimIndent() val request = put(baseUrl + "1").contentType(jsonContentType).content(passedJsonString) val resultJsonString = """ { "name": "iPhone 4S", "description": "Smart phone by Apple", "id": 1 } """.trimIndent() mockMvc.perform(request) .andExpect(status().isOk) .andExpect(content().json(resultJsonString, true)) } @Test fun `4 - Get first product`() { val request = get(baseUrl + "1").contentType(jsonContentType) val resultJsonString = """ { "name": "iPhone 4S", "description": "Smart phone by Apple", "id": 1 } """.trimIndent() mockMvc.perform(request) .andExpect(status().isFound) .andExpect(content().json(resultJsonString, true)) } @Test fun `5 - Get list of products, with one product`() { val request = get(baseUrl).contentType(jsonContentType) val resultJsonString = """ [ { "name": "iPhone 4S", "description": "Smart phone by Apple", "id": 1 } ] """.trimIndent() mockMvc.perform(request) .andExpect(status().isOk) .andExpect(content().json(resultJsonString, true)) } @Test fun `6 - Delete first product`() { val request = delete(baseUrl + "1").contentType(jsonContentType) mockMvc.perform(request).andExpect(status().isOk) } }
PS
チュートリアルでは、このようなアプリケーションを実装するための多くのオプションの1つのみを説明し、何も主張していません。 どんな批判も歓迎します。私がどこで間違いを犯したかを知ってうれしいです。
ソース
みんなありがとう!