ほとんどの開発者は、Spring Securityの内部で何が起こっているかについての概観しか持っていません。これは危険であり、脆弱性につながる可能性があります。
この記事では、httpリクエストのパスに沿って順を追って説明します。これは、Spring Securityの問題の構成と解決を理解するのに役立ちます。
プロジェクトの準備
まず、プロジェクトを準備し、
https://start.spring.io/に移動して、Web> web、およびCore> Securityの反対側のボックスを
オンにし
ます 。
コントローラーを追加します。
@RestController public class Controller { @GetMapping public String get() { return String.valueOf(System.currentTimeMillis()); } }
安心の追加:
testCompile('io.rest-assured:rest-assured:3.0.2')
溝を追加します。
apply plugin: 'groovy'
テストを書きましょう:
ControllerIT.groovy @RunWith(SpringRunner.class) @SpringBootTest(webEnvironment = SpringBootTest.WebEnvironment.RANDOM_PORT) @TestPropertySource(properties = "security.user.password=pass") class ControllerIT { @LocalServerPort private int serverPort; @Before void initRestAssured() { RestAssured.port = serverPort; RestAssured.filters(new ResponseLoggingFilter()); RestAssured.filters(new RequestLoggingFilter()); } @Test void 'api call without authentication must fail'() { when() .get("/") .then() .statusCode(HttpStatus.SC_UNAUTHORIZED); } }
テストを実行します。 ログには何が含まれていますか?
リクエスト:
Request method: GET Request URI: http://localhost:51213/
答えは:
HTTP/1.1 401 X-Content-Type-Options: nosniff X-XSS-Protection: 1; mode=block Cache-Control: no-cache, no-store, max-age=0, must-revalidate Pragma: no-cache Expires: 0 X-Frame-Options: DENY Strict-Transport-Security: max-age=31536000 ; includeSubDomains WWW-Authenticate: Basic realm="Spring" Content-Type: application/json;charset=UTF-8 Transfer-Encoding: chunked Date: Sun, 22 Oct 2017 11:53:00 GMT { "timestamp": 1508673180745, "status": 401, "error": "Unauthorized", "message": "Full authentication is required to access this resource", "path": "/" }
SSは、追加設定なしで、メソッド呼び出しの保護を開始しました。これは、構成が機能しているためです
SpringBootWebSecurityConfigurationはスプリングブートによって提供されます。 このクラス内には、デフォルトを設定する
ApplicationNoWebSecurityConfigurerAdapterあります。
それらのいくつかは、設定によって影響を受ける可能性があります。
docs.spring.io/spring-boot/docs/current/reference/html/common-application-properties.html「#SECURITY PROPERTIES」を探して、コードを調べることもできます:
SecurityPropertiesストーリーを完了するために、スプリングブート構成を構成します。
@TestPropertySource(properties = [ "security.user.password=pass", "security.enable-csrf=true", "security.sessions=if_required" ])
フィルター
WebアプリケーションのSpring Securityは、サーブレットフィルターから始まります。
取引を試みますが、最初に承認に成功したテストを追加します。
@Test void 'api call with authentication must succeed'() { given() .auth().preemptive().basic("user", "pass") .when() .get("/") .then() .statusCode(HttpStatus.SC_OK); }
休憩を入れて、テストを実行します。
 図 1-メソッドを取得
巨大な呼び出しスタック
(new Exception().getStackTrace().length == 91)を下って、最初の言及を見つけます
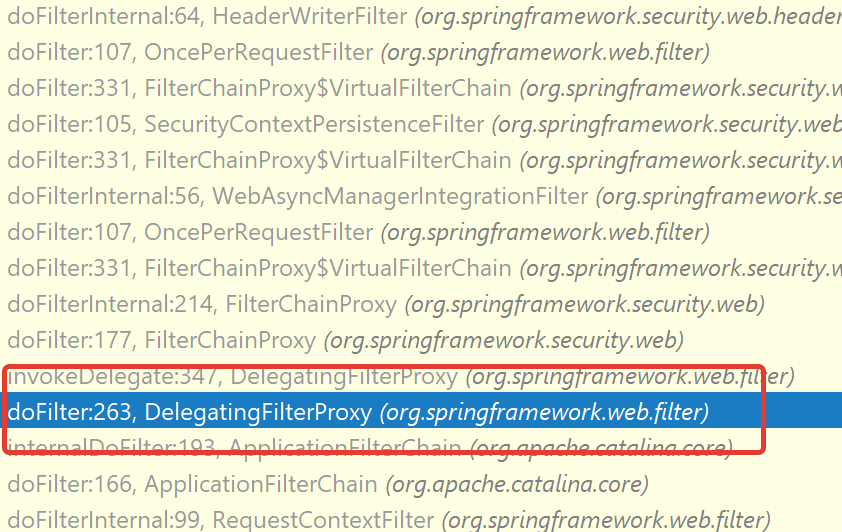 図 2-呼び出しスタック
変数
filterChainにあるものを見てみましょう
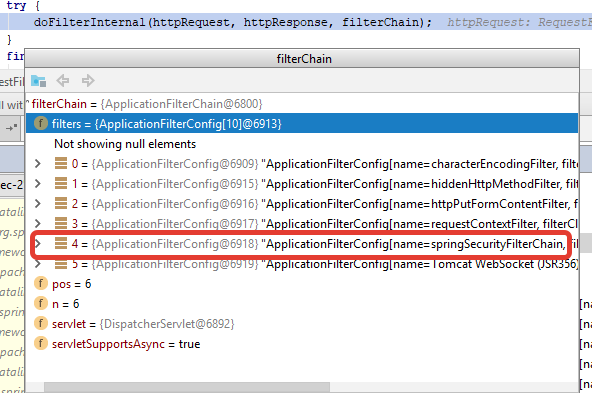 図 3-アプリケーションフィルターチェーン
springSecurityFilterChainフィルターは、すべてのSSがWebパーツで機能
springSecurityFilterChainため、
springSecurityFilterChainで興味深いもの
springSecurityFilterChain 。
DelegatingFilterProxyRegistrationBean自体はあまり興味深いものではありません。作業の委任先を見てみましょう。
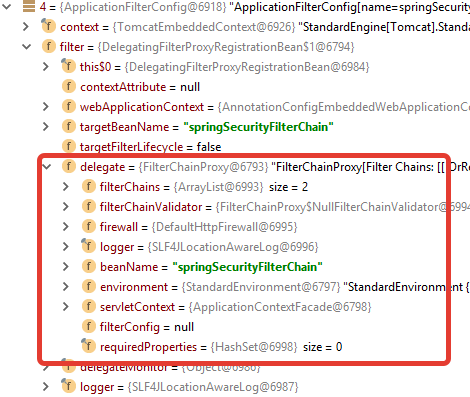 図 4-フィルターチェーンプロキシ
彼は仕事を
FilterChainProxyクラスに委任します。 その中で、いくつかの興味深いことが起こります。
まず、
FilterChainProxy#doFilterInternal見てみましょう。 ここで何が起こっていますか? フィルターを
VirtualFilterChain 、
VirtualFilterChainを作成し、それらに対して要求と応答を実行します。
List<Filter> filters = getFilters(fwRequest); ... VirtualFilterChain vfc = new VirtualFilterChain(fwRequest, chain, filters); vfc.doFilter(fwRequest, fwResponse);
getFiltersメソッド内で、リクエストに一致する最初の
SecurityFilterChainを取得します。
private List<Filter> getFilters(HttpServletRequest request) { for (SecurityFilterChain chain : filterChains) { if (chain.matches(request)) { return chain.getFilters(); } } return null; }
デバッガに行き、どのリストが繰り返されるのか見てみましょう。
 図 5-セキュリティフィルターチェーン
このリストは何を教えてくれますか?
両方のシートに
OrRequestMatcherがあり、現在のURLをリストの少なくとも1つのパターンと一致させようとします。
リストの最初の要素にはそれぞれフィルターの空のリストがあり、追加のフィルターはありません。その結果、保護はありません。
実際に確認してください。
これらのパターンに一致するURLは、デフォルトではSSによって保護されません。
"/css/**", "/js/**", "/images/**", "/webjars/**", "/**/favicon.ico", "/error"
メソッドを追加します。
@GetMapping("css/hello") public String cssHello() { return "Hello I'm secret data"; }
テストを書きましょう:
@Test void 'get css/hello must succeed'() { when() .get("css/hello") .then() .statusCode(HttpStatus.SC_OK); }
さらに興味深いのは、任意のURL「/ **」に一致する2番目のSecurityFilterChainです。
この場合、次のフィルターのリストがあります。
0 = {WebAsyncManagerIntegrationFilter} 1 = {SecurityContextPersistenceFilter} 2 = {HeaderWriterFilter} 3 = {CsrfFilter} 4 = {LogoutFilter} 5 = {BasicAuthenticationFilter} 6 = {RequestCacheAwareFilter} 7 = {SecurityContextHolderAwareRequestFilter} 8 = {AnonymousAuthenticationFilter} 9 = {SessionManagementFilter} 10 = {ExceptionTranslationFilter} 11 = {FilterSecurityInterceptor}
このリストは、設定および追加された依存関係によって異なる場合があります。
たとえば、この構成では:
http .authorizeRequests().anyRequest().authenticated() .and() .formLogin() .and() .httpBasic();
このリストにフィルターが追加されます。
UsernamePasswordAuthenticationFilter DefaultLoginPageGeneratingFilter
デフォルトでフィルターがどの順序で実行されるかは、FilterComparatorで確認できます
0 = {WebAsyncManagerIntegrationFilter}
ドキュメントによると、SecurityContextと非同期リクエストを処理するWebAsyncManagerを「統合」します。
1 = {SecurityContextPersistenceFilter}
セッションでSecurityContextを検索し、見つかった場合はSecurityContextHolderを設定します。
デフォルトは、ThreadLocal変数にSecurityContextを保存するThreadLocalSecurityContextHolderStrategyです。
2 = {HeaderWriterFilter}
ヘッダーを応答に追加するだけです。
キャッシュをオフにします。
-キャッシュ制御:キャッシュなし、ストアなし、max-age = 0、必須の検証
-プラグマ:no-cache
-有効期限:0
ブラウザがコンテンツのタイプを自動的に判断することは許可していません。
-X-Content-Type-Options:nosnif
iframeを許可しない
-X-Frame-Options:拒否
クロスサイトスクリプティング(XSS)からブラウザーの組み込み保護を有効にします
-X-XSS-Protection:1; モード=ブロック
3 = {CsrfFilter}
おそらく、SSに精通しているときに「csrfトークンの不足」というエラーに遭遇しない開発者は1人もいないでしょう。
以前にこのエラーを見たことがないのはなぜですか? 簡単です。csrf保護のないメソッドを実行しました。
POSTメソッドを追加してみましょう
@PostMapping("post") public String testPost() { return "Hello it is post request"; }
テスト:
@Test void 'POST without CSRF token must return 403'() { given() .auth().preemptive().basic("user", "pass") .when() .post("/post") .then() .statusCode(HttpStatus.SC_FORBIDDEN); }
テストは成功し、403エラーが返されました。csrf保護が設定されています。
4 = {LogoutFilter}
次にログアウトフィルターがあり、URLがパターンに一致するかどうかをチェックします
Ant [pattern='/logout', POST] -ログアウト手順を開始します
handler = {CompositeLogoutHandler} logoutHandlers = {ArrayList} size = 2 0 = {CsrfLogoutHandler} 1 = {SecurityContextLogoutHandler}
デフォルトでは、次のことが行われます。
- Csrfトークンは削除されました。
- セッションは終了します
- ブラシ付きSecurityContextHolder
5 = {BasicAuthenticationFilter}
次に、認証に直接進みます。 内部で何が起こっているのですか?
フィルターは、Basicで始まる値を持つAuthorizationヘッダーがあるかどうかをチェックします
見つかった場合、ユーザー名\パスワードを取得し、
AuthenticationManager渡します
内部では、このコードのようなもの:
if (headers.get("Authorization").startsWith("Basic")) { try { UsernamePasswordAuthenticationToken token = extract(header); Authentication authResult = authenticationManager.authenticate(token); } catch (AuthenticationException failed) { SecurityContextHolder.clearContext(); this.authenticationEntryPoint.commence(request, response, failed); return; } } else { chain.doFilter(request, response); }
AuthenticationManager
public interface AuthenticationManager { Authentication authenticate(Authentication authentication) throws AuthenticationException; }
AuthenticationManagerは、認証を受け入れ、認証も返すインターフェイスです。
この場合、認証の実装はUsernamePasswordAuthenticationTokenです。
AuthenticationManager自体を実装することも可能ですが、ほとんど意味がありません。デフォルトの実装であるProviderManagerがあります。
ProviderManagerは、承認を別のインターフェイスに委任します。
public interface AuthenticationProvider { Authentication authenticate(Authentication authentication) throws AuthenticationException; boolean supports(Class<?> authentication); }
Authenticationオブジェクトを
ProviderManagerに渡すと、既存の
AuthenticationProviderを反復処理し、サポートするかどうかを確認します
AuthenticationProvider認証のこの実装
public boolean supports(Class<?> authentication) { return (UsernamePasswordAuthenticationToken.class .isAssignableFrom(authentication)); }
その結果、
AuthenticationProvider.authenticate内では、実行キャストなしで、渡された認証を目的の実装に既に転送できます。
次に、特定の実装からクレジットカードを取得します。
認証が失敗した場合、
AuthenticationProviderは実行を終了する必要があり、
ProviderManagerはそれをキャッチしてリストから次のAuthenticationProviderを試行します。AuthenticationProviderが成功した認証を返さない場合、ProviderManagerは最後にキャッチされた実行を転送します
このプロセスの詳細と写真は次のとおりです。
https://spring.io/guides/topicals/spring-security-architecture/次に、
BasicAuthenticationFilterは受信した認証をSecurityContextHolderに保存します
SecurityContextHolder.getContext()。SetAuthentication(authResult);
これで認証プロセスが完了しました。
AuthenticationExceptionがスローされると、
SecurityContextHolder.clearContext();がスローされ
SecurityContextHolder.clearContext(); コンテキストとAuthenticationEntryPointが呼び出されます。
public interface AuthenticationEntryPoint { void commence(HttpServletRequest request, HttpServletResponse response, AuthenticationException authException) throws IOException, ServletException; }
AuthenticationEntryPointのタスクは、認証が失敗したという情報を書き戻すことです。
基本認証の場合、これは次のようになります。
response.addHeader("WWW-Authenticate", "Basic realm=\"" + realmName + "\""); response.sendError(HttpServletResponse.SC_UNAUTHORIZED, authException.getMessage());
その結果、ブラウザに基本認証ウィンドウが表示されます。
6 = {RequestCacheAwareFilter}
このフィルターの目的は何ですか? シナリオを想像してください:
1.ユーザーは安全なURLにアクセスします。
2.彼はログインページにそれを投げます。
3.認証に成功すると、ユーザーは最初に要求したページにリダイレクトされます。
このフィルターが存在するのは、元の要求を復元するためです。
内部では、保存された要求があるかどうかがチェックされ、ある場合は、現在の要求がその要求に置き換えられます。
リクエストはセッションに保存されます。保存される段階は以下のとおりです。
再現してみましょう。
メソッドを追加します。
@GetMapping("customHeader") public String customHeader(@RequestHeader("x-custom-header") String customHeader) { return customHeader; }
テストを追加します。
@Test void 'passed x-custom-header must be returned'() { def sessionCookie = given() .header("x-custom-header", "hello") .when() .get("customHeader") .then() .statusCode(HttpStatus.SC_UNAUTHORIZED) .extract().cookie("JSESSIONID") given() .auth().basic("user", "pass") .cookie("JSESSIONID", sessionCookie) .when() .get("customHeader") .then() .statusCode(HttpStatus.SC_OK) .body(equalTo("hello")); }
2番目のリクエストでわかるように、最初のリクエストで渡したヘッダーが返されました。 フィルターは機能しています。
7 = {SecurityContextHolderAwareRequestFilter}
SecurityContextHolderAwareRequestWrapperの既存のリクエストをラップします
chain.doFilter(this.requestFactory.create((HttpServletRequest) req, (HttpServletResponse) res), res);
実装は、サーブレット2.5 / 3のサーブレットAPIバージョンによって異なる場合があります
8 = {AnonymousAuthenticationFilter}
このフィルターが実行されるまでに、SecurityContextHolderは空、つまり 認証に失敗しました;フィルターはSecurityContextHolderオブジェクトに匿名認証を入力します-ロール "ROLE_ANONYMOUS"を持つAnonymousAuthenticationToken。
これにより、SecurityContextHolderにオブジェクトが存在することが保証されます。これにより、NPを恐れることなく、無許可のユーザーにアクセスを設定するためのより柔軟なアプローチが可能になります。
9 = {SessionManagementFilter}
この段階で、セッションに関連付けられたアクションが実行されます。
可能性があります:
-セッションIDの変更
-同時セッションの数を制限する
-securityContextRepositoryにSecurityContextを保存する
この場合、次のことが発生します。
HttpSessionSecurityContextRepositoryのデフォルト実装を
SecurityContextRepositoryは、SecurityContextをセッションに保存します。
sessionAuthenticationStrategy.onAuthenticationsessionAuthenticationStrategyの内部:
sessionAuthenticationStrategy = {CompositeSessionAuthenticationStrategy} delegateStrategies 0 = {ChangeSessionIdAuthenticationStrategy} 1 = {CsrfAuthenticationStrategy}
2つのことが起こります:
1.デフォルトでは、セッション固定攻撃からの保護は有効になっています。 認証後、セッションIDが変更されます。
2. csrfトークンが転送された場合、新しいcsrfトークンが生成されます
最初の項目を確認してみましょう。
@Test void 'JSESSIONID must be changed after login'() { def sessionCookie = when() .get("/") .then() .statusCode(HttpStatus.SC_UNAUTHORIZED) .extract().cookie("JSESSIONID") def newCookie = given() .auth().basic("user", "pass") .cookie("JSESSIONID", sessionCookie) .when() .get("/") .then() .statusCode(HttpStatus.SC_OK) .extract().cookie("JSESSIONID") Assert.assertNotEquals(sessionCookie, newCookie) }
10 = {ExceptionTranslationFilter}
この時点で、SecurityContextには匿名または通常の認証が含まれている必要があります。
ExceptionTranslationFilterは、フィルターチェーンを介して要求と応答を転送し、可能性のある許可エラーを処理します。
SSは2つのケースを区別します。
1. AuthenticationException
sendStartAuthenticationが
sendStartAuthentication 、その内部で次のことが発生します。
SecurityContextHolder.getContext().setAuthentication(null); -SecurityContextHolderをクリーンアップします
requestCache.saveRequest(request, response); -現在のリクエストをrequestCacheに保存し、RequestCacheAwareFilterが復旧するものを持っているようにします。
authenticationEntryPoint.commence(request, response, reason); -authenticationEntryPointを呼び出します-認証が必要であることを示す信号を書き込みます(ヘッダー\リダイレクト)
2. AccessDeniedException
ここでも2つのケースが考えられます。
if (authenticationTrustResolver.isAnonymous(authentication) || authenticationTrustResolver.isRememberMe(authentication)) { ... } else { ... }
1.匿名認証、またはrememberMeトークンによる認証を持つユーザー
sendStartAuthenticationが呼び出されます
2.完全な非匿名認証を持つユーザーが呼び出されます:
accessDeniedHandler.handle(リクエスト、レスポンス、(AccessDeniedException)例外)
デフォルトは禁止403です
11 = {FilterSecurityInterceptor}
最後の段階で、リクエストのURLに基づいた承認が行われます。
FilterSecurityInterceptorはAbstractSecurityInterceptorを継承し、現在のユーザーが現在のURLにアクセスできるかどうかを決定します。
@Securityd \ @PreAuthorizeアノテーションを使用する場合、メソッド呼び出しの許可を担当するMethodSecurityInterceptorの別の実装があります。
AccessDecisionManagerは内部で呼び出されます
許可するかどうかを決定するためのいくつかの戦略があり、デフォルトは次のとおりです。AffirmativeBased
内部のコードは非常に簡単です。
for (AccessDecisionVoter voter : getDecisionVoters()) { int result = voter.vote(authentication, object, configAttributes); switch (result) { case AccessDecisionVoter.ACCESS_GRANTED: return; case AccessDecisionVoter.ACCESS_DENIED: deny++; break; default: break; } } if (deny > 0) { throw new AccessDeniedException(); } checkAllowIfAllAbstainDecisions();
言い換えれば、誰かが賛成票を投じた場合、それをスキップし、少なくとも1票が反対の場合は手放し、誰も投票しない場合は手放しません。
要約すると:
springSecurityFilterChainスプリングセキュリティフィルターのセット。
基本認証用のフィルターセットの例:
WebAsyncManagerIntegrationFilter -SecurityContextをWebAsyncManagerと統合します
SecurityContextPersistenceFilterセッション内でSecurityContextを検索し、見つかった場合にSecurityContextHolderを設定します
HeaderWriterFilter 「セキュリティ」ヘッダーを応答に追加します
CsrfFilter -csrfトークンを確認します
LogoutFilterログアウトを実行します
BasicAuthenticationFilter基本認証を生成します
RequestCacheAwareFilter認証前に保存されたリクエストがあれば、それを復元します
SecurityContextHolderAwareRequestFilter既存のリクエストをSecurityContextHolderAwareRequestWrapperにラップします
AnonymousAuthenticationFilter -SecurityContextに匿名認証を設定します
SessionManagementFilterセッション関連のアクティビティを実行します
ExceptionTranslationFilterスタックの下で発生するAuthenticationException \ AccessDeniedExceptionを処理します。
FilterSecurityInterceptor現在のユーザーが現在のURLにアクセスできるかどうかを確認します。
FilterComparatorここでは、フィルターのリストと可能な順序を見ることができます。
AuthenticationManager担当するインターフェース
ProviderManager内部で
AuthenticationProviderを使用するAuthenticationManager実装
AuthenticationProvider特定の
Authentication実装の認証を担当するインターフェース。
SecurityContextHolder認証を通常ThreadLocal変数に保存します。
AuthenticationEntryPoint応答を変更して、認証が必要であることをクライアントに明確にします(ヘッダー、ログインページへのリダイレクトなど)
AccessDecisionManagerは、
Authenticationリソースにアクセスできるかどうかを決定します。
AffirmativeBasedは、AccessDecisionManagerで使用されるデフォルトの戦略です。
推奨事項
フィルターの順序とその設定をテストする簡単なテストを作成します
これにより、不快な驚きを避けることができます。
FilterChainIT.groovy @RunWith(SpringRunner.class) @SpringBootTest(webEnvironment = SpringBootTest.WebEnvironment.RANDOM_PORT) class FilterChainIT { @Autowired FilterChainProxy filterChainProxy; @Autowired List<Filter> filters; @Test void 'test main filter chain'() { assertEquals(5, filters.size()); assertEquals(OrderedCharacterEncodingFilter, filters[0].getClass()) assertEquals(OrderedHiddenHttpMethodFilter, filters[1].getClass()) assertEquals(OrderedHttpPutFormContentFilter, filters[2].getClass()) assertEquals(OrderedRequestContextFilter, filters[3].getClass()) assertEquals("springSecurityFilterChain", filters[4].filterName) } @Test void 'test security filter chain order'() { assertEquals(2, filterChainProxy.getFilterChains().size()); def chain = filterChainProxy.getFilterChains().get(1); assertEquals(chain.filters.size(), 11) assertEquals(WebAsyncManagerIntegrationFilter, chain.filters[0].getClass()) assertEquals(SecurityContextPersistenceFilter, chain.filters[1].getClass()) } @Test void 'test ignored patterns'() { def chain = filterChainProxy.getFilterChains().get(0); assertEquals("/css/**", chain.requestMatcher.requestMatchers[0].pattern); assertEquals("/js/**", chain.requestMatcher.requestMatchers[1].pattern); assertEquals("/images/**", chain.requestMatcher.requestMatchers[2].pattern); } }
SecurityContextHolder.getContext()を呼び出さないでくださいGetAuthentication(); 現在のユーザーを取得する
認証自体はあまり使いやすいオブジェクトではありません。 ほとんどすべてのメソッドはObjectを返し、必要な情報を取得するには特定の実装にキャストする必要があります。
インターフェースを取得し、ニーズに応じて実装を作成し、HandlerMethodArgumentResolverを記述します。
このアプローチを使用したコードは、読み取り、テスト、保守の方が優れています。
interface Auth { ... } public class AuthUserArgumentResolver implements HandlerMethodArgumentResolver { @Override public boolean supportsParameter(MethodParameter parameter) { return parameter.getParameterType().equals(Auth.class); } @Override public Auth resolveArgument(MethodParameter parameter, ModelAndViewContainer mavContainer, NativeWebRequest webRequest, WebDataBinderFactory binderFactory) { Object principal = SecurityContextHolder.getContext().getAuthentication().getPrincipal(); return toAuth(principal) } } @GetMapping public String get(Auth auth) { return "hello " + auth.getId(); }
既存の実装を拡張する
Springセキュリティには実装可能な多くのインターフェイスが含まれていますが、ほとんどの場合、必要なことを99%実行する抽象クラスがあります。
たとえば、認証インターフェイスには
AbstractAuthenticationTokenがあり、
AbstractAuthenticationTokenから認証フィルターを継承するのが妥当です。
SecurityConfigurerAdapterを使用して認証を構成する
完全にカスタム認証を使用している場合は、次のことを行う必要があります。
1.認証実装を作成する
2.認証実装をサポートするAuthenticationProviderを作成します
3.認証プロセスを開始したフィルターを追加します。
それらをすべて1か所にまとめるのは理にかなっています。 同じことを行う
HttpBasicConfigurer, OpenIDLoginConfigurerを見てください。
class MyConfigurer extends SecurityConfigurerAdapter<DefaultSecurityFilterChain, HttpSecurity> { @Override public void configure(HttpSecurity http) throws Exception { AuthenticationManager authenticationManager = http.getSharedObject(AuthenticationManager.class); MyAuthenticationProvider myAuthenticationProvider = http.getSharedObject(MyAuthenticationProvider.class); MyAuthenticationFilter filter = new MyAuthenticationFilter(authenticationManager); http .authenticationProvider(myAuthenticationProvider) .addFilterBefore(postProcess(filter), AbstractPreAuthenticatedProcessingFilter.class); } } public class SecurityConfig extends WebSecurityConfigurerAdapter { protected void configure(HttpSecurity http) throws Exception { http .authorizeRequests().anyRequest().authenticated() .and() .apply(new MyConfigurer()) } }
ロールによるメソッド呼び出しを制限するには、@ Secured \ @PreAuthorizeを使用します
コントローラーのすべてのメソッドを通過するテストを作成し、@ Secured \ @PreAuthorizeアノテーションの存在を確認します。
WebSecurityConfigurerAdapterを構成する場合、すべてのURLの承認が必要です。 必要に応じて例外を追加します。 例外はできるだけ厳しくする必要があります。
httpメソッドのタイプを明示的に指定します。URLはできるだけ完全でなければなりません。
このようなエンドポイントを持つ他のapiが記述されていなかった場合でも、メソッドへのフルパスを明示的に示す方が適切です。
たとえば、2つのGETメソッドを持つコントローラーがある場合:
"url/methodOne", "url/methodTwo" 、
これをしないでください:
authorizeRequests().antMatchers(HttpMethod.GET, "url/**").permitAll().
より良い書き込み:
authorizeRequests().antMatchers(HttpMethod.GET, "url/methodOne", "url/methodTwo").permitAll().
問題が発生した場合は、org.springframework.securityを有効にします:debug
Spring Securityには非常に詳細なデバッグログがあり、多くの場合、問題の本質を理解するには十分です。
antMatchers( "permit_all_url")。PermitAll()とweb.ignoring()。AntMatchers( "ignored_url")を区別します
@Override protected void configure(HttpSecurity http) throws Exception { http.authorizeRequests(). anyRequest() .authenticated() .antMatchers("permit_all_url") .permitAll(); } @Override public void configure(WebSecurity web) throws Exception { web.ignoring().antMatchers("ignored_url"); }
「ignored_url」の場合、セキュリティフィルターチェーンを選択する段階でチェックされ、URLが一致する場合、空のフィルターが使用されます。
「permit_all_url」の場合、検証はAccessDecisionManagerステージで行われます。
参照資料
- https://github.com/VladDm93/spring-security-request-journey.git-コード。
- https://spring.io/guides/topicals/spring-security-architecture-Springセキュリティアーキテクチャの概要。