読者の皆さん、こんにちは。
私の記事では、ツリービューの実装をRecyclerViewと共有したいと思います。 追加のライブラリを使用せず、子配列も使用しません。
猫の下で誰が気にしてください。 私は可能な限り何をどのように説明しようとします。
要素のリストを形成する原則は、子を表示または非表示にすることです。
ただし、実装には追加のライブラリは必要ないと述べましたが、標準ライブラリを接続する必要があります。
接続されたライブラリdependencies { implementation 'com.android.support:appcompat-v7:26.1.0' implementation 'com.android.support:design:26.1.0' implementation 'com.android.support:recyclerview-v7:26.1.0' }
マークアップはごくわずかです-RecyclerViewリストのみ。
マークアップ <RelativeLayout xmlns:android="http://schemas.android.com/apk/res/android" android:layout_width="match_parent" android:layout_height="match_parent"> <android.support.v7.widget.RecyclerView android:layout_width="match_parent" android:layout_height="match_parent" android:id="@+id/recycler_list"> </android.support.v7.widget.RecyclerView> </RelativeLayout>
さらに、リスト値を格納する別のクラスが必要です。
データData.javaのクラス public final class Data { private String valueText = "";
コメントは明確でなければなりませんが、説明します。 リストの各要素について、特定の識別子
valueId 、名前
valueText 、親要素の識別子
parentId 、要素が親
itemParentであることを示すラベル、および
childVisibilityの子要素の可視性値を
格納します。
次の準備手順は、リストアイテム自体のマークアップを作成することです。
item.xmlのマークアップ <LinearLayout xmlns:android="http://schemas.android.com/apk/res/android" xmlns:app="http://schemas.android.com/apk/res-auto" android:id="@+id/item" android:layout_width="match_parent" android:layout_height="wrap_content"> <RelativeLayout android:layout_width="match_parent" android:layout_height="match_parent"> <android.support.v7.widget.AppCompatImageView android:id="@+id/icon_tree" android:layout_width="wrap_content" android:layout_height="wrap_content" android:background="@drawable/icon_hide" android:visibility="gone" app:backgroundTint="@color/colorPrimary" android:layout_centerVertical="true"/> <LinearLayout android:id="@+id/block_text" android:layout_width="match_parent" android:layout_height="wrap_content" android:layout_toRightOf="@+id/icon_tree"> <TextView android:id="@+id/value_name" android:layout_width="match_parent" android:layout_height="wrap_content" android:foreground="?android:attr/selectableItemBackground" android:text="sdfdsf"/> </LinearLayout> <View android:layout_width="match_parent" android:layout_height="1dp" android:background="@color/colorPrimary" android:layout_below="@+id/block_text" android:layout_marginTop="4dp" android:layout_marginLeft="4dp" android:layout_marginRight="4dp"/> </RelativeLayout> </LinearLayout>
親要素の状態を表示
するには、AppCompatImageViewが必要です。
TextView-要素の値を表示します。
ビューは共有用です。
最後の準備手順は、リストアダプタを処理するクラスを作成することです。
リストRecyclerViewAdapter.java用アダプター public class RecyclerViewAdapter extends RecyclerView.Adapter<RecyclerViewAdapter.ViewHolder> { private View vv; private List<Data> allRecords;
メイン処理は
onBindViewHolderプロシージャで行われます。 各リスト項目について、その識別子、値、および親値のパラメーターが取得されます。 子は表示または非表示になり、親のステータスアイコンも表示されます。 さて、リストのクリックの処理はハングします。 次に、リストを処理する方法を全員が決定します。 この例は、idと要素の値を持つメッセージを単に示しています。
setVisibility子要素のshowまたはhideプロシージャも、80ピクセルで子要素のテキストをインデントします。
正しい場所にリストを記入するだけです。
リスト構築 List<Data> records = new ArrayList<Data>();
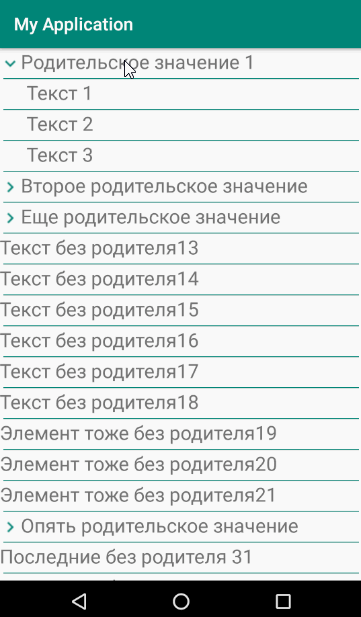
結果は、子要素をサポートする単純なリストです。 この実装により、複数のネストされた要素を入力できます。 ただし、ネストレベルが1を超える場合は、子要素のインデントをわずかに調整する必要があります。
ご清聴ありがとうございました。